
Photo locations, techniques and technology. Highlights of locations we frequent as well as features on how and why we shoot the way we do, including gear reviews specific to nature photographers.
The fear of Missing out
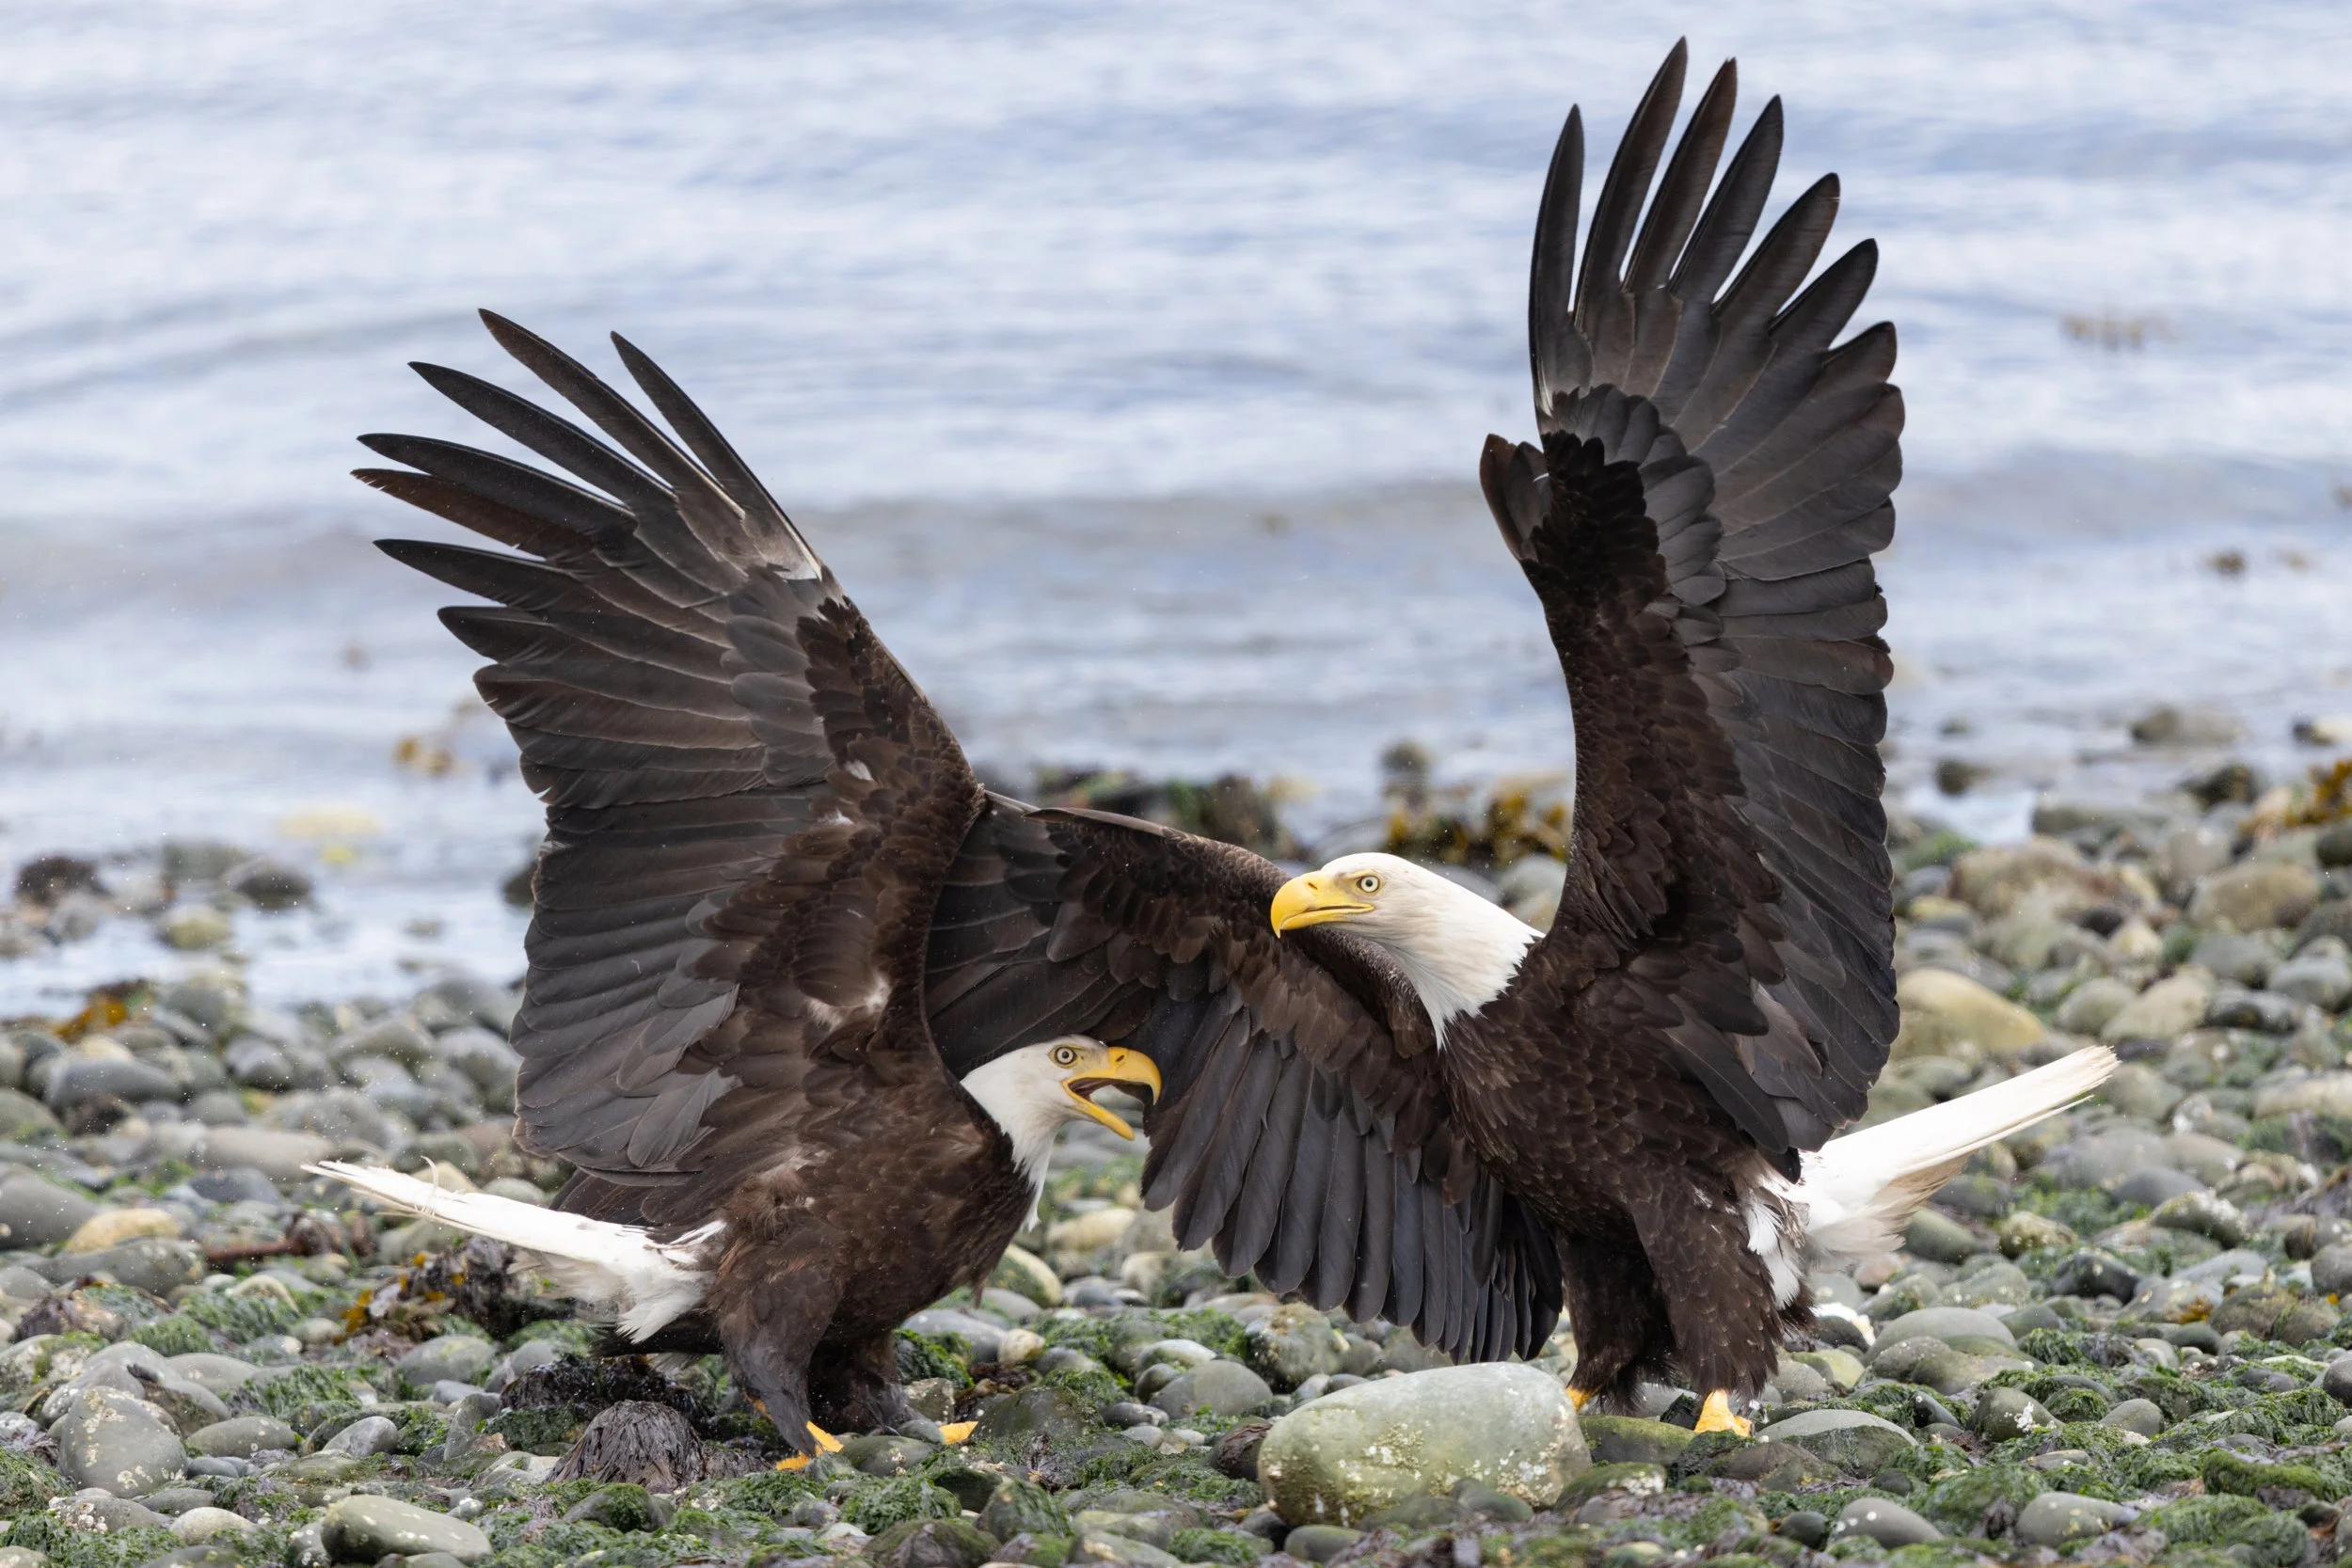
I have realized that I have a problem when it comes to shooting video, especially nature video. Simply put, it’s FOMO. I spend a great deal of time out in nature putting myself in a position to get that interesting interaction or moment that comes along so rarely. I make sure I'm ready for the shot, settings optimized, keeping an eye on what the animals are doing in hopes that I might capture an eagle just as it grasps a fish in beautiful evening glow, or the smack of two bighorn sheep fighting on a rocky edge.
A still photographer’s conundrum
I have realized that I have a problem when it comes to shooting video, especially nature video. Simply put, it’s FOMO. I spend a great deal of time out in nature putting myself in a position to get that interesting interaction or moment that comes along so rarely. I make sure I'm ready for the shot, settings optimized, keeping an eye on what the animals are doing in hopes that I might capture an eagle just as it grasps a fish in beautiful evening glow, or the smack of two bighorn sheep fighting on a rocky edge.
Black bears and the pink salmon run. Mostly Salwa’s footage and edited by Salwa.
Having said that, I want to do more nature focused videos. I have always enjoyed teaching and helping people with their photography and YouTube is a great medium for that, and I think I can bring something a little different to that scene. Unfortunately, I keep getting in my own way.
So how do I get out of my own head and start shooting video? I'm hoping that writing about it is a good start. If I can express the issue in print, maybe I can internalize it and the next time FOMO hits, I can move beyond it. I just need to accept that I might miss a shot, but I might also capture a story that is just as compelling.
There’s also the learning curve. I’ve had nearly 30 years to figure out how to take the pictures I want and I shouldn't expect videos to be perfect immediately. Granted, the quality of the videos I’ve taken is good since composing a scene is not that different from still photography. I’ve learned that giving the subject a significant amount of room in the shot to move through the image is more interesting than punching in on the subject. The other thing I learned is that you really need to shoot different perspectives, including a wide establishing shot, a number of close up shots, along with the main action driven shot to round things out.
Much like photography, a lot of shots are going to end up on the editing floor. But unlike stills, the camera needs to be rolling before the action starts, so there’s bound to be loads of video of birds sitting, preening or sleeping right up until the action. Bears, for example, are particularly good at balancing on all fours on a small rock and staring into the river for what seems forever, until suddenly, they pounce on a fish. If I’m going to get the action then I’m also going to get loads of ‘extra’ footage.
I spent this past fall with black bears along the local salmon spawning rivers and while I took loads of stills, I also tried to shoot more video. However, I found that when the action started, when a bear started fishing or there were multiple bears interacting I tended to default back to photography. Looking back, I think video would have told the story better.
Short video of Orca close to home.
To ease into video mode, I started to bring a second camera with a slightly wider lens that I could point towards the action and just let it run while still taking stills with a longer telephoto lens. This is a good start but I really had to think about the field of view of the video to know when to readjust the frame. I also tried putting my Sony ZV1 in the hot shoe of my camera so that I could capture some video while I was shooting with the same view (although much wider) as I was taking shots.
Another issue is editing video to create a compelling story - and that takes time. Sure, this is just a matter of climbing that steep learning curve and I typically enjoy the learning process. With time, I’m sure, I’ll begin to understand the workflow necessary to create a story and complete a video, just as I’ve learned to understand and use Lightroom to create the photos. So, that’s not an excuse to not shoot more video.
Beyond composition, I need to learn how to move smoothly with the camera, when to let the subject move through the frame and when to follow. I also need to learn more about what frame rates are best for what types of shots. Most of all, I really just need to learn not to be afraid of missing the shot (or possibly be afraid of not being as good at video) and just accept that process just like I did years ago learning to get action photos of animals and birds.
The other part of video that I need to get used to is putting myself in the scene. I almost never put myself (or for that matter rarely put any humans) in my photos but I have learned from watching many nature videos that having the narrator in the shot or at least at the location speaking in context is so much better than videos where the narration is just a voice reading a script. BBC nature shows are so good for this reason, whether it is David Attenborough sitting beside a gorilla or Gordon Buchanan in the field with big cats it is so much more engaging than hearing just a famous disembodied voice talking over the action.
First off, I need to get used to hearing my own voice on video recordings, which of course never sounds the same as it does in my head. Secondly, I need to be able to seem comfortable talking to the camera. Both of these things Salwa has managed to overcome and I think it just takes time doing and redoing recordings. Since I'm usually talking about subjects that I'm very familiar with, I don't tend to have trouble expressing myself. It’s just a matter of getting used to doing this in front of a camera.
Screech owl video from back in Fort Erie, Ontario.
It’s become very obvious that if I want to promote my photography and to share with a bigger audience, I need to expand to a video format. Whether on their phones with social apps, or on YouTube on their computers or living rooms, most people are watching videos. I myself enjoy watching nature videos, so it makes sense that at some point I should embrace that medium. I know it doesn't need to be either video or photos, but if I'm going to produce videos worth watching I'm going to need to put at least the same amount of time and effort as I did learning to take photos in nature.
So, will I take my own advice after writing this? Stay tuned and make sure you like and subscribe!

Telephoto Options for Nature Photography in 2026
I have been talking a lot about the cameras that I was looking to use over the last couple of years. I have some very good lenses for the kinds of photography that I do but lately a bunch of companies have started coming out with a bunch new choices for nature photographers some of which are actually reasonably affordable.
I have been talking a lot about the cameras that I was looking to use over the last couple of years. I have some very good lenses for the kinds of photography that I do but lately a bunch of companies have started coming out with a bunch new choices for nature photographers, some of which are actually reasonably affordable.
We tend to buy lenses to last a lot longer these days than the cameras. I'm currently still using the Canon 100-400 F4.5-5.6 II that I have had since selling the original push-pull version of that lens, and it is very sharp and works well on the R5II with the RF adapter. I also bought a big white prime back a number of years ago. That for many of us is not something that you can afford to do even once but now it is not worth selling to try to get a new one, either for Canon or Sony, so I'm using it on the R5II with the adapter as well.
Sony 200-600
Sony
On the Sony side of things I have been using the 200-600 f/5.6-6.3 since that lens came out. It is a solid lens that works well in reasonable light and is sharp enough, but the out of focus portions of the frame can be less than pleasing if the background is close to the subject or very busy. Options for Sony lenses up until recently have been either very expensive or quite cheap otherwise with even the 100-400 f/4.5-5.6 being quite pricey for the range you are getting.
I'm pretty happy with the wide angle options out there, 16-35 is a go-to when I'm doing landscape work but once you get past the ultrawide I am finding that some of the new, not so normal zooms are pretty tempting. The first one that tempted me so much that I picked one up is the Tamron 35-150 mm f/2-2.8. This is a range that for me can get rid of 2 lenses that I used to carry. I really don't need a 24-70 or 24-105 which I used to have in the bag all the time, and I also don't really need a 70-200 since the missing bit at the top of the range is most often covered by my telephoto lens. Sony this year has come out with something similar but, of course, went a bit more specialized with the 50-150mm f/2. I think I could easily use this lens in place of the 35-150 with that added bonus of more light gathering at the telephoto end for the dark days here on the wet coast. This is a spectacular lens but it definitely comes at a large price. Currently going for $4000 USD compared to $1600 USD for the Tamron it is hard to suggest to myself that the benefits are worth 2.5 times the price.
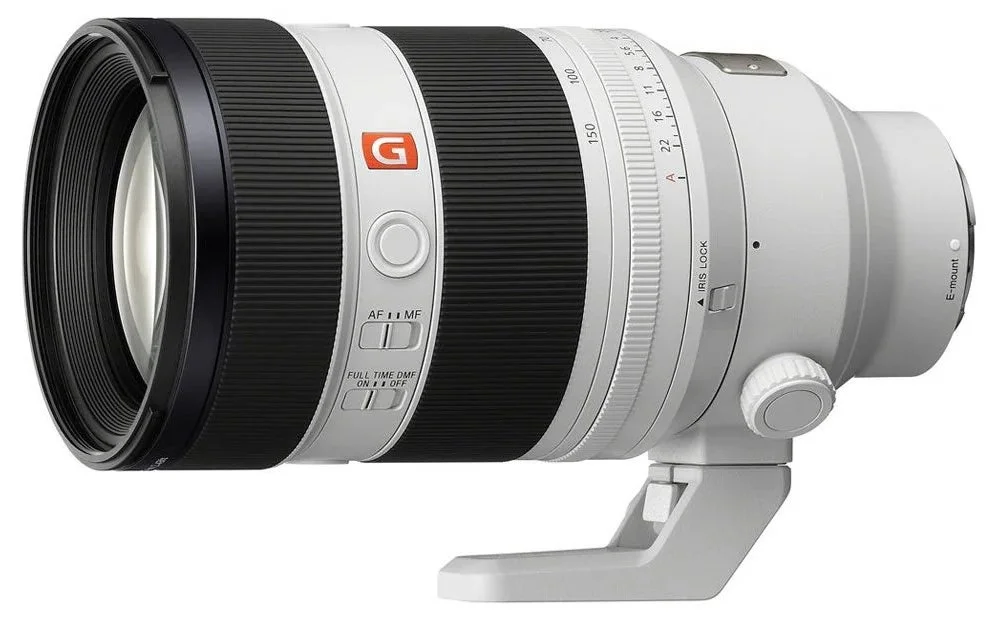
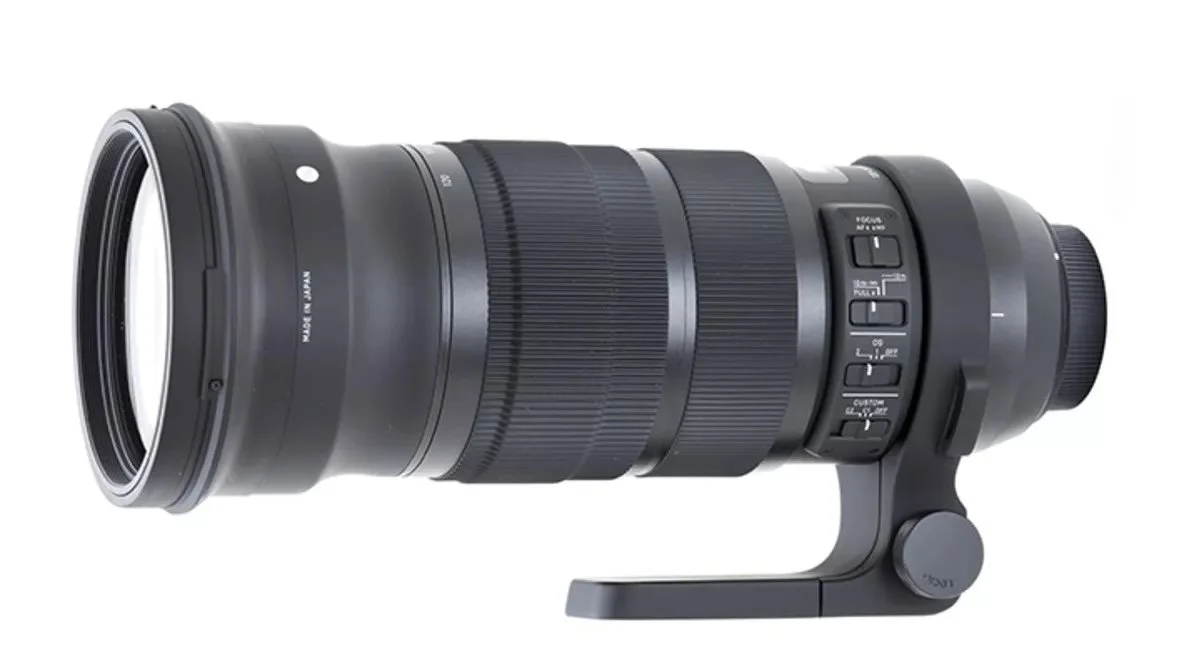
Sony 50-150 f/2.
Sony also came out with the new 400-800mm f/6.3-8 zoom lens currently for $3300 USD. This lens is very similar to the 200-600 in build with the internal zoom and the image quality seems to be on par and maybe a bit sharper. The issue here is that we are getting very specialized, it seems like a very good option for birding and larger animals a good distance away but the 2 time zoom is a bit limiting and it is big and fairly heavy. I would like to try this lens but I'm not sure the range is what I need as often as that 200-600 which has lived on my camera for extensive periods.

Sony 400-800
Sigma
Sigma has come out with a few amazing options lately. The first was the light 500mm f/5.6 prime that I picked up early on. This is a fantastic small and light lens that fits easily into a camera bag for travel. Images are sharp and clean but not quite at the level of my Canon 500 prime....but most of the time close enough. The one major downside of this lens has nothing to do with Sigma and everything to do with Sony. With my Canon 500mm I very often use it with the both the 1.4 and 2 time teleconverters making it a inconvenient but useful 500-700-1000 almost zoom. The quality of the images is indistinguishable with the 1.4 and just a tiny bit softer with the 2 times. Sony has limited all third party lenses (at this time) to not accept teleconverters. If they were allowed I think I would be using the Sigma 500 prime with the 1.4 times all the time. The other thing is that Sony limits the number of frames per second you can shoot when a third party lens is attached to a maximum of 15 fps. Currently this doesn't affect me since the A7RV can shoot a maximum of 10 fps but it does limit those using the A1, A9 series or the new A7V. I don't often shoot that fast even on the Canon R5 II but it is nice those few time I need it.
Sigma 500 f/5.6
The next interesting lens from Sigma is the 200mm f/2 prime. This lens currently costs $3300 USD which is a steal for such a low light beast. I'm interested in this lens for bear photography where I'm often shooting at dusk or dawn trying to capture action in very low light but I'm not so far away so 200mm is often sufficient. This lens would allow me to shoot at a couple stops lower ISO than I currently am able, reducing noise while allowing me to keep the shutter speed up to catch those salmon fishing moments. If this lens was able to accept teleconverters on a Sony body it would be a fantastic option.
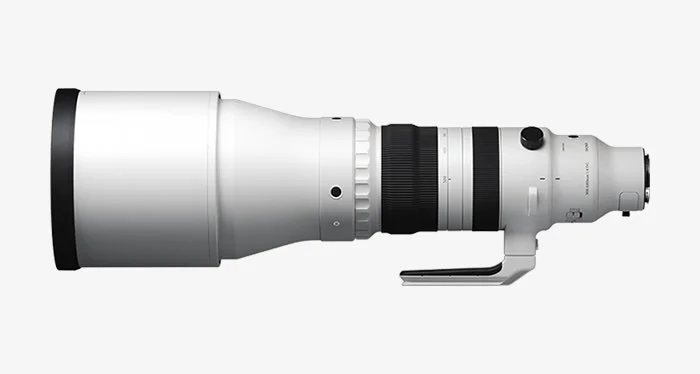
Sigma 300-600 f/4
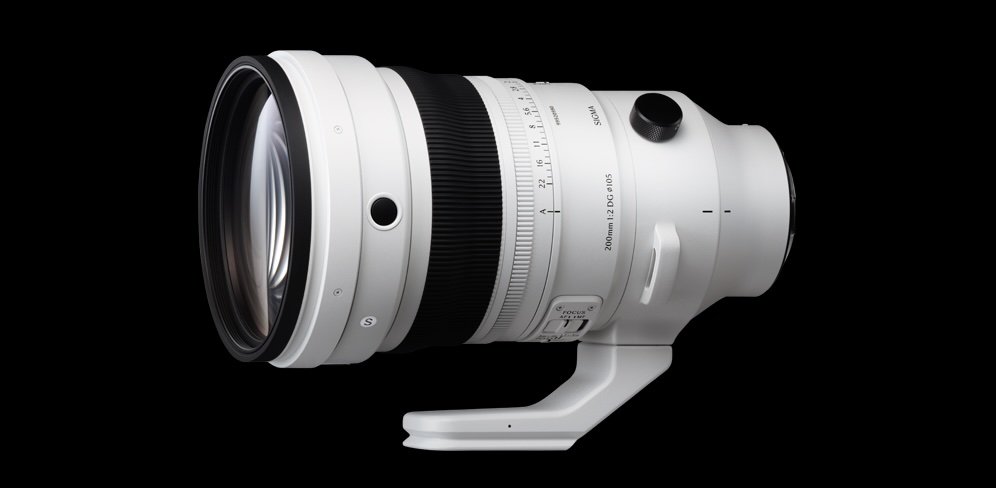
Sigma 200 f/2
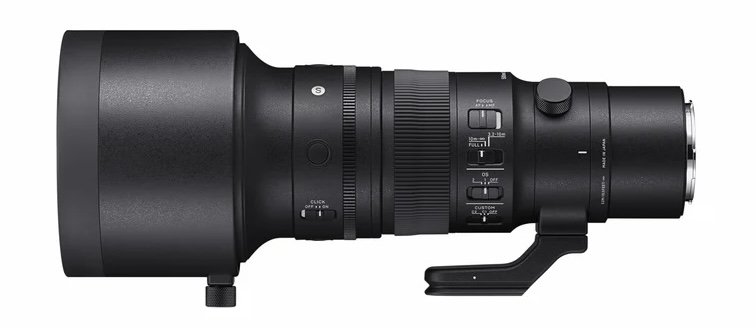
The other big announcement from Sigma last year was their 300-600 f/4 super telephoto zoom. This is a range that I think is pretty fantastic with the closest options in the past being Canon's 200-400 f/4 with inbuilt 1.4 teleconverter or possibly the 100-300 f/2.8 if you added the teleconverter but both those options are significantly more expensive than this Sigma lens. The lens is not light, 8.75 lbs (4kg) at about 2 lbs heavier than the Canon or Sony 600 primes. If this lens is anywhere near as sharp as their old 120-300 f/2.8 zoom then this may be one of the best superzooms out there and the price ($6600 USD) is less than half of the 600 primes.
Canon

Canon 100-300 f/2.8
Canon has not come out with anything new recently but they have their standard 400 f/2.8, 600 f/4, and 800 f/5.6 out there at astronomical prices (not really different from Sony or Nikon on the price side). Instead of a 300 f/2.8 prime Canon does have a 100-300 f/2.8 which may be one of the most useful lenses out there for nature photography if you can afford it. For many years I owned the Sigma 120-300 f/2.8 Sport lens and the range with the 2 teleconverter made it an excellent option for nearly all situations. The only downside was the weight which I believe Canon's new offering is significantly lighter. At $10,600 USD it is at least 3 times what I paid for the Sigma so it had better be good.
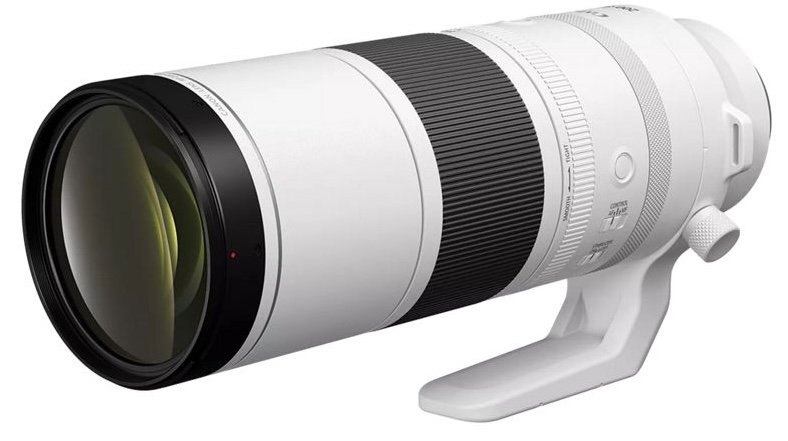
Canon 200-800
Canon really doesn't have anything in between the that 10 grand and around 3000 where the options are pretty limited to their slow 100-500 f/4.5-7.1 and even slower 200-800 f/6.3-9 which both have extending barrels unlike the larger zooms from Sony and Nikon. Since Canon currently doesn't allow third party options on RF mount you are limited to these lenses at the medium/low end or using old EF telephoto lenses with the adapter.
Canon 100-500
The last option for Canon is the two fixed aperture primes (600 and 800 f/11) which are very inexpensive but are not very useful in anything but extremely bright conditions.
Nikon
Nikon seems to be considering nature and wildlife photographers more than others over the last few years. They have the typical expensive f/4 supertelephoto primes like Canon and Sony but also offer a second tier of PF (phase fresnel) lenses that are light primes based on diffractive optics. On Z mount they have a 600 f/6.3 and 800 f/6.3 coming in at $4000 and $ 6000 USD respectively. You might also be able to find the F mount 300 f/4 and 500 f/5.6 lenses for considerably less.
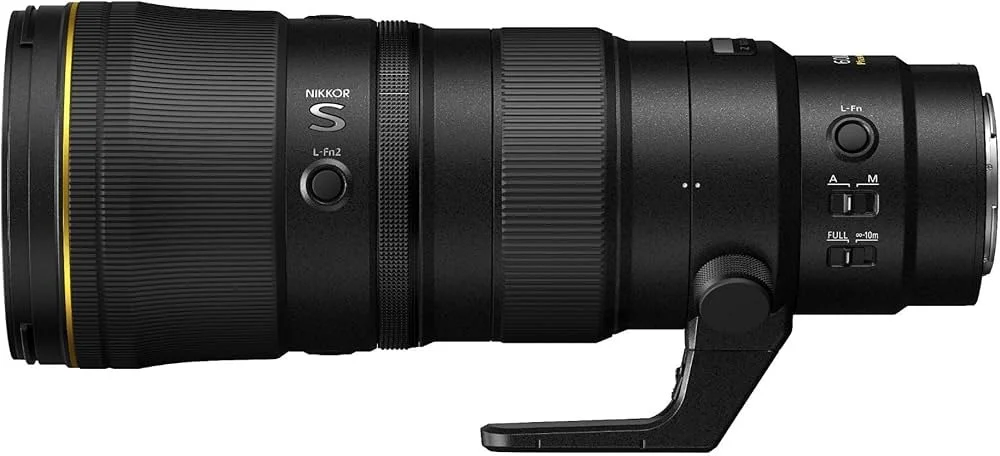
Nikon 600 pf
Nikon also came out with a 180-600 f/5.6-6.3 that is very similar to Sony's 200-600 in functionality and is even a bit cheaper at just under $2000 USD at the moment. For many people this could be their main wildlife lens on Z mount.
Although Nikon has not opened up to all third party lens manufacturers they have partnered with Tamron and as such have the option of the 35-150mm f/2-2.8. I'm sure this is as useful on Nikon cameras as it is on Sony.
Fuji
Fuji 200 f/2
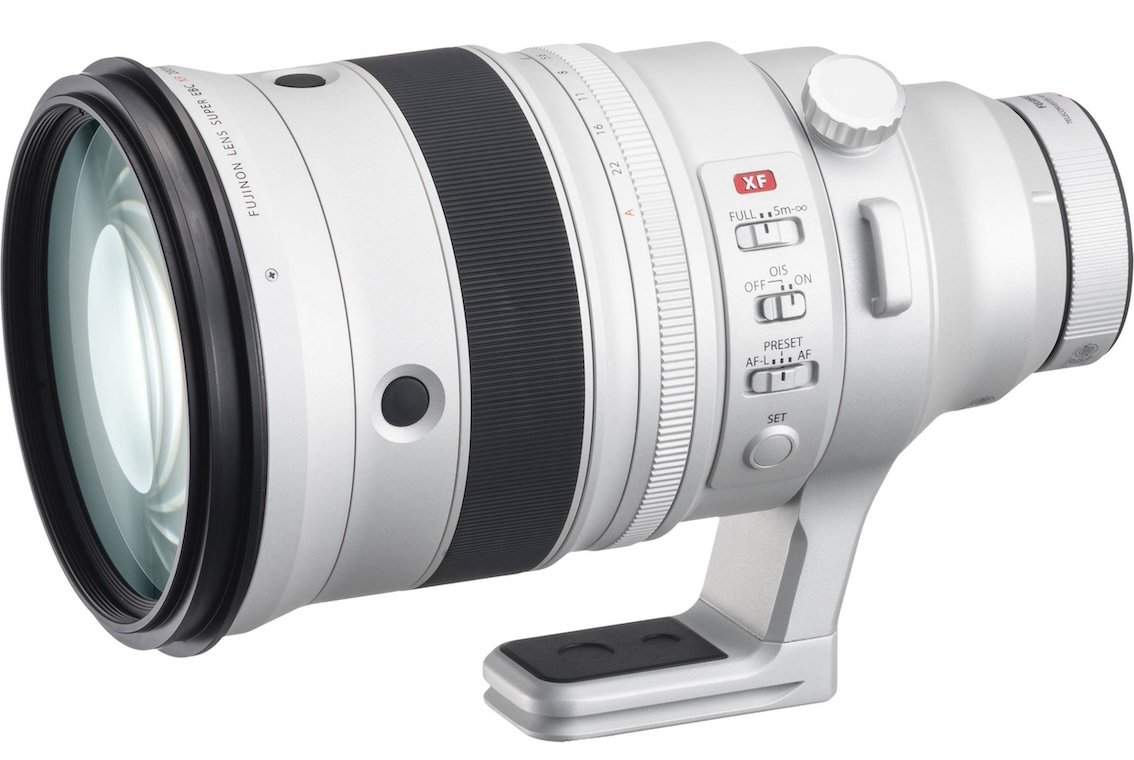
When it comes to APSC cameras most of the options above are still applicable and currently there are not a lot of APSC specific supertelephoto lens options. Fuji is the one outlier since they only produce APSC cameras for their XF line of cameras. With Fuji there is a fairly new 500mm f/5.6, and then a 150-600 f/5.6-8 or the 100-400 f/4/5-5.6 and you do have third party lenses on XF mount for some similar options from Sigma and Tamron. Fuji do have a 200mm f/2 that comes in at $6000 USD which I think may be their most expensive lens.
Fuji GF 500 f/5.6
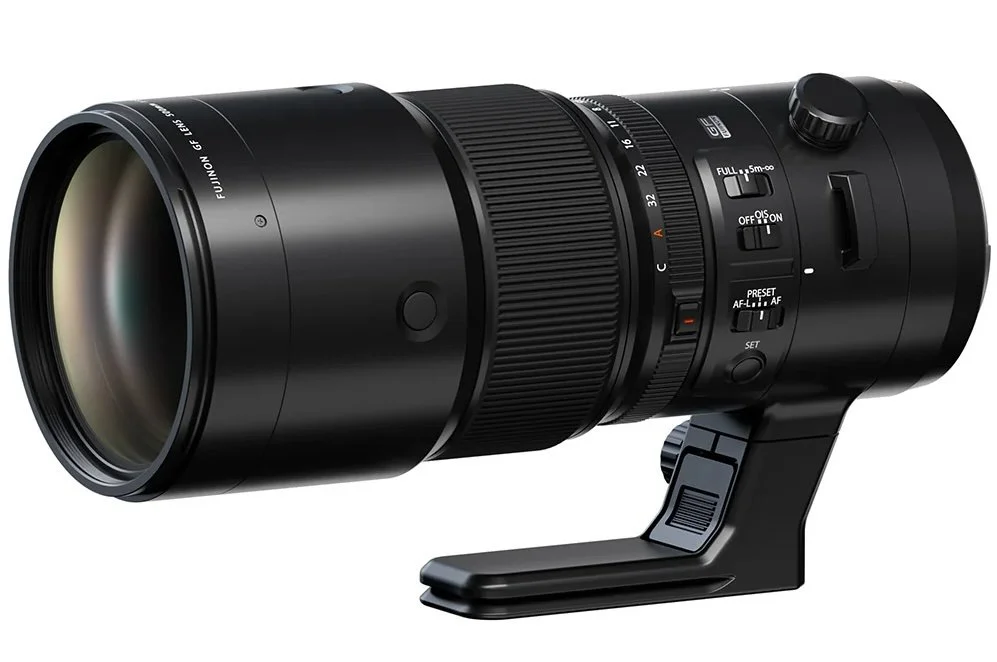
If you want to try a hand at medium format nature photography Fuji does have a few options now on the GF line of lenses. Their 100-200 f/5.6 may be a good option for more environmental shots but you do have more expensive 250mm f/4 and 500mm f/5.6 and a 1.4X teleconverter. The latest GFX100II camera does make it possible to capture some interesting nature shots although you might find it doesn't autofocus quite at the level of the latest full frame cameras. This to me is an interesting option for capturing larger animals in action in interesting environments. I think it is the one option I would consider moving to as my second system if I ever moved from Sony or Canon since it would give me very different results with the high resolution and more importantly the 16 bit files to capture the smoothest of colour gradients.
OM System
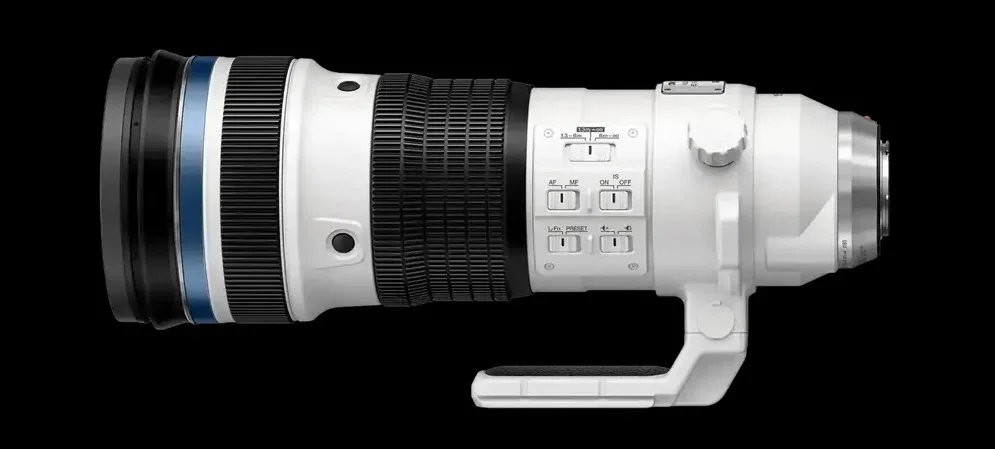
OM System 150-400
OM system has been providing interesting lenses for the micro 4/3 cameras. Their latest a 50-200 f/2.8 is a fast 100-400 equivalent lens (and with the increased effective depth of field it is fairly easy to get more of the subject in focus while still being able to capture more light.
OM also have an inexpensive 100-400 f.5-6.3, a relatively fast 40-150 f/2.8, a 300mm f/4, a 150-600 f/5.6.3 and their very expensive 150-400 f/4.5 (with 1.25 teleconverter). These are all interesting options with the 2 times crop giving you a lot of reach in relatively smaller packages. As long as you are ok with what you are getting out of the sensors these are good options if you want to go a bit lighter.
Rumors
There don't seem to be a lot of rumours out there at the moment with respect to new super telephoto lenses. Sony may be updating their 100-400mm options soon
What's missing from my perspective?
It is nice to see that we have been getting some new options in the last couple of years which the re-introduction of a couple of f/2 200mm primes, the 100-300 f/2.8, the 300-600 f/4. I hope these lenses are successful enough that we might see more lenses at focal lengths that are not considered "normal". I would really like to see Sigma bring back the 120-300 f/2.8 but much lighter. I would like to see more internal zoom lenses and I would like to see someone come out with a telephoto powerzoom for video.
I'm not sure if we will see any new 500mm f/4 lenses, no one has come out with one so far and maybe now that the 600mm lenses are much lighter it doesn't make sense to have a 500 in the lineup.
I would really like to see some more diffractive optics lenses. Canon's last EF 400 DO f/4 was quite a good lens and Nikon PF lenses are good options currently. Not sure why Sony/Sigma/Tamron haven't unless there are too many patent issues around them still. It is a fantastic way to make long lenses much smaller and lighter and it seems like Nikon and Canon were technically able to make the images sharp even if the out of focus areas tend to be a bit frenetic. Trying to find inexpensive ways to include the DO lenses into groups of regular lenses may still be an issue but I hope the research continues.

Tanzania teaser- Start with the big five and add a few
As a child I remember getting up on Saturday mornings to watch cartoons and nature shows like New Wilderness or Wild Kingdom. Years later, as a nature photographer, my dream has always been to go to Africa to live that life, even if only for a short time.

Elephant family slowly making its way towards the river for a drink
Growing up in small town Ontario, I remember waking up on Saturday mornings to one of two exciting things; Cartoons and Nature shows. I probably never really grew up because I have never gotten over either of them. We only had 3 TV channels and had to move the antennae each time we wanted to change the channel. So with the TV guide in hand, we would plan what shows to watch. We had just a few options but Lorne Greene's New Wilderness, Mutual of Omaha's Wild Kingdom and Untamed World are the ones I remember and it was always the African Safari episodes that kept me imagining myself in a safari vehicle exploring with a camera.
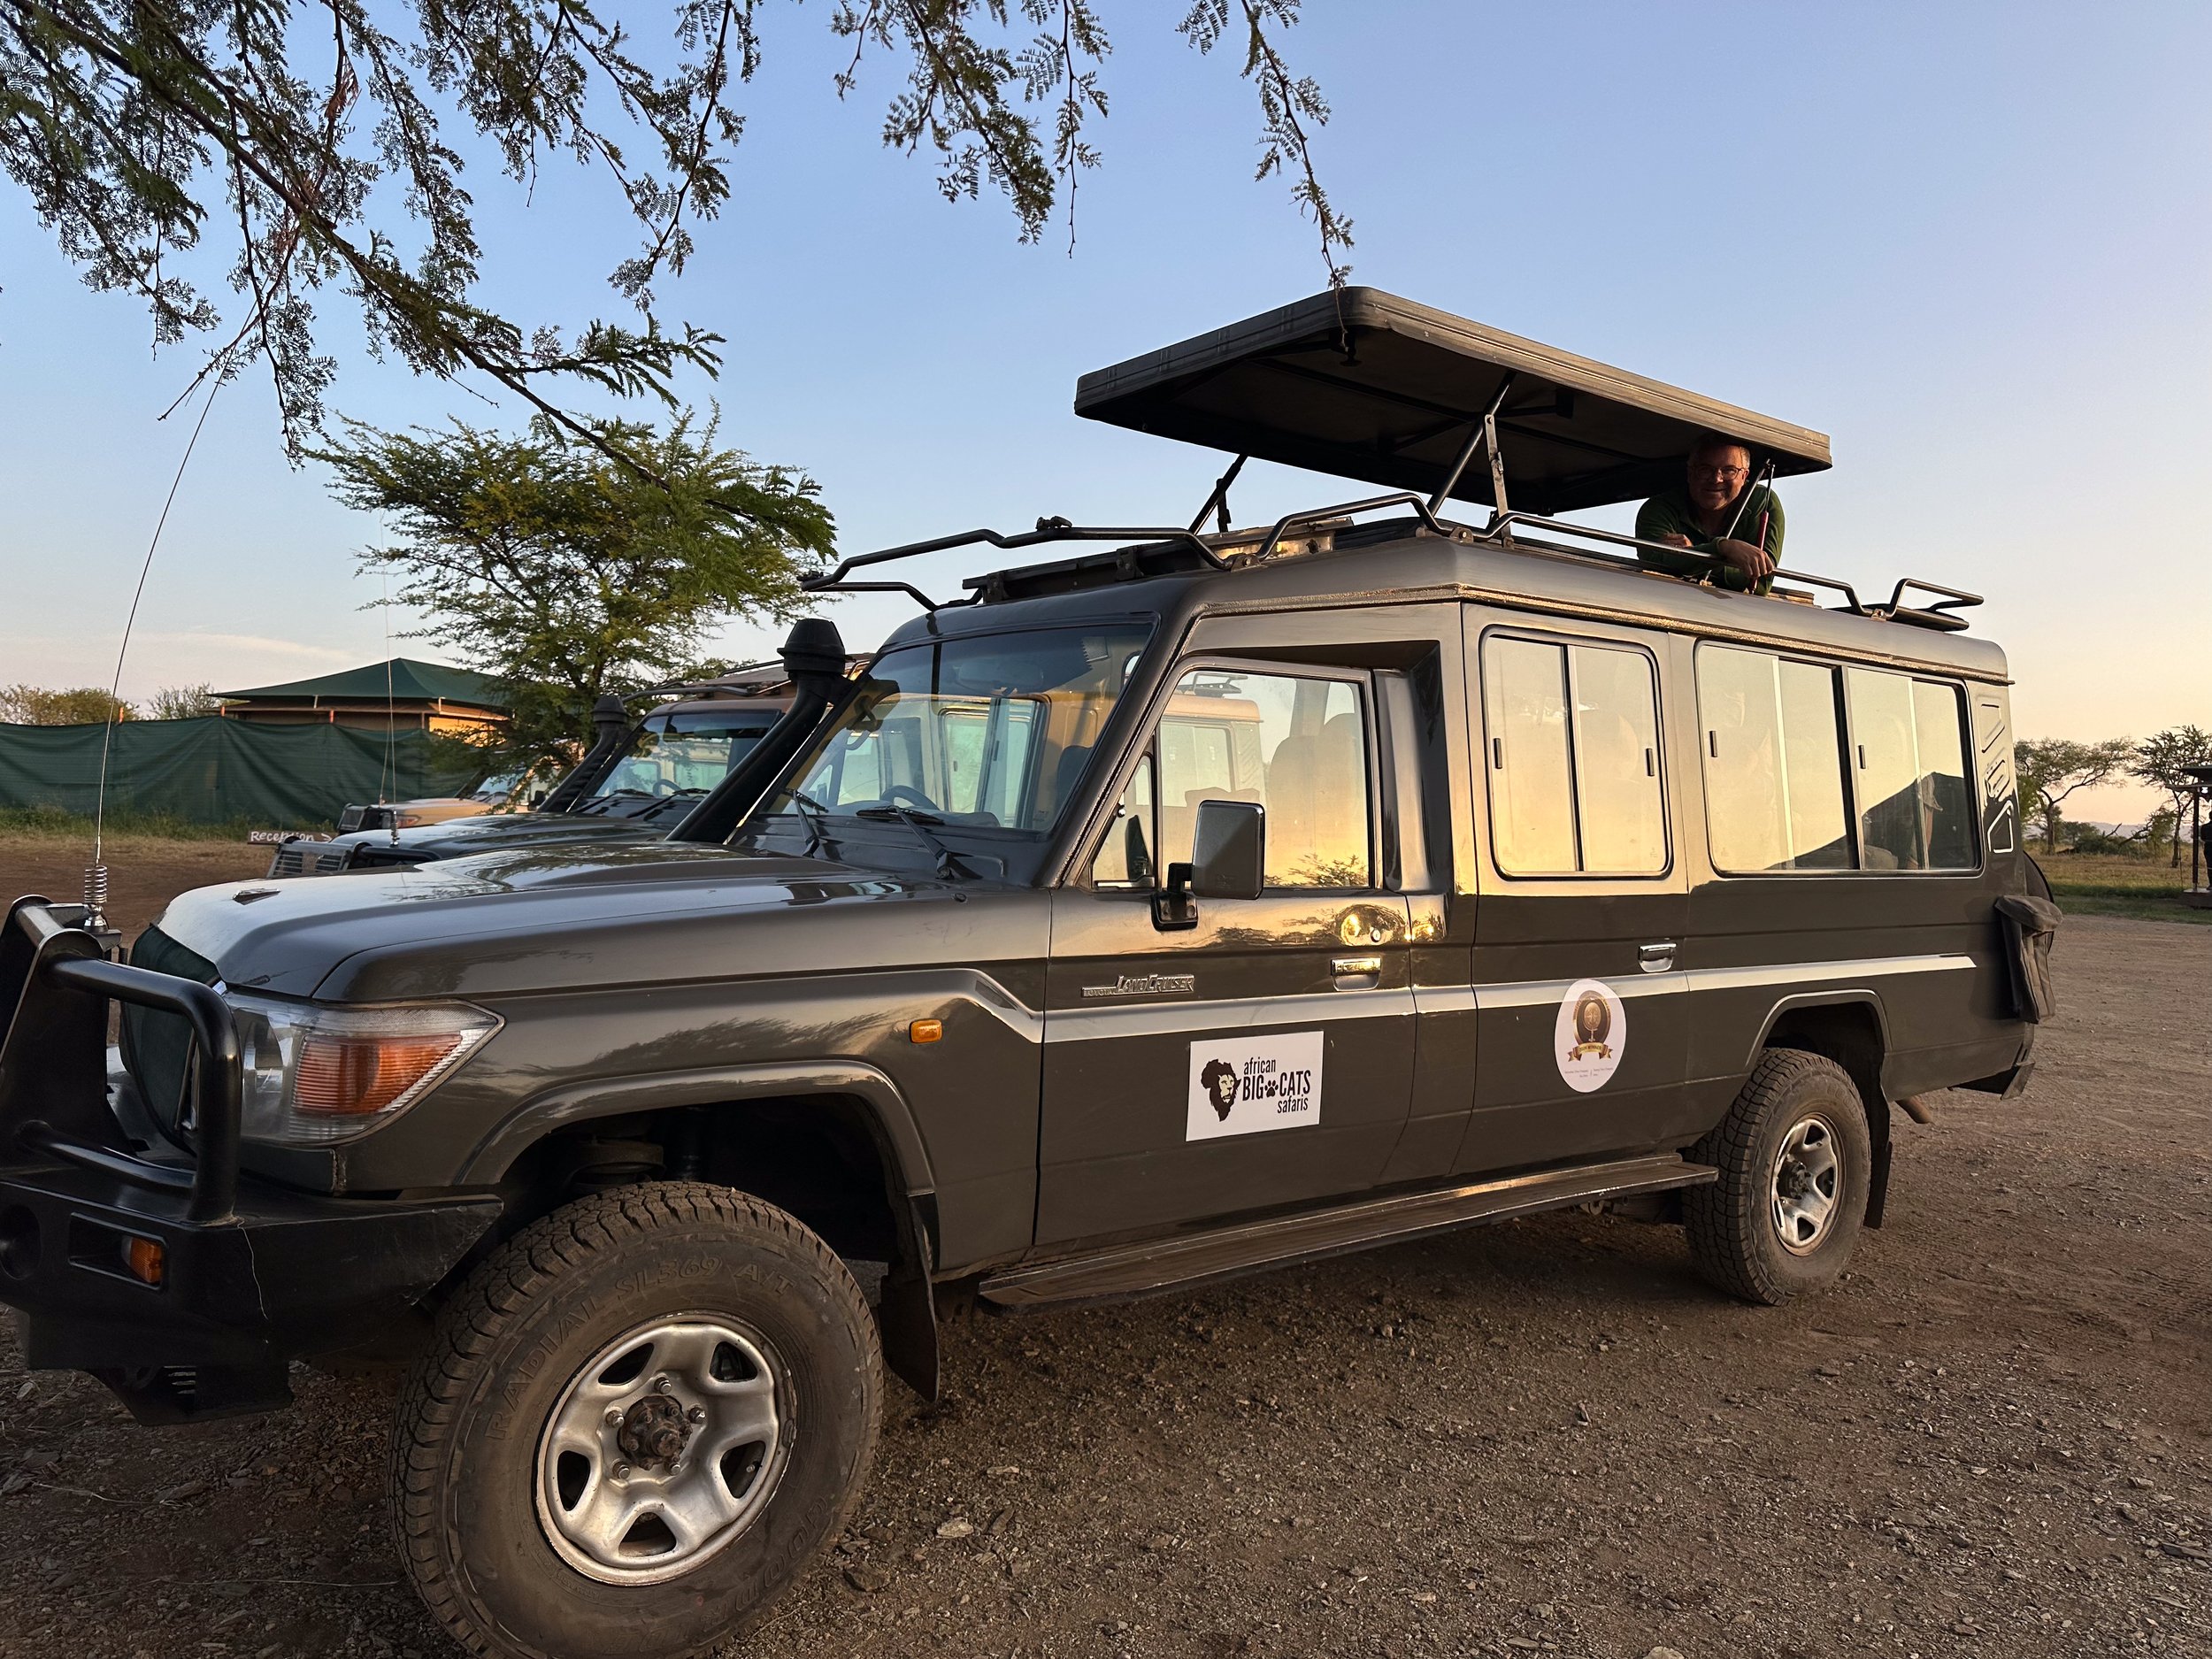
Standing in our Toyota Land Cruiser. Looks pretty similar to the ones I saw on TV as a kid. (Photo by Salwa Farah)
Years later, as a nature photographer, my dream has always been to go to Africa to live that life, even if only for a short time. Nearly a year ago, we made plans for a 2 week trip to Tanzania with a group of nature photographers. With just one week to go, we got news of protests that resulted in deaths during the Tanzanian election. This resulted in a number of countries making statements basically saying "do not travel" to Tanzania. Needless to say, I was stressed out and a bit depressed with the idea that the money we had put towards a once in a lifetime trip may be gone. Fortunately, after going back and forth with the safari company and reassurance from customers on the ground in Tanzania, with the exception of one couple, we made the decision to go. The trip was a success and I believe I got almost everything I wanted out of it. My inner child saw everything he dreamed about and more.

I didn’t realize that lions climbed into trees as often as they do.
Getting the big five animals in Africa was certainly one of the goals, but it wasn't about ticking things off a list. I really wanted to get to see these animals living their lives. It wasn’t about just getting a pretty portrait of each. For the big five I can say we managed to get good pictures for 80% on that goal. There was so much more to see than the big five, and I'll explore those later, but for now let's take a look at some of the big ones, let's call them the big five-ish.

A pair of male lions doing a bit a of dance before lying down to rest on the Serengeti
So, let's start with what is the accepted definition of the big five. They consist of elephants, lions, leopards, buffalo, and rhinos. For me the "ish" part adds in giraffe, hippos, and cheetah.

Three cheetah taking a quick look back before heading off.
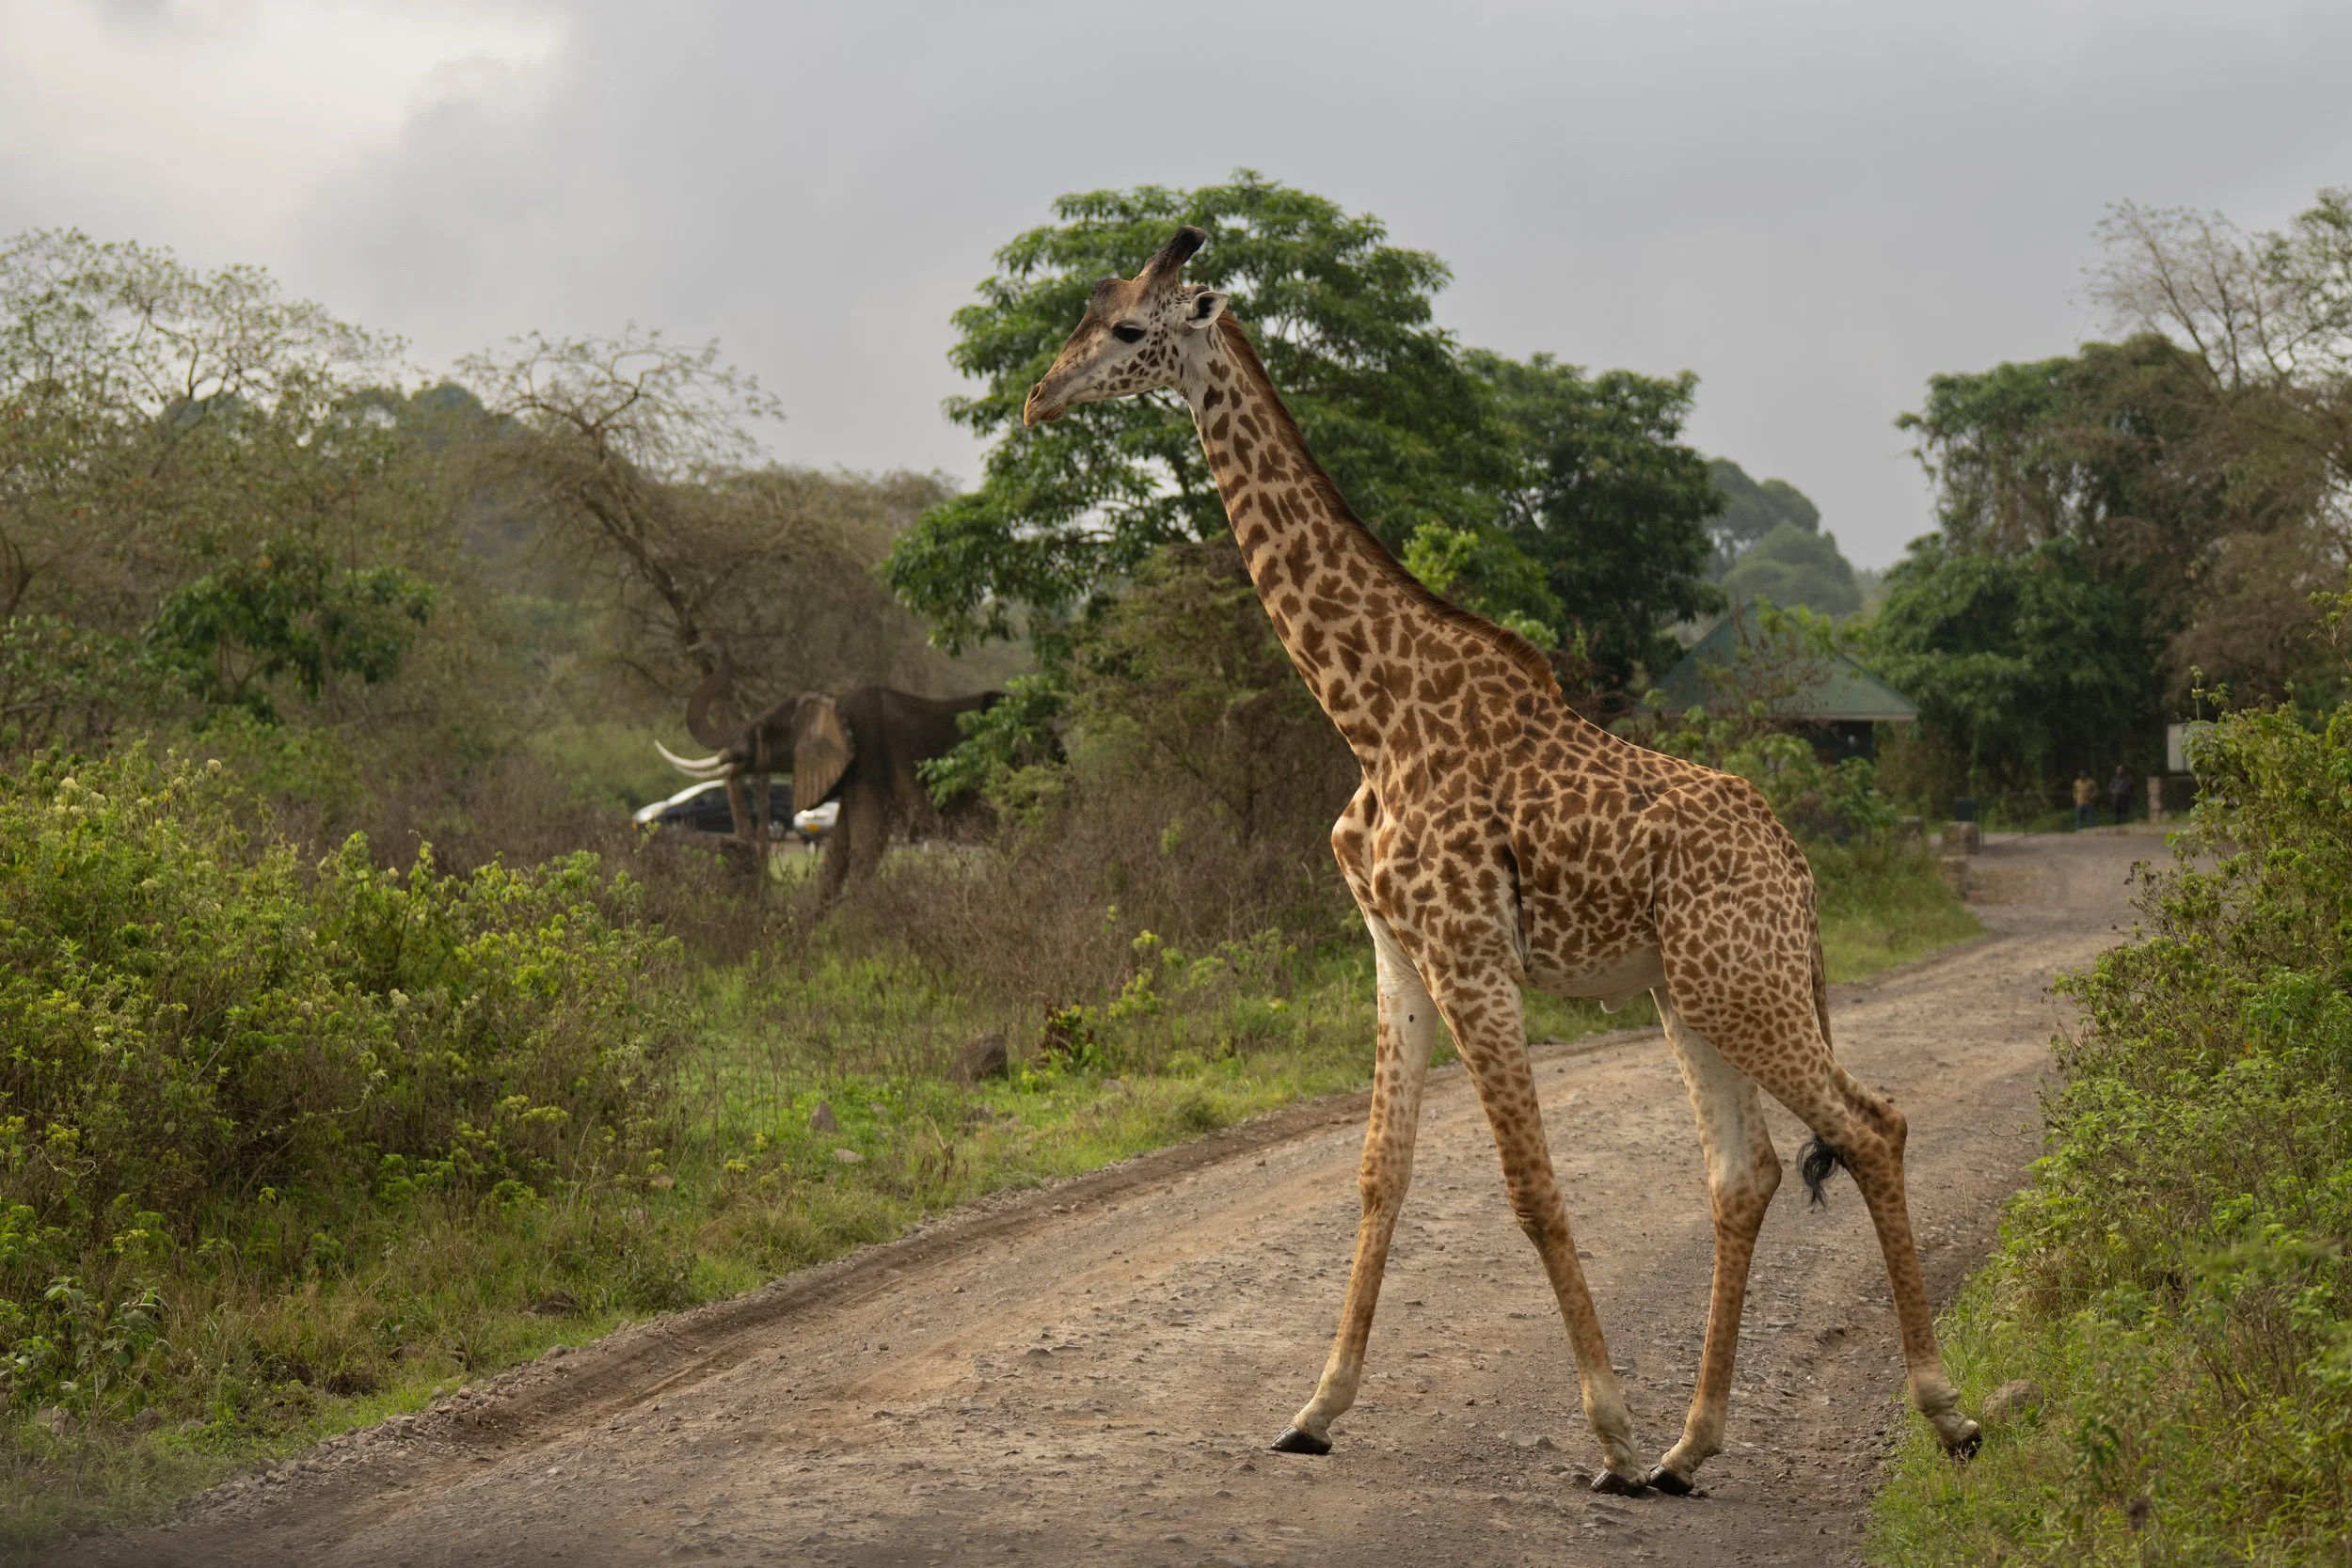
With nature photography in Canada you can usually count the number of animals you see on a single hand, On our first day out in Tanzania, we saw a half dozen giraffe in the first 5 minutes of crossing into our first National Park, and things got even better from there.
Giraffe at the entrance to Arusha National Park with an elephant statue in the background near the gate.
Giraffe
Giraffe are an interesting challenge to photograph, especially from a truck that can't leave the road. This is where the Tamron 35-150mm lens became the most useful not only for big subjects that were up close, but also for those shots that include more of the environment. We saw giraffe almost everyday, and in so many different environments. These are a majestic animals that I could easily take pictures of daily without ever getting bored.

Lone giraffe wandering across the stark grasslands
Elephants
While the Giraffe were fun to watch, usually one or two at a time, the elephants on the other hand were most often seen in family groups. The interactions between the elephants made for the best shots, I really had no idea how active they were and how much they interacted with each other. This was a show again I could watch over and over again. We watched them walking together slowly in long trains to reach water, but once they got there they were like a bunch of children in a playground.

Two elephants play fighting in the water left in the river basin
Sometimes they would play fight, other times they sprayed water or dirt over their hides, and the little ones would fall and roll in the dust, as if they were still discovering how to use their legs and trunks.
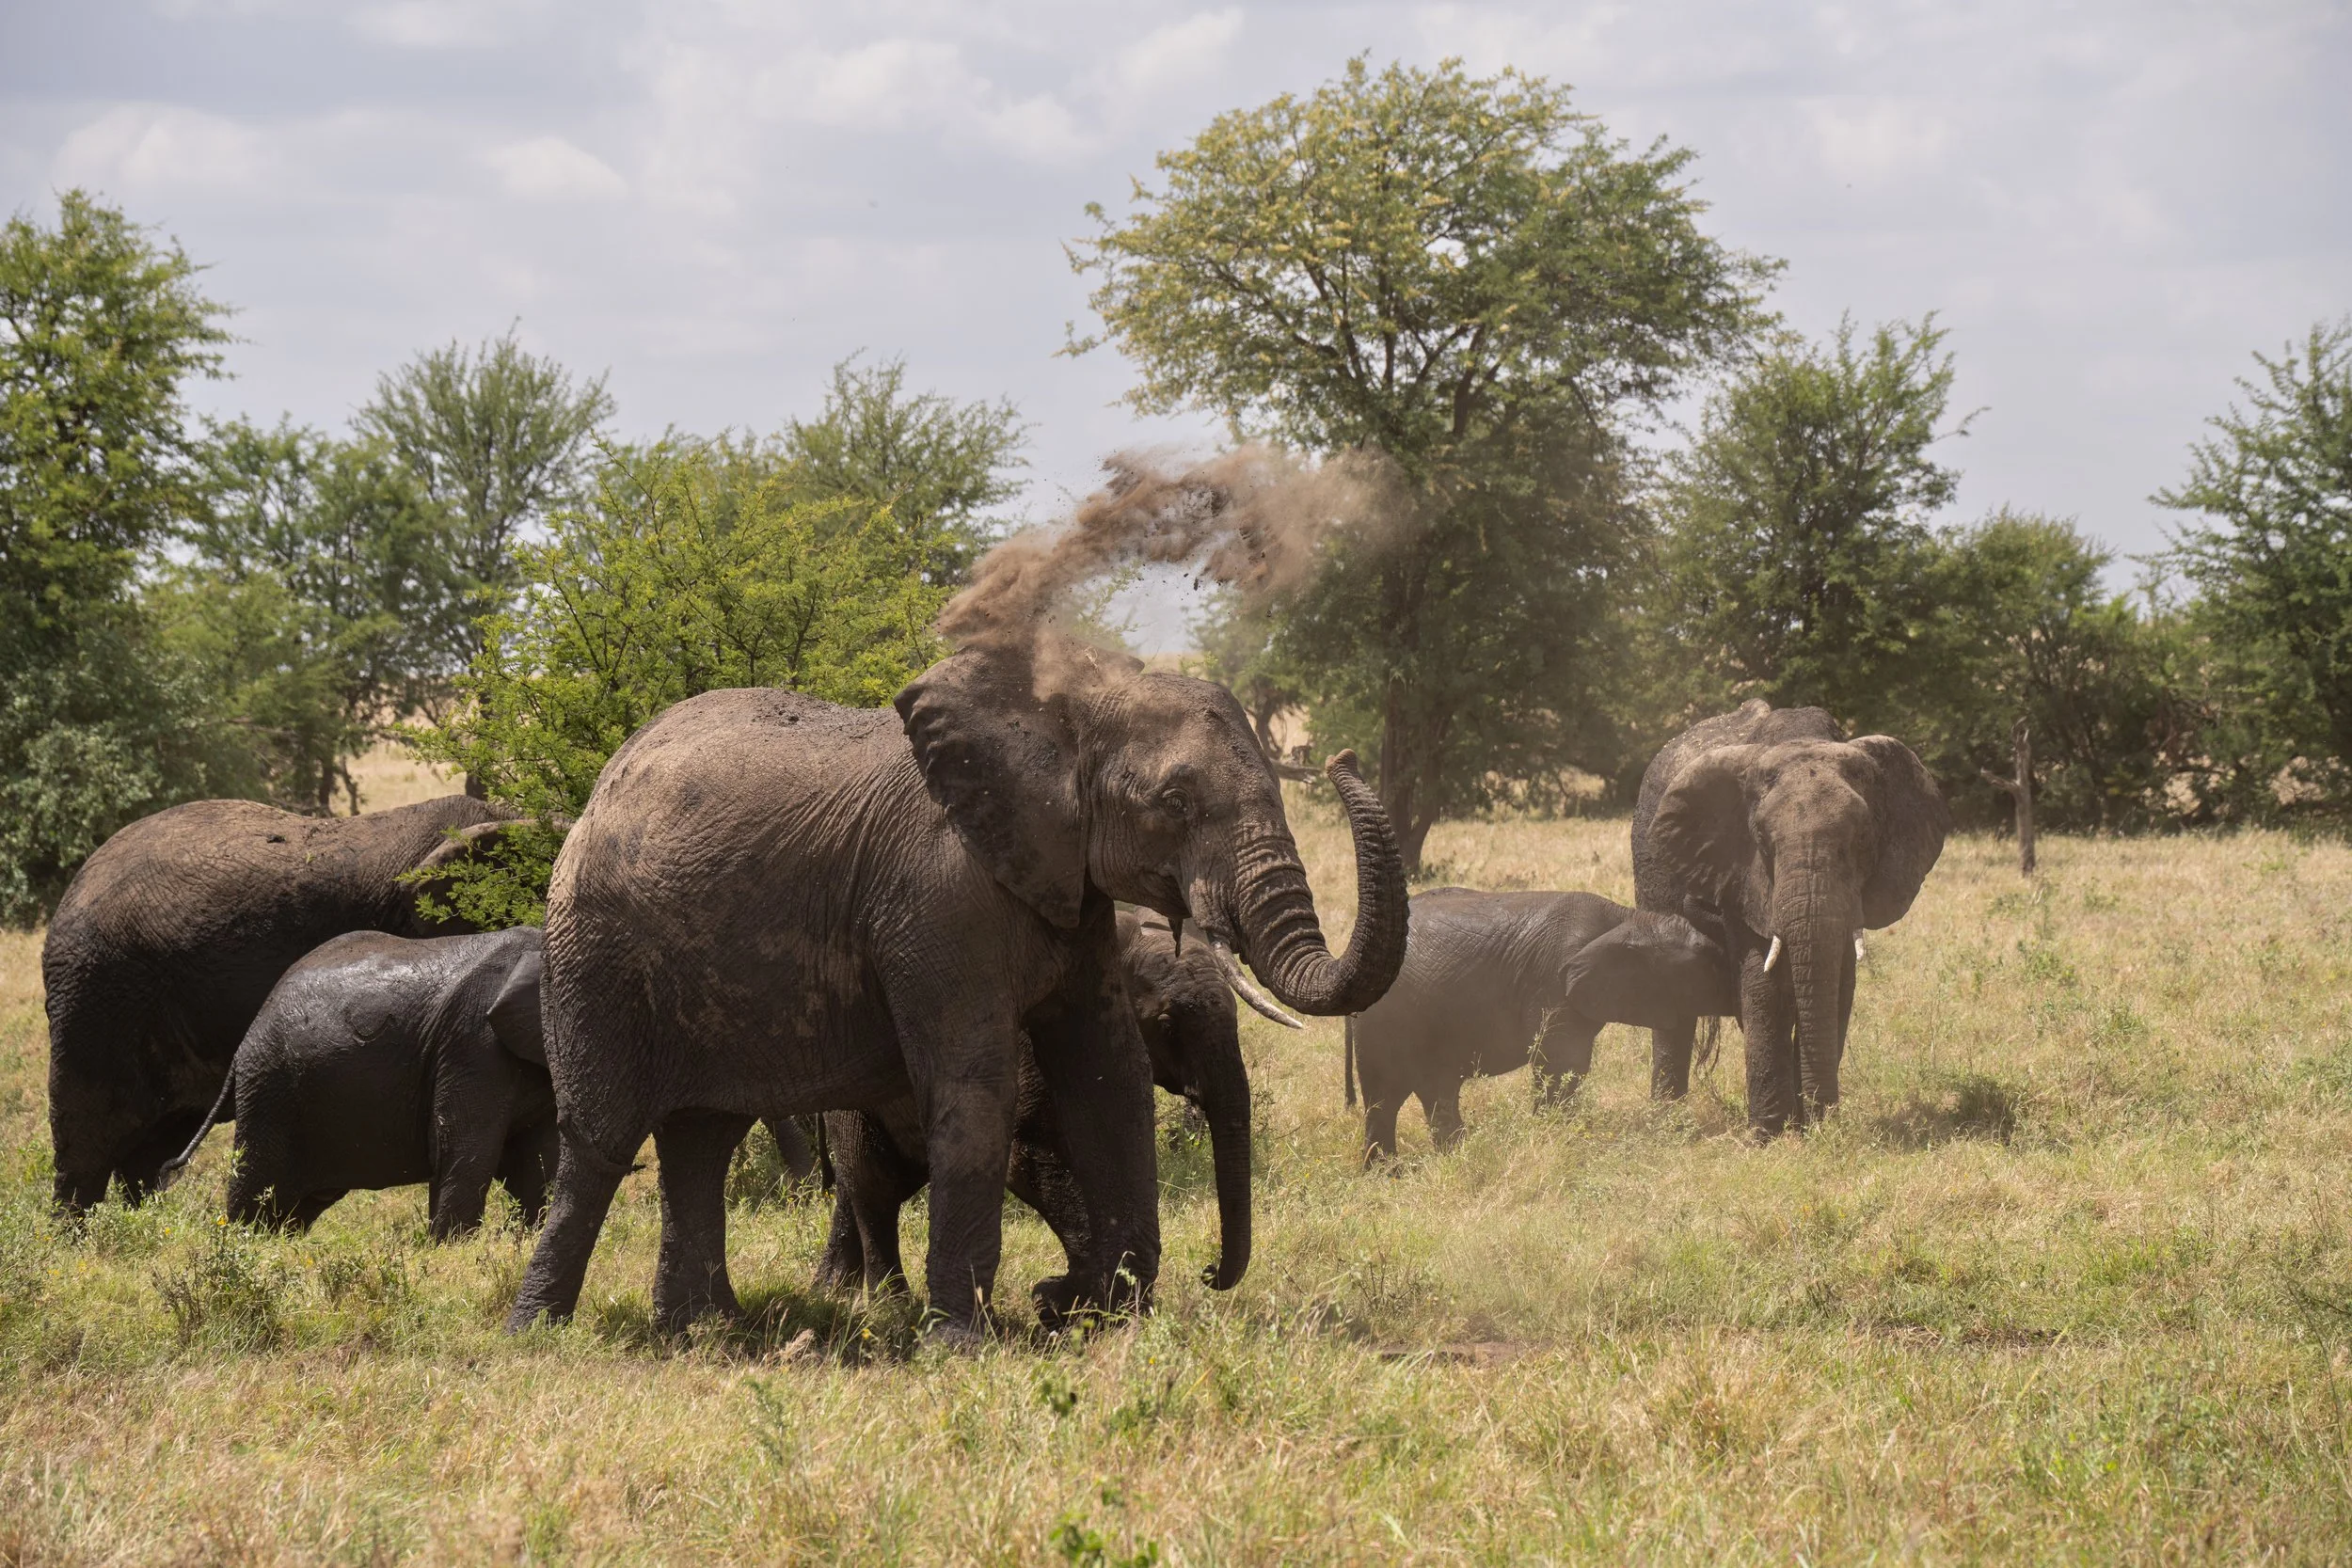
Spraying a little dirt overhead, I’m assuming it helps with the bugs or the sun.
Lions
Most times of the year you are limited to staying on the roads in Tanzania’s National Parks, so getting to see lions at first was mostly a case of seeing them at a far distance as they lay under the shade of a tree to escape from the heat of the sun. Fortunately, the more we explored, the more lions we saw. We found several families resting near the road and another group hanging around in a large sausage tree.

Lions are not quite as agile as leopards when it comes to climbing but this one managed pretty well
These animals are so used to the vehicles that most of the time they barely noticed us, and when they did it was in passing as they used the shade of a truck to get out of the sun before making their way towards a watering hole. Luckily for us, most of the time we got to enjoy the lions by ourselves. Although this wasn’t the busiest time of year for safari’s, there were occasions when we saw lions in a tree with a bunch more vehicles. I managed to get a shot of one descending from the tree with a Land Cruiser in the background.
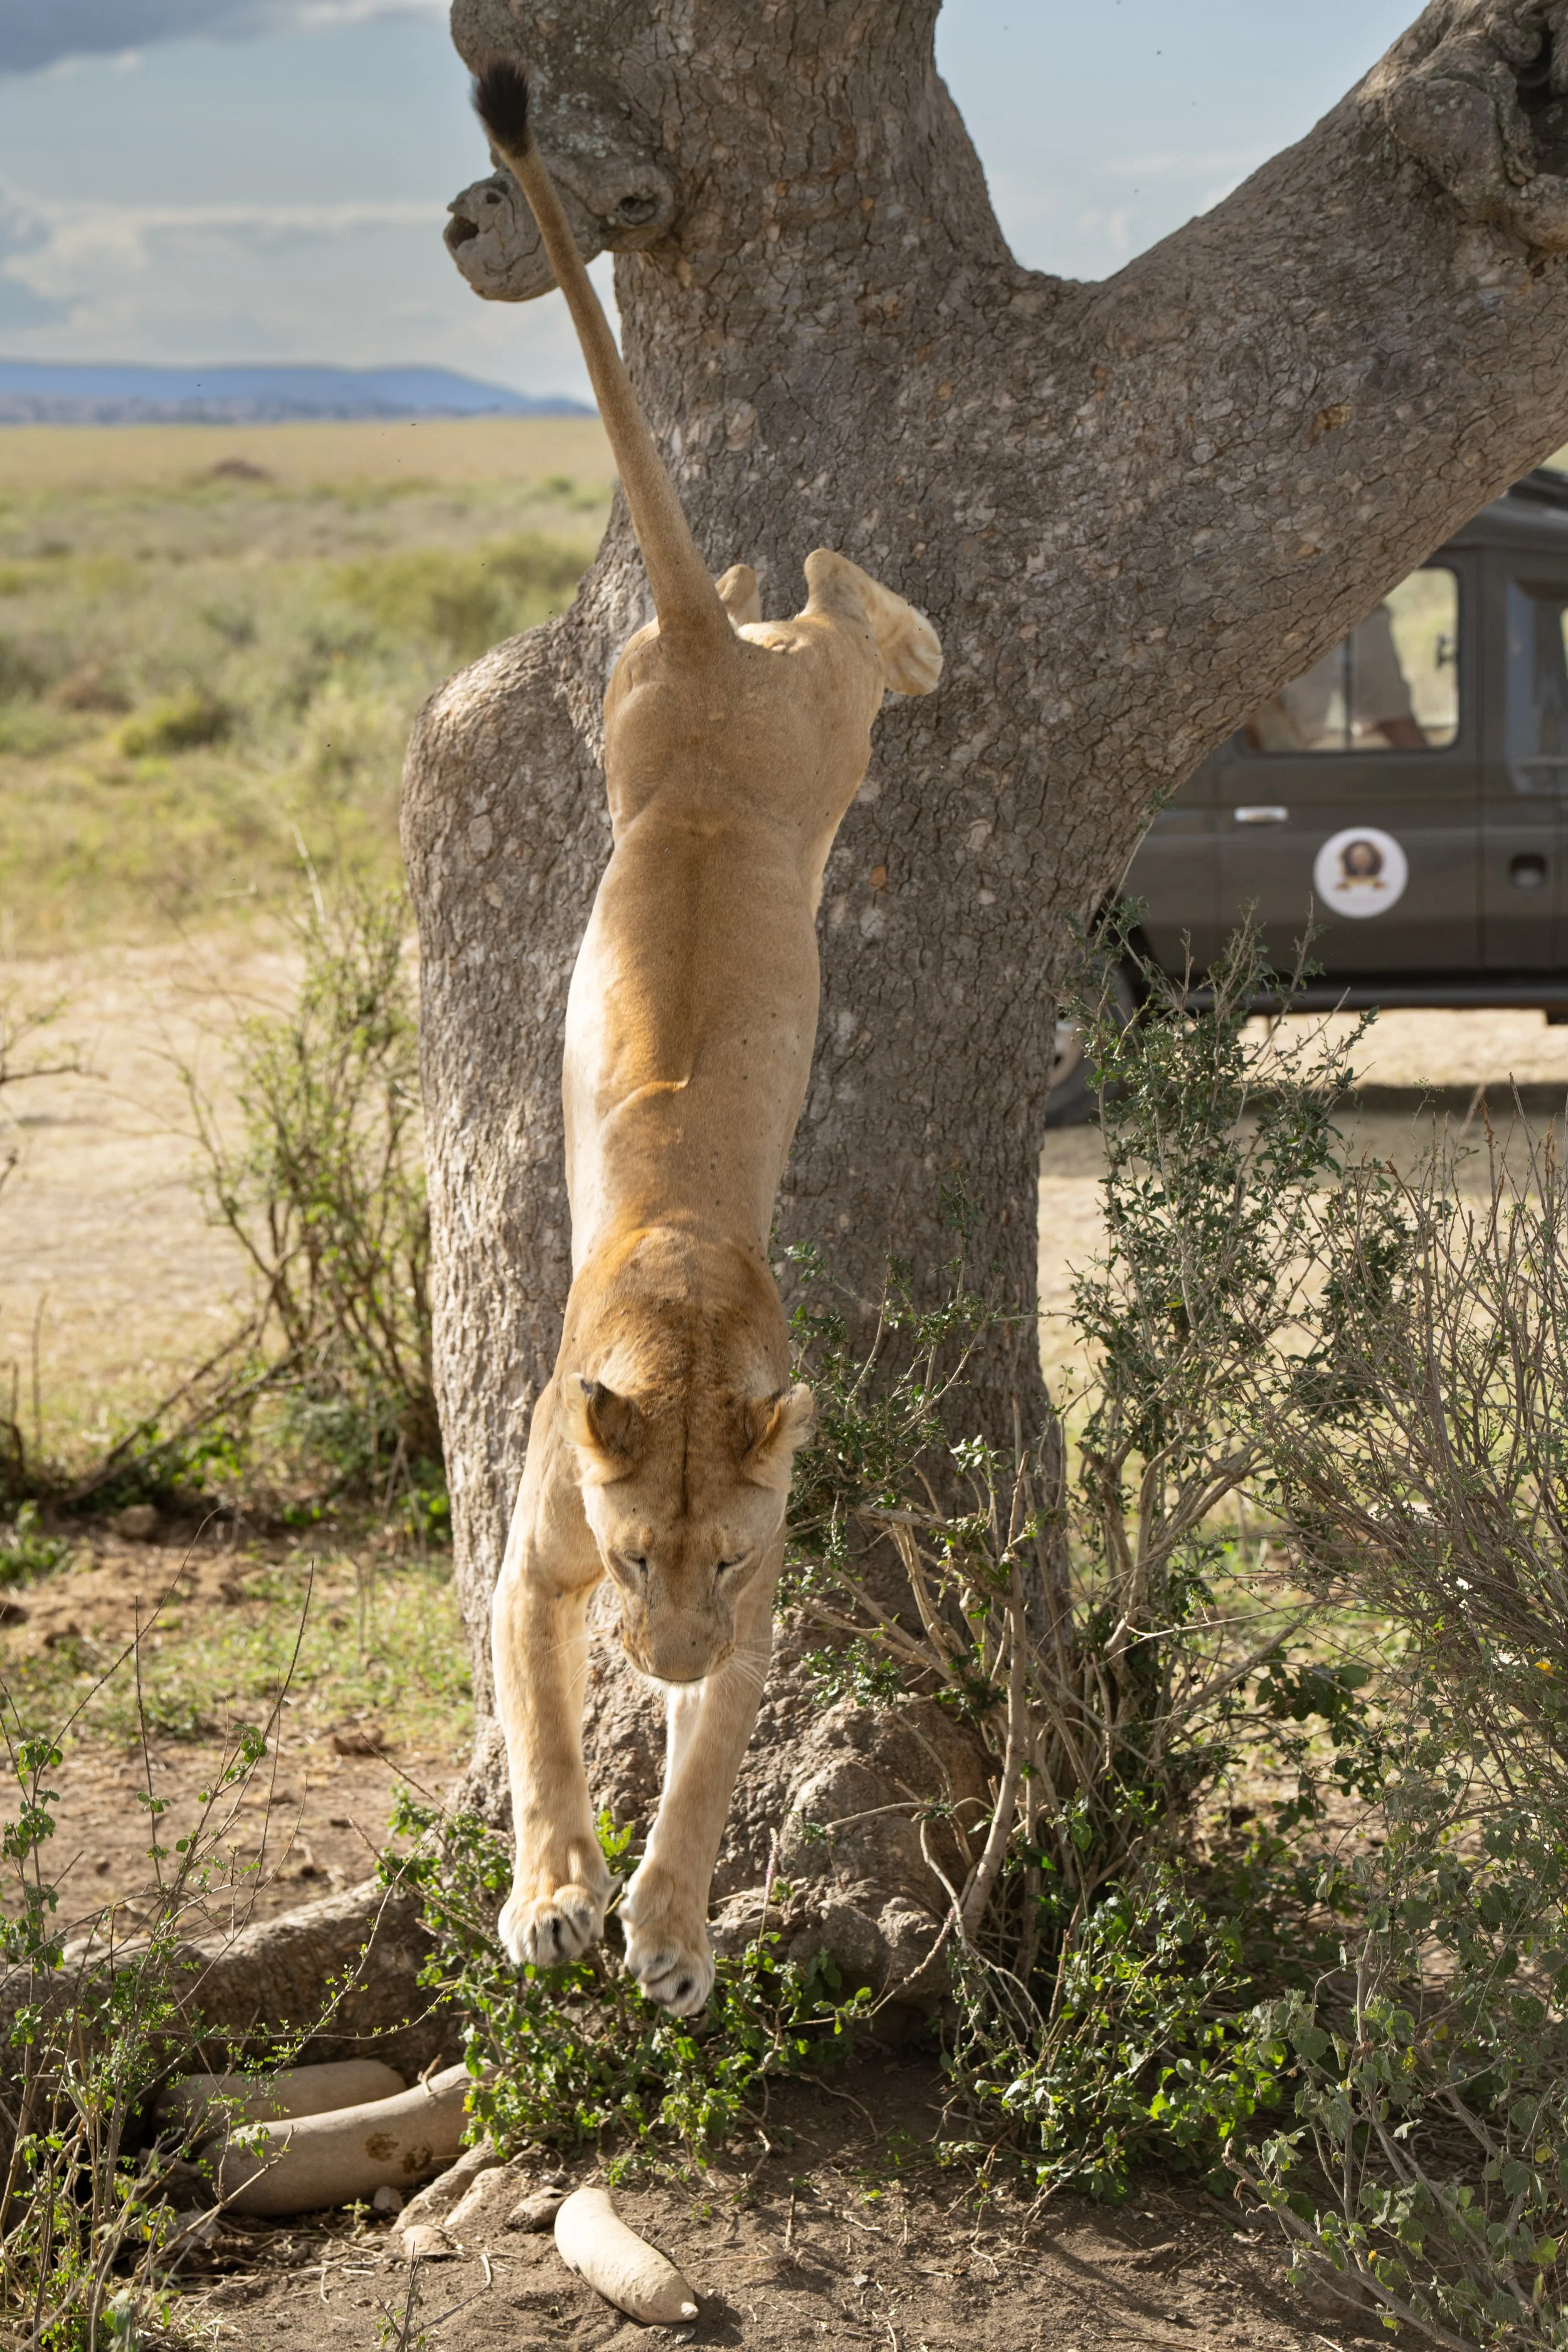
With safari vehicles in front and behind, this lion acted as if we weren’t there at all but wandered behind our truck to get out of the sun for a bit before heading back to the rest of the pride.
We were lucky to see many lion cubs, sometimes playing with the rest of the pride lazing in the sun and with a couple that were a little curious about us.

Fuzzy and cute, lion cubs seemed to act a lot like house kittens, curious and energetic but often a bit clumsy.
Leopards
I can say that we were very lucky to see several leopards on this trip. Our guide was pretty thrilled since typically they can only get a glimpse of them in a distant tree. Instead, we got to spend a good amount of time watching one resting in a tree, another coming down from a tree to start to hunt, as well as another beside a tree after an unsuccessful hunt for a mongoose.

lone leopard in a tree noticing something interesting back behind us
Although the light was challenging to get great shots, the fact that we were able to spend as much time with this elusive cat made it worth having to do a little work to get the best out of the shots.

Buffalo
Cape buffalo were a little difficult to get interesting photos of, at first we only saw them far away in small herds and often mostly hidden in the brush, but in the Ngorongoro crater we got to see a larger group of them in a wet, muddy open area. One of the photographers in our group was on a mission to get a picture with oxpeckers on the buffalo which, after patiently waiting, we did manage to get exactly the shot he wanted. I also managed to get something, but the composition I really wanted would have been a backlit headshot.
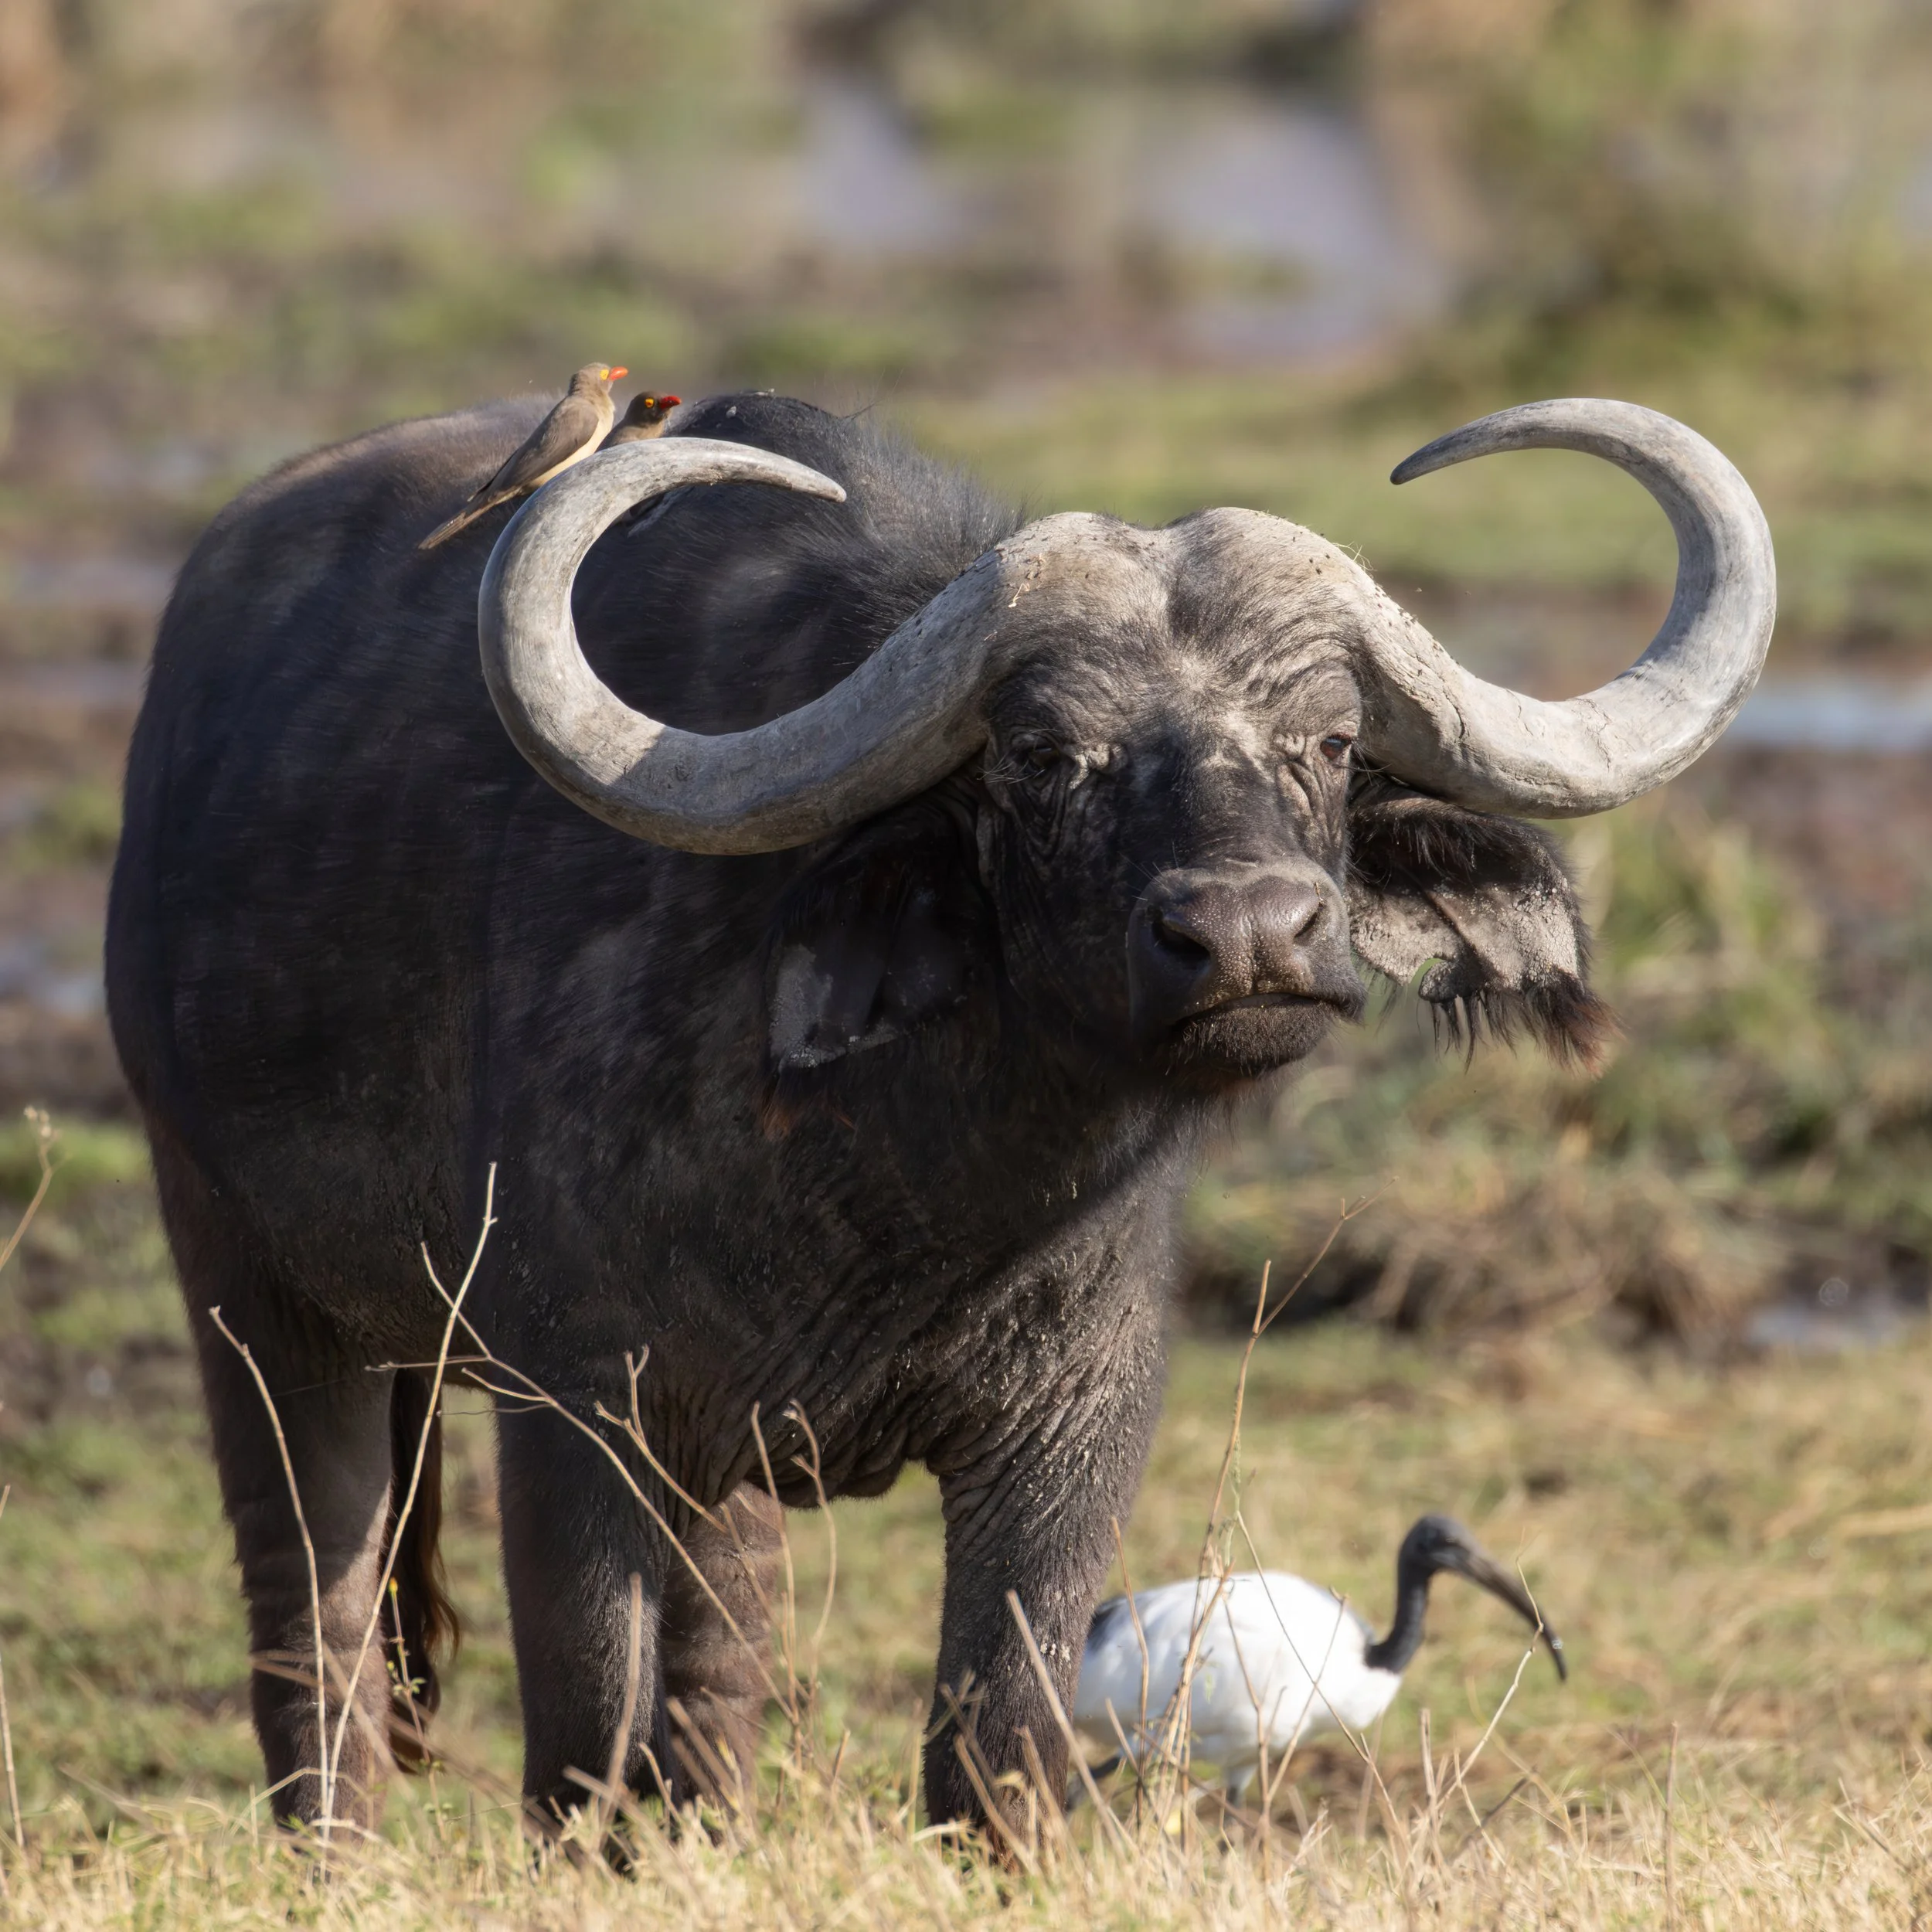
Cape Buffalo with a pair of oxpeckers in the Ngorongoro crater
Rhinoceros
Salwa wanted to see a black rhino, from our first day out it was on her list and it wasn't until the final day that we had a chance to see them. In this case that was pretty much all we can claim is that we saw a couple as it was from a long distance though many trees with a significant amount of heat haze in the air. I only managed to get a couple of shots off, and I think I can at least say for certain that it was a rhino but I'm not going to be showing off any of these photos. I think in this case I'm mostly disappointed about the fact that rhinos now need to be protected so much due to human predation and over tourism that they have had to close down many of the roads to allow them a bit of room away from people. It is our own fault and I hope that some of the work being done will mean that these magnificent animals will have a future. For now, I can live without getting a nice picture.
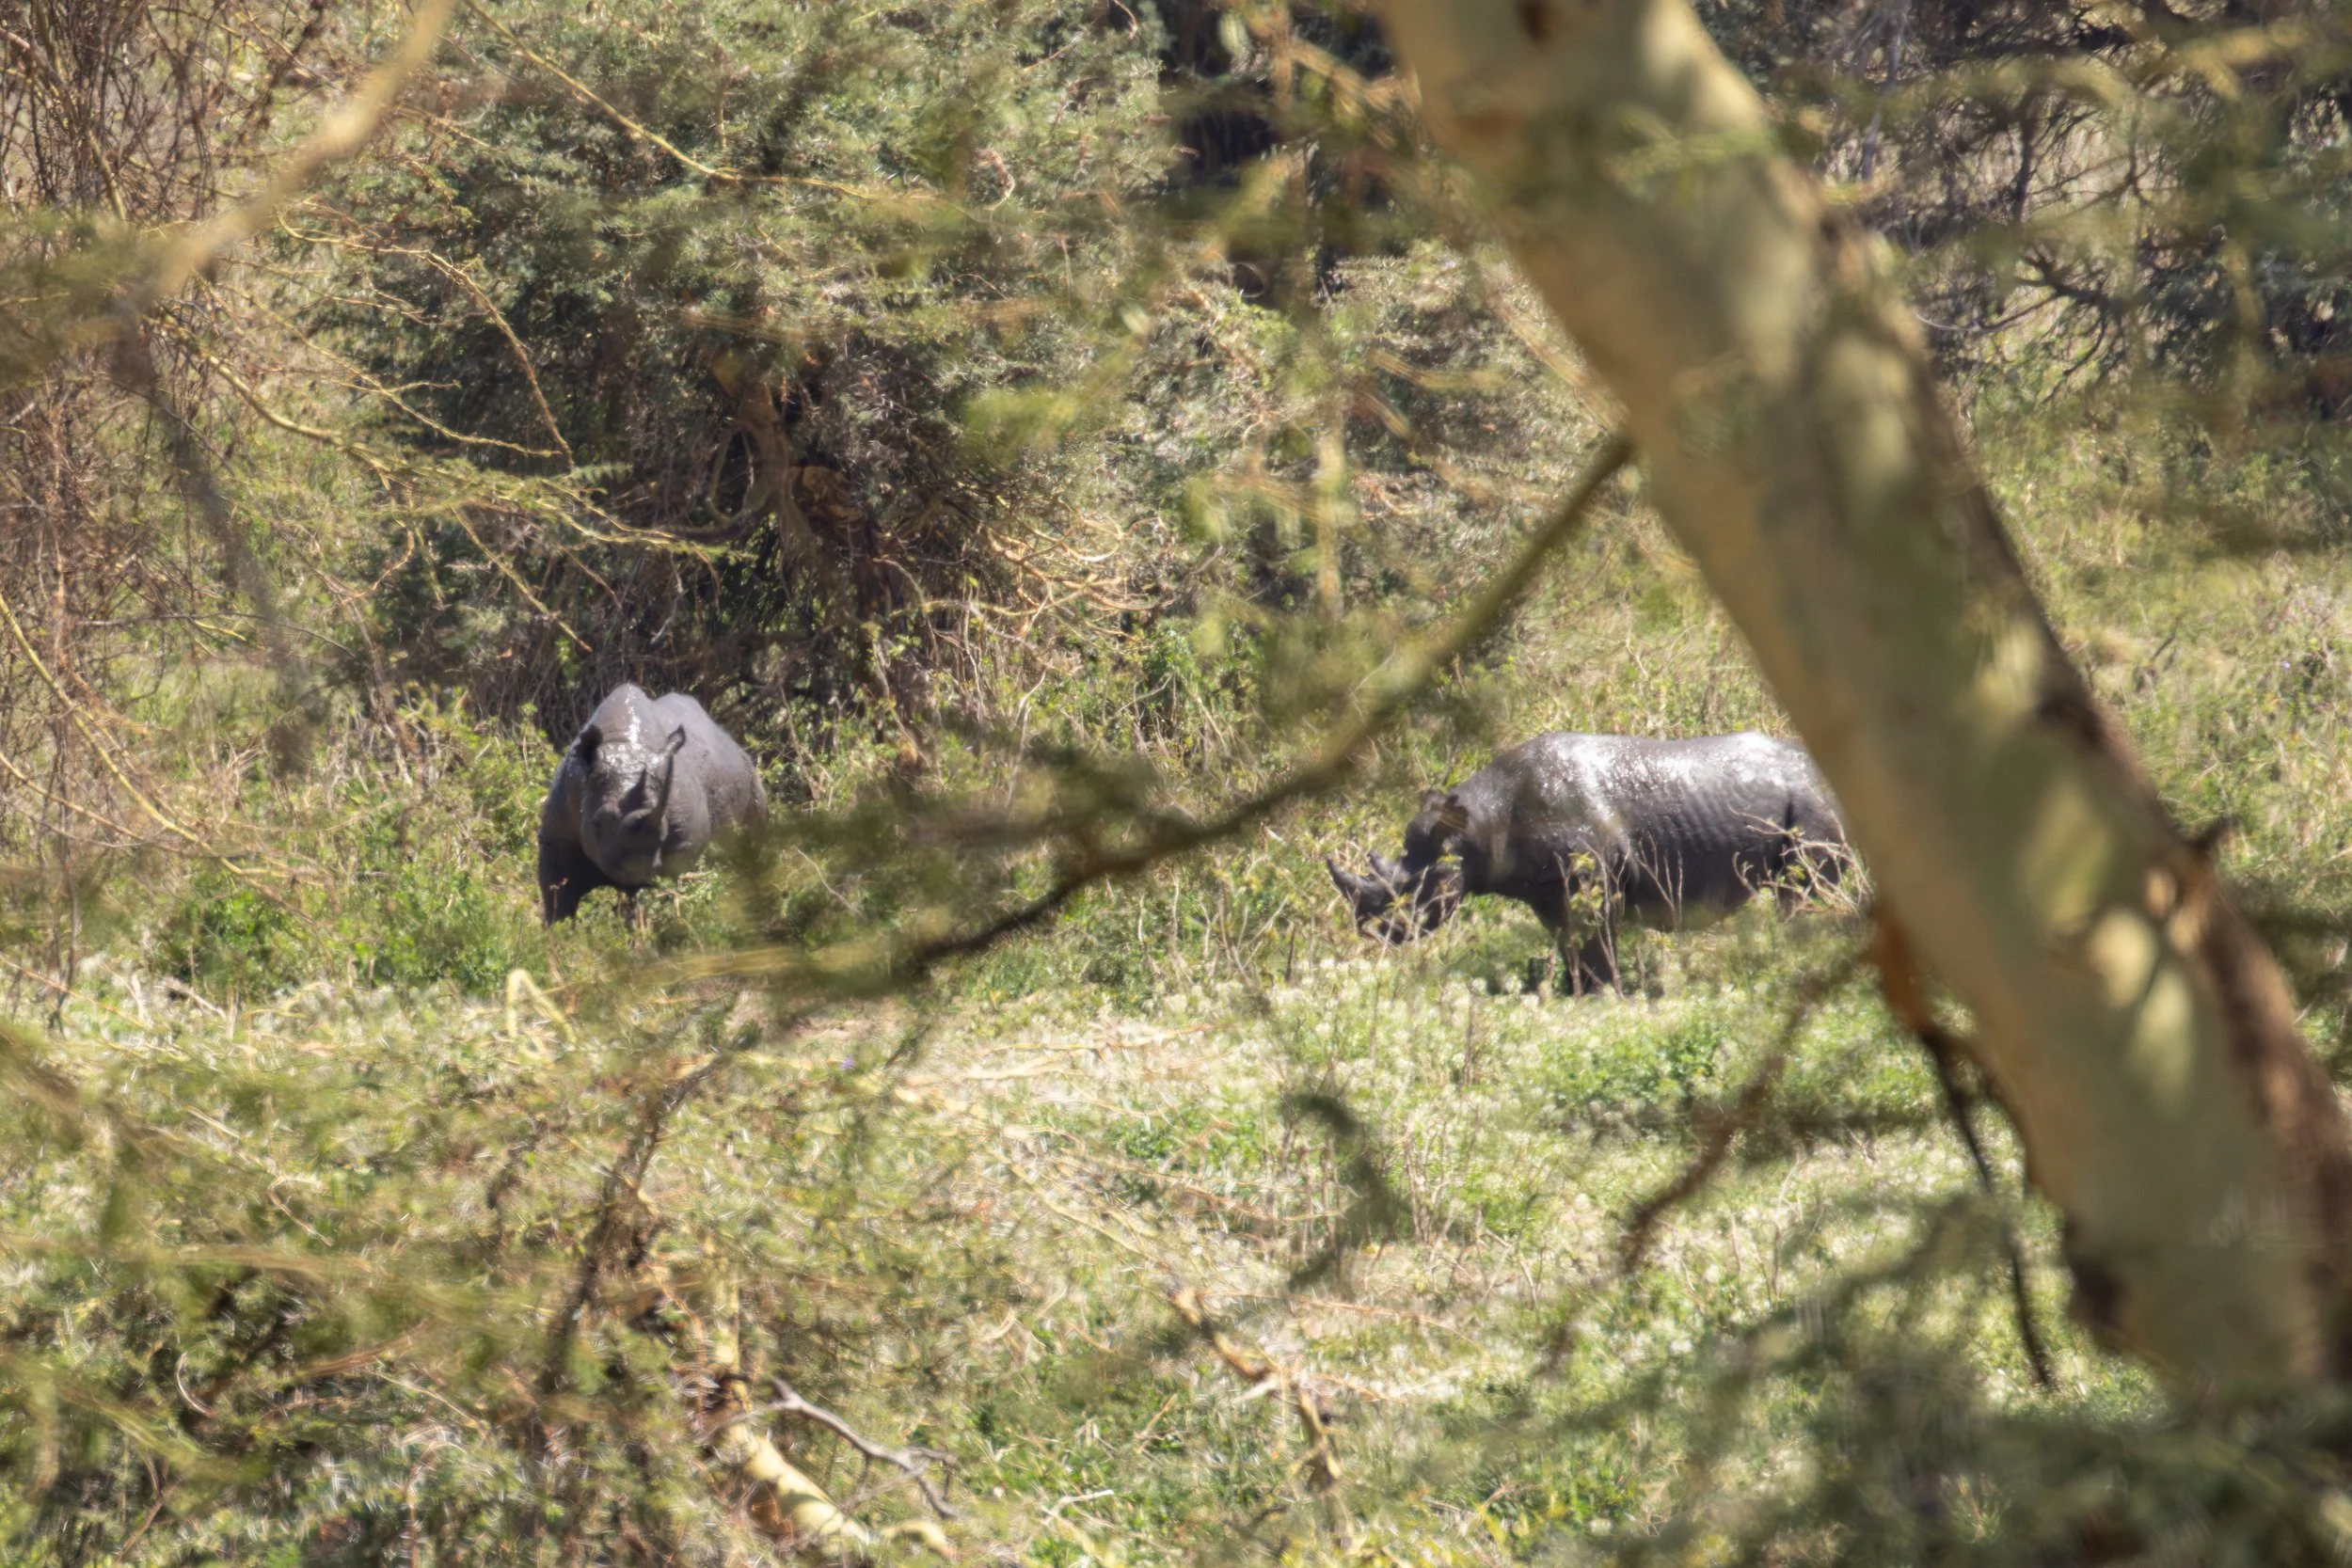
Highly cropped image of two black rhinos deep in the bushes on a hot afternoon in Ngorongoro conservation area. Not a great shot but at least we got to see them on the last day.
Cheetah
From day 1 of the trip, when asked what I wanted to see, it was always a cheetah on the hunt. While I didn't get to see one at full stride chasing an antelope I did get to see a mom with two cubs and three active cheetahs on the plains. I think these were my favourite moments from the entire trip, and something that child watching TV on Saturday mornings can now say he got to see in person.

Cheetah mom and cub on a termite mound to give it a bit better view of anything wandering by
Hippos
Anytime we came close to water and the air smelled rank, there was a good chance that we might be close to some hippopotamus. The rainy season had not quite started yet so most of the time we found hippos in muddy, putrid ponds where they were all squeezed close together. Hippos seem to be rather ornery creatures, but I suppose I would be as well if someone was flinging dung in my face with their tail.

Big yawn, very big teeth and a lot of attitude.
The one thing we watched numerous times that I hadn't expected was hippos rolling over with their feet up in the air on a regular basis. It helps to keep their backs wet and muddy so they don't get sun burnt, and it was amusing to watch.
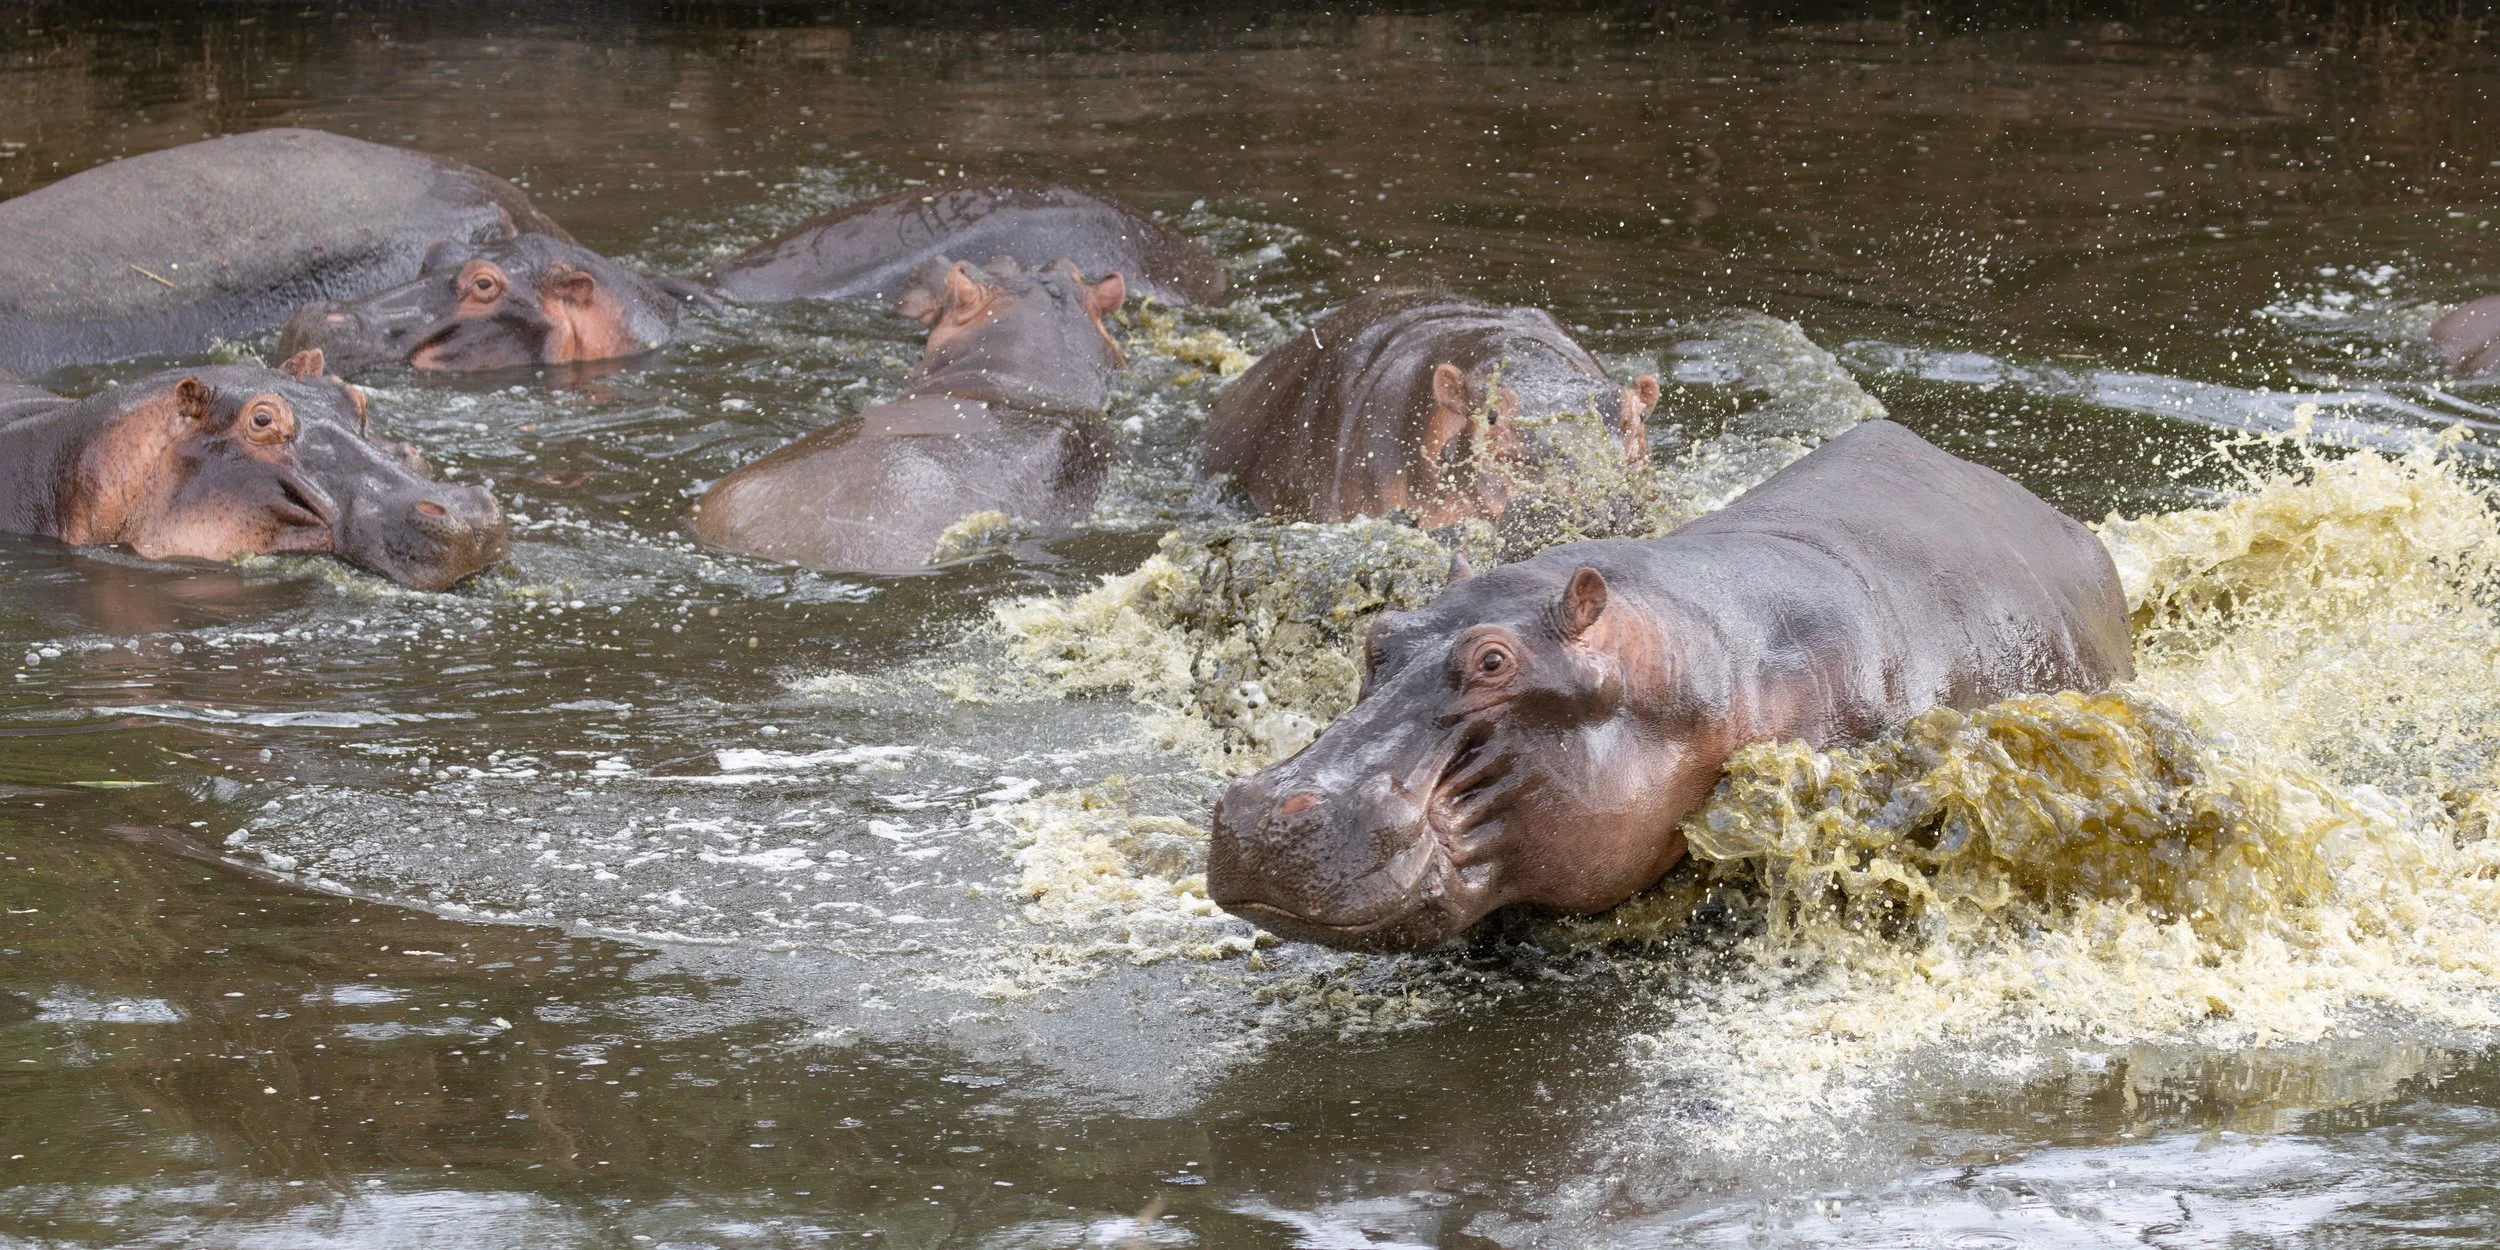
Hippos can move very quickly in water, and tend to raise a good bit of muck while doing so
While we can certainly call the trip a success on the basis of seeing and photographing the big five, there was so much more to see. So many antelopes of different types, numerous birds everywhere, lizards, smaller mammals, and monkeys. We travelled through Arusha National Park, Tarangere, Lake Manyara, the Serengeti and Ngorongoro crater over 10 days. I’ll have many more photos to share in the next few posts. You can take a look at the Tanzania Gallery for some of my favourites.

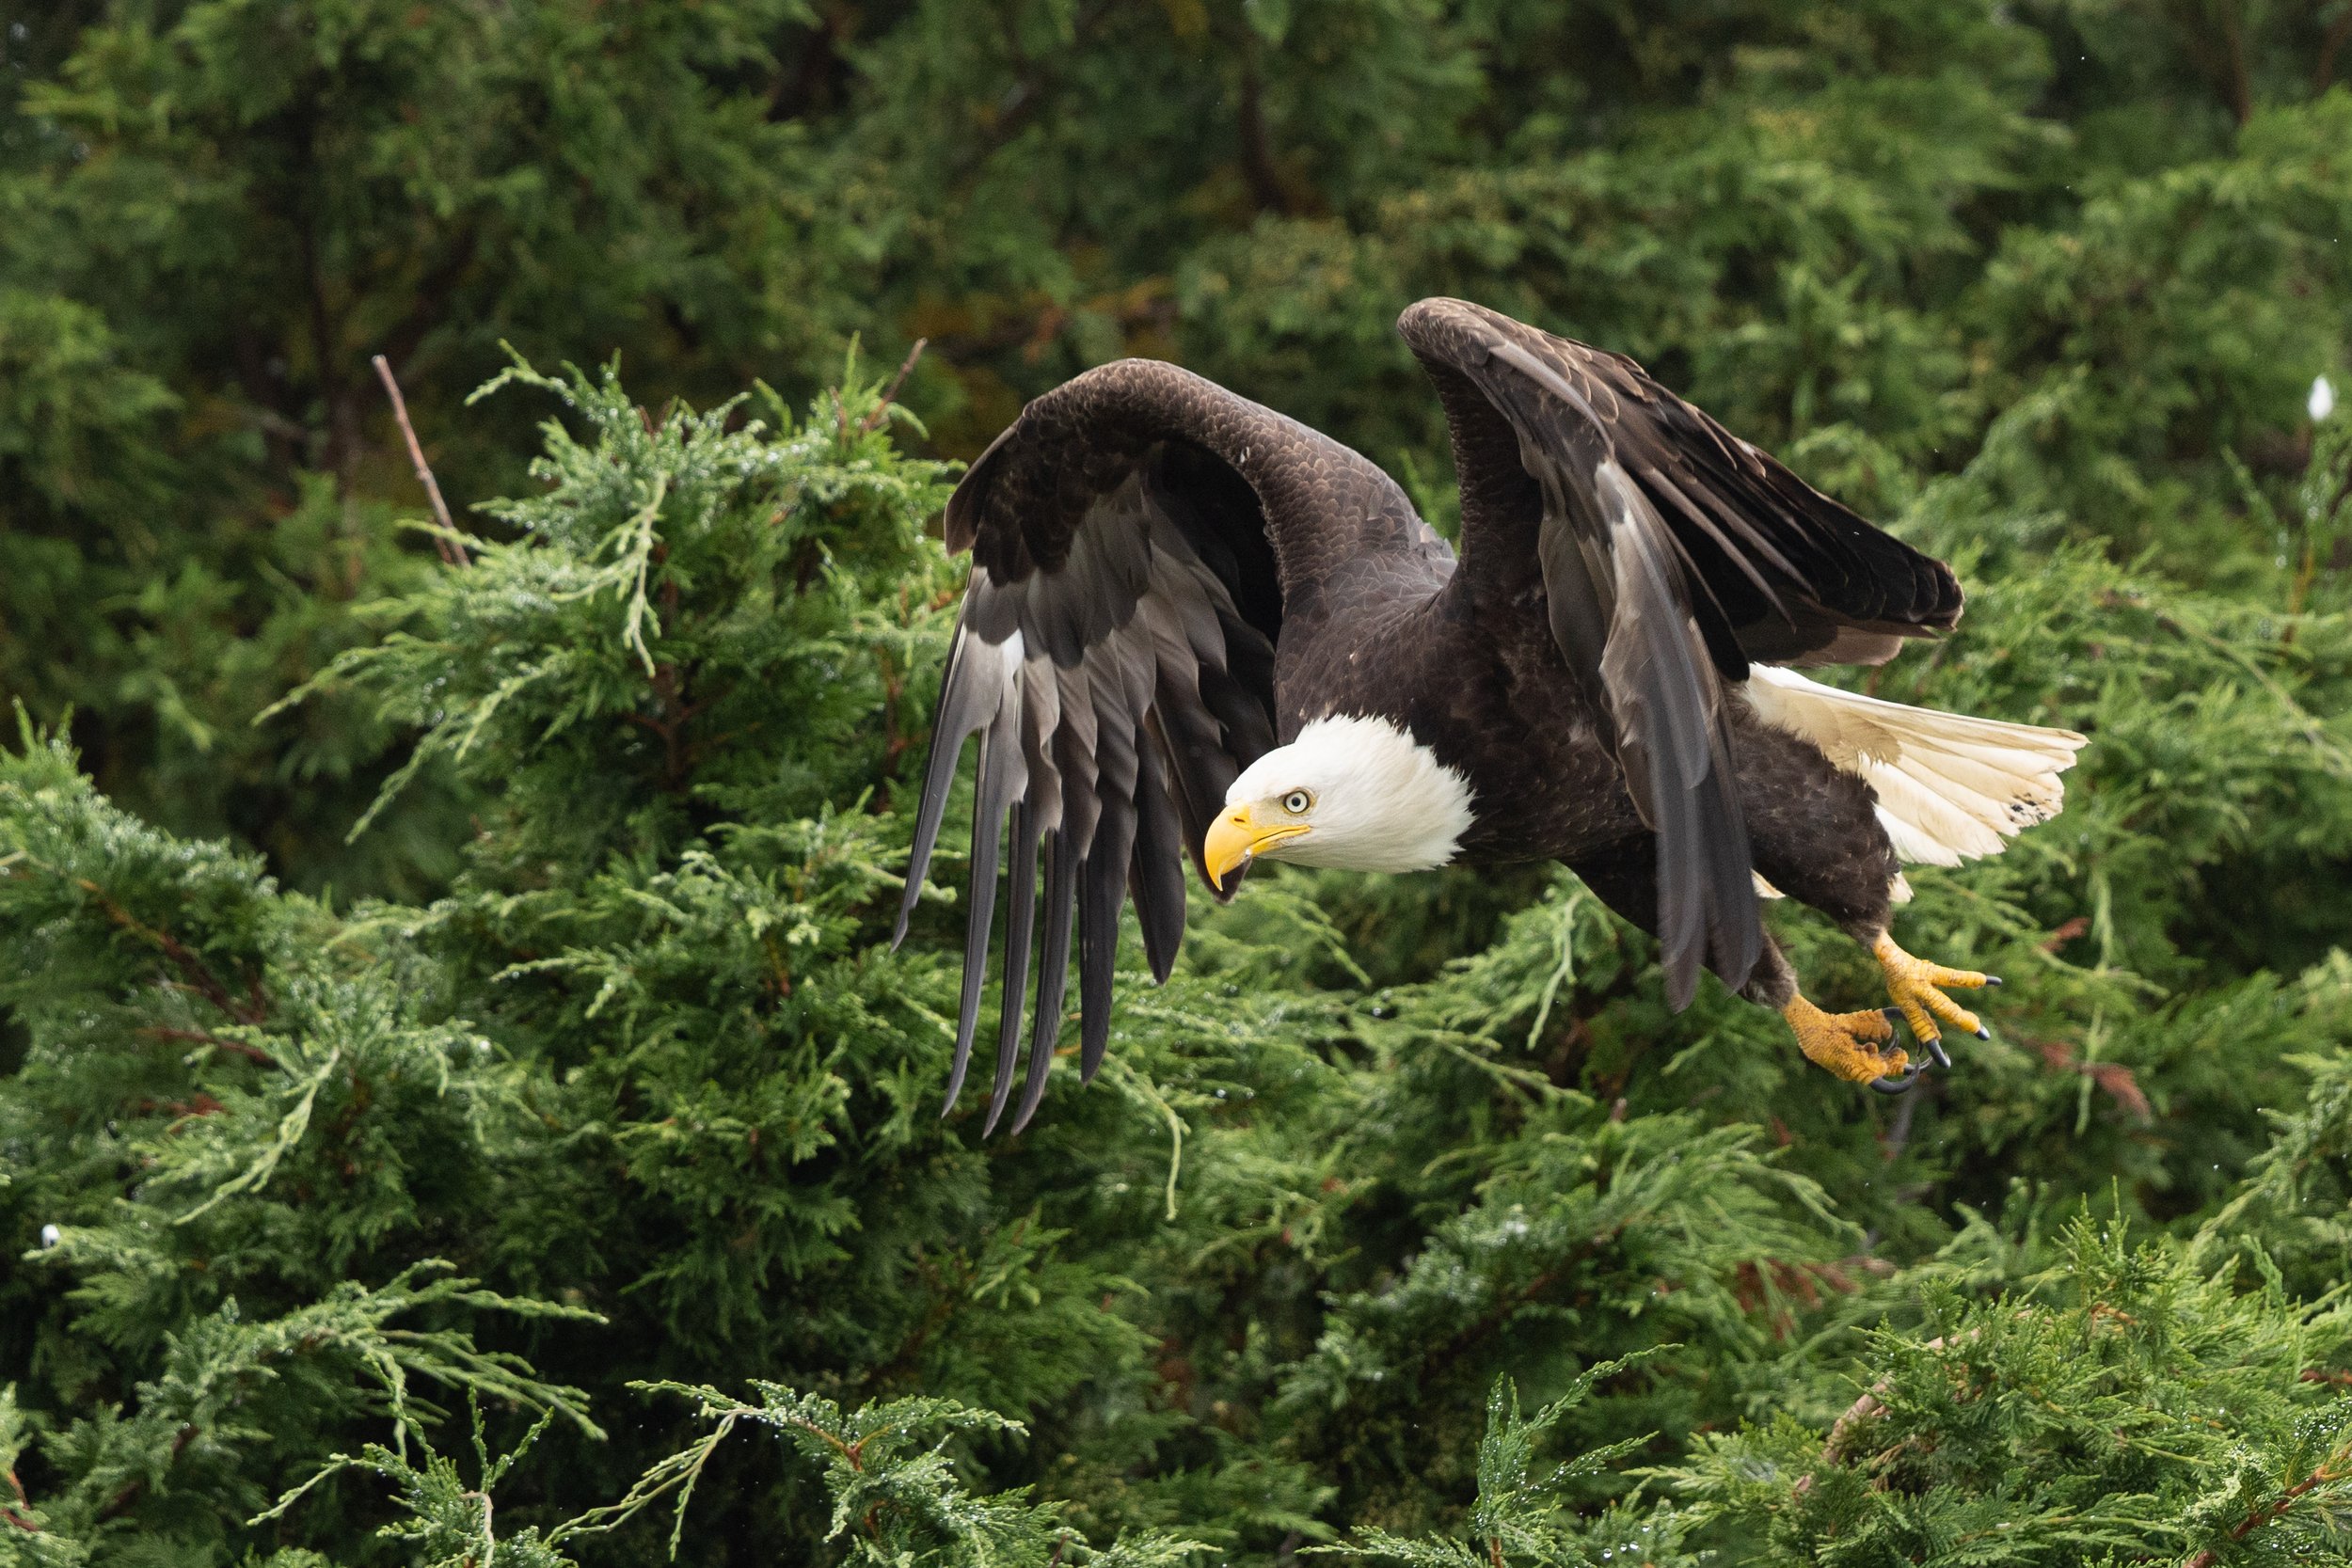
Summertime Bald Eagles - a few pointers for those who want to get some interesting eagle shots.
Summer can be difficult for nature photographers, the spring migration is over and here on the wet coast we are eagerly awaiting the salmon to head up river as autumn arrives. Here in Campbell River we do have a huge number of Bald eagles along the coast in summer and they can be very active fishing off the coast or just grabbing leftovers from the fisher people as they come back from a day on the water.

Bald Eagle taking off along the shore in an industrial area. Certainly not the most beautiful background but it does tell a story.
Summer can be difficult for nature photographers, the spring migration is over and here on the wet coast we are eagerly awaiting the salmon to head up river as autumn arrives. Here in Campbell River we do have a huge number of Bald eagles along the coast in summer and they can be very active fishing off the coast or just grabbing leftovers from the fisher people as they come back from a day on the water. Although the best times of day for interesting light are early morning and as evening approaches, often these eagles are very active in the bright light of day. This can often make shooting eagles difficult as we can have deep shadows and very bright whites just on the eagle. Personally I like having some interesting shadows on some of my bird shots to give a bit more emphasis on the brighter portions but that does mean that I have to be picky about which shots have the light on the most interesting part of the bird….and that means shooting at high number of frames per second. This is a nice option to have as just a few years ago I was getting a maximum of 5 frames per second which meant I often missed that crucial moment when the eyes were in the light. Some of the latest cameras like the Canon R5II that I am using now allow me to get up to 30 frames per second and even allow for precapture so that I get up to 15 shots from before I pressed the shutter button. This really does mean that I come home with a much better chance of having the best shot possible on my memory card.

Eagle in flight on a bright day. Notice the shadows of the wing tips across its neck which gives an interesting added element to this shot. Taken with Canon R5 II with 500 f/4 at 1/4000s, f/4, ISO 320.
Bright days of summer do mean that you don’t necessarily need to have a large aperture telephoto prime to stop motion and get reasonably good detail in the shot. This allows for lenses like my 200-600 which has a maximum aperture of 6.3 at 600 to still be able to get shots at 1/2000-1/3000s at relatively low ISO which means minimal noise. This allows us to get interesting in flight and interaction shots relatively easily.

Adult bald eagle circling near a boat launch while a juvenile eagle sits on the rocks in the background. Taken with Canon R5 II with 500 f/4 at 1/4000s, f/4, ISO 500.
In flight eagle shots can be very fun to capture. Eagles here are often flying fairly low and banking around the beaches looking for fish. If you find a place where someone has left parts of fish after filleting their catches you can easily have a dozen eagles vying for a piece of the easy prize. The eagles also tend to stay around certain beaches as the tide recedes waiting to see what gets caught out of water. In these cases I have found that having a long telephoto zoom allows you to capture many of the fleeting moments that occur sometimes fairly close to you but also nice shots as the birds approach and circle around the scene. My usual starting camera setting for these situations are with the camera set to M (manual but not really), auto ISO (which is the not really), shutter speed of 1/2000s, and the aperture as open as possible. This allows for easy changes to the aperture if you have situations where you need a deeper depth of field, like trying to capture multiple birds interacting. It also allows for quick changes to shutter speed if you need it but still allows the camera to determine the ISO which will usually mean that you let the computer on board determine the exposure as the birds move in and out of the light. Depending on the exposure metering method and how well it obtains automagical exposures you can still change things with the exposure compensation more to your liking as you see your shots come out. Eagles can be difficult as you have white and very dark areas on the bird so it can be easy to blow out the whites on the eagles head if you aren’t paying attention.

Two juvenile eagles fighting over some salmon left on the beach. Because they were so close to the same distance from the camera they are mostly both in focus with the other eagles well out of the range of the depth of focus. Taken with Sony A7R5 with Sigma 500 f/5.6 at 1/2000s, f/5.6, ISO ??
Hot days in the summer do have one major issue for shooting long distances especially close to the ground/water. The further away you try to take a shot the more the atmosphere itself between you and the subject can reduce the perceived sharpness of your image. Especially over water you can often see a shimmering in the air and trying to take images through that is basically not going to produce the best results. Luckily this effect is reduced as you get closer to the subject but just be aware that you may not notice this effect as you are taking your shots until you get back to processing your images.
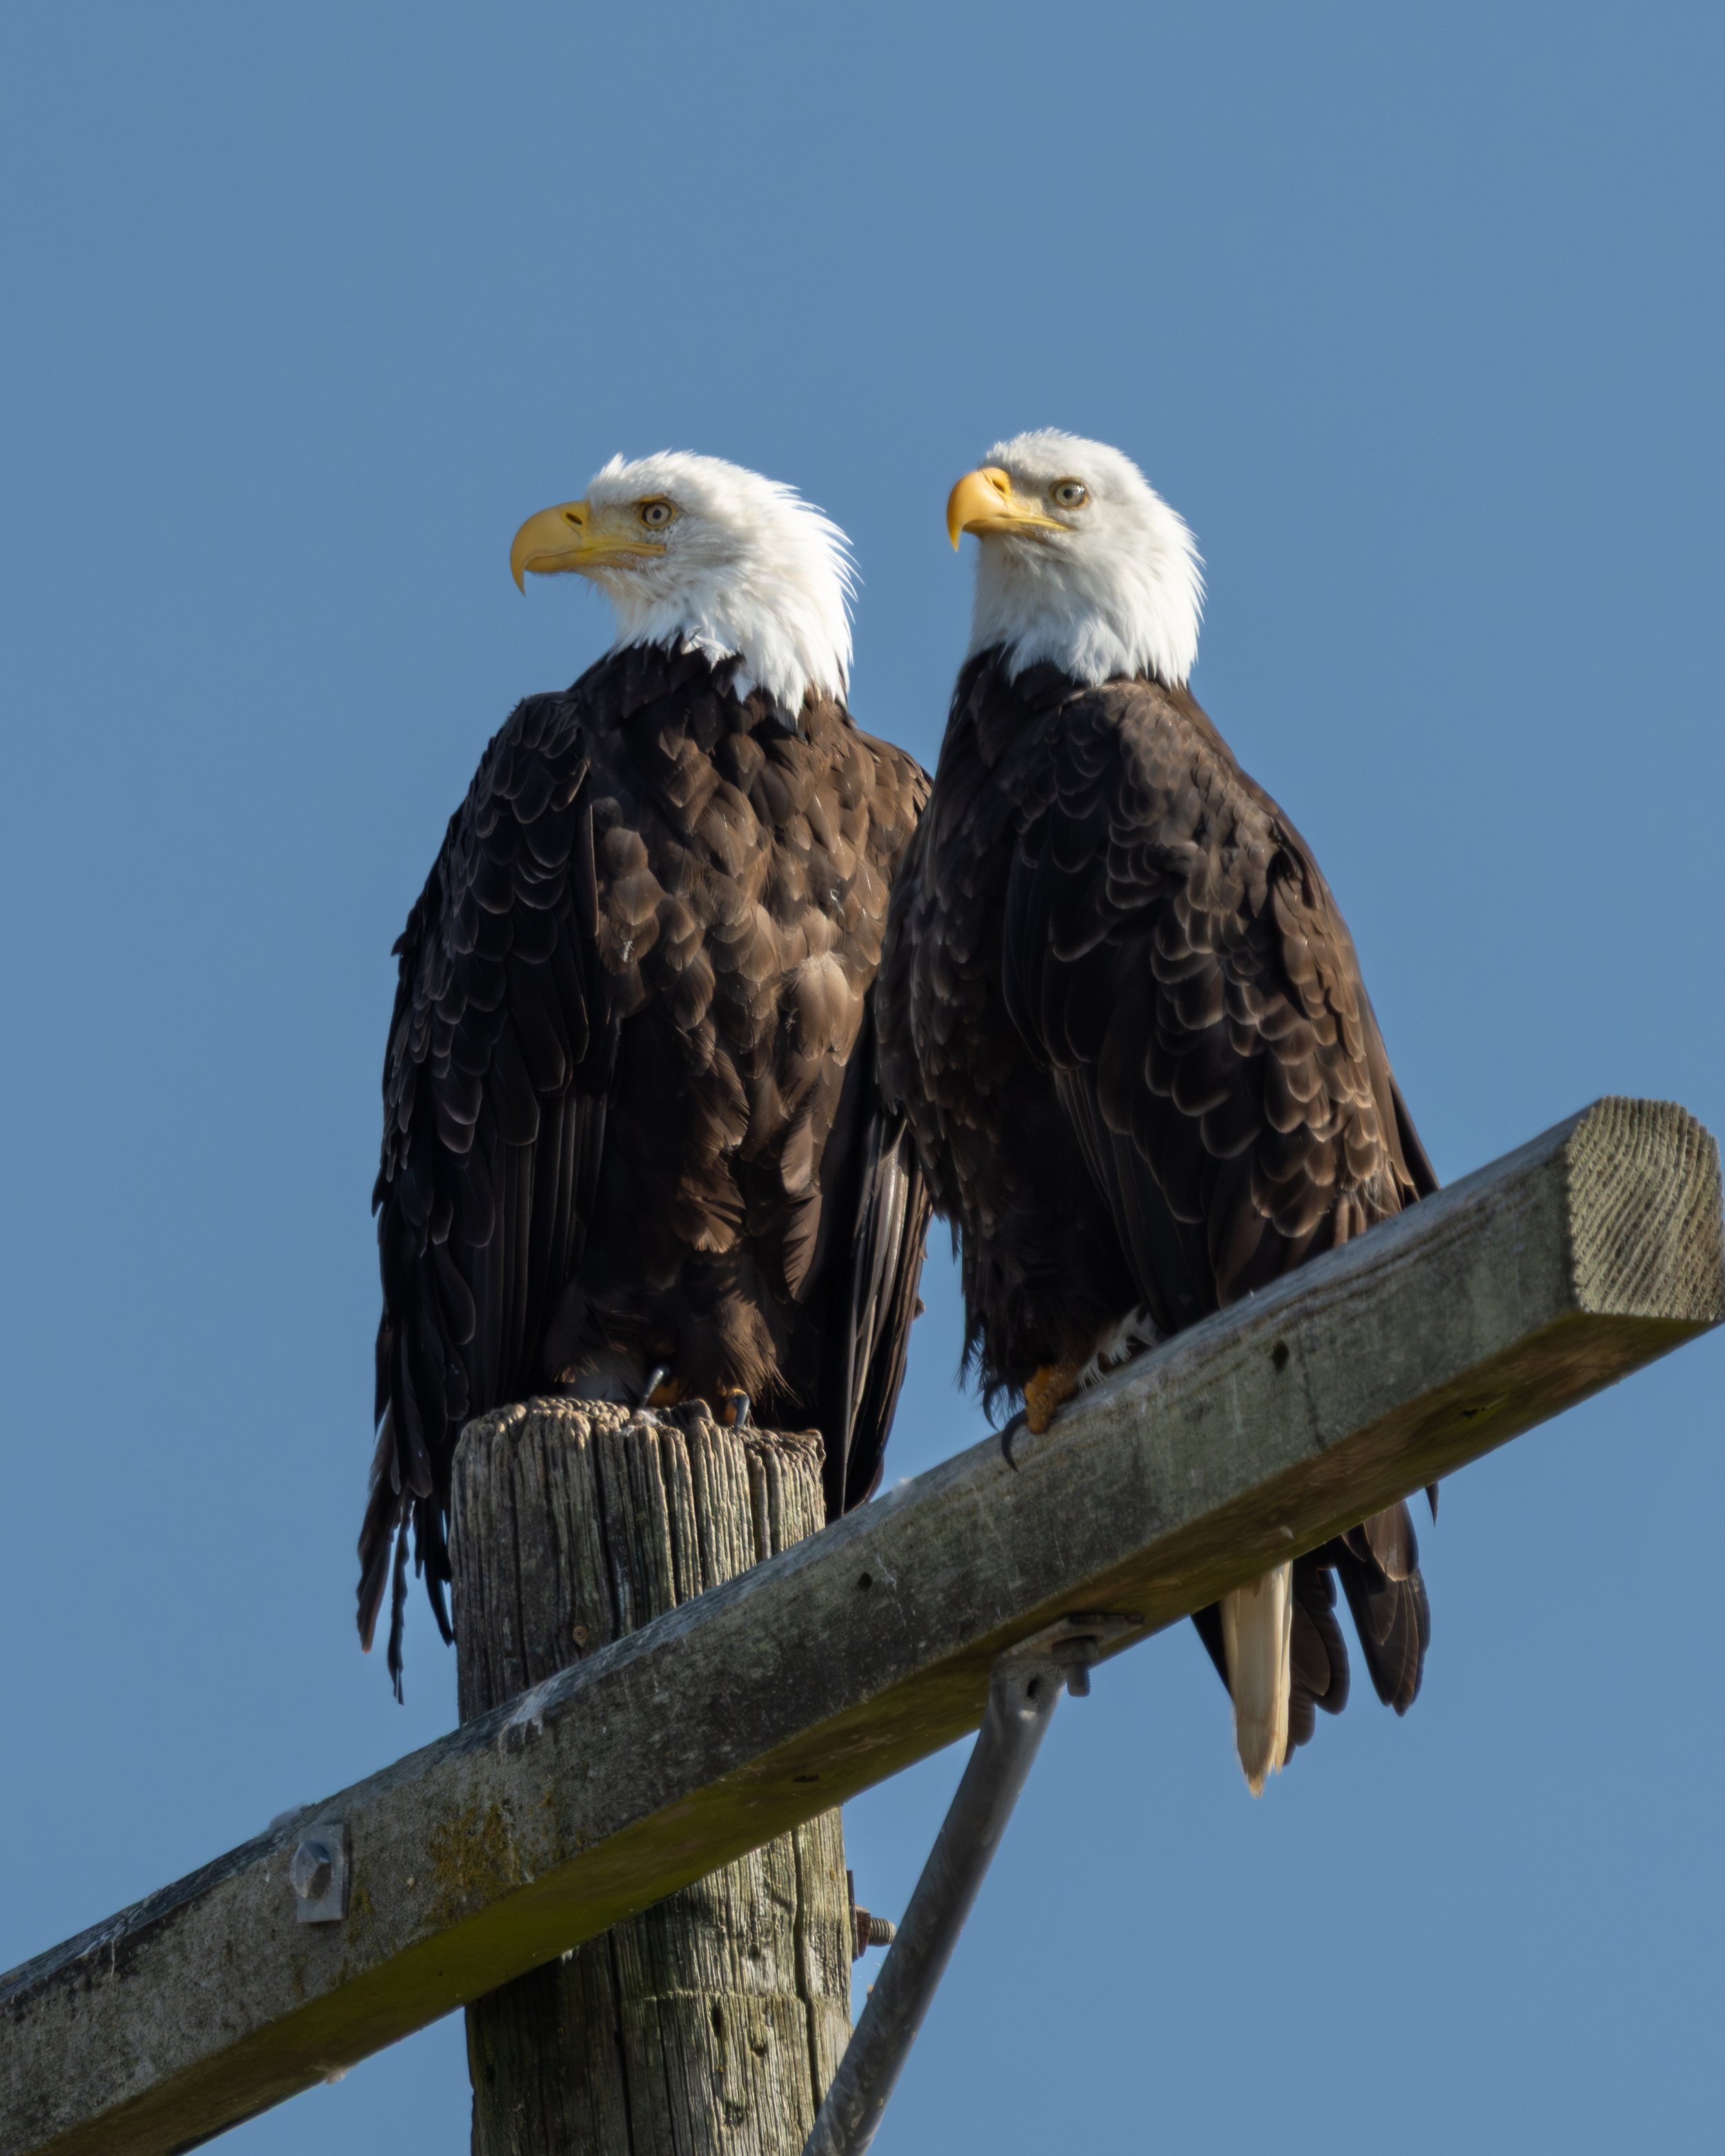
Pair of Bald Eagles on an old phone pole at the local spit. This portrait was taken while waiting for these guys to take off and hopefully do something interesting. Taken with Sony A7R5 and Sony 200-600mm at 600mm, f/6.3, 1/2000s, ISO 320. I could have reduced the shutter speed but since I was waiting for action I had it set at 1/2000s.
If you don’t get to see eagles often, you will likely be happy grabbing some beautiful shots of perched birds often as they are sitting on dead branches looking for their next meal or on the beach at low tide. You can get some fantastic portraits and environmental shots often of single eagles or of small groups of them together. In these cases I will often reduce my shutter speed to get the lowest ISO I can to reduce noise. Once you have those shots in the bag, then the birds in flight shots are often the next target. Although a few shot of the underside of an eagle as it passes over you are kind of fun, I have found the most interesting shots are as the eagle banks and turns. In these cases you can often get beautiful full wing spreads hopefully with the eagle looking towards you (or at least towards the water/ground but in your direction). If you can get the sun behind you a bit in these situations you should also be able to get a good bit of light on the eyes which will really help to liven up the image. As the eagles come down to the surface they will usually start to bring their legs down and open their talons. These can produce some interesting shots and if all goes well you might capture them as they grab a fish from the water or something interesting from the beach.

I managed to get many of the elements that I wanted in this shot, good light, grabbing a fish from the shallows, nice wing spread but I just missed in the wing position being able to see the eyes. The other shots were just before it grabbed the fish and then in the air. Taken with Canon R5II, 500mm +1.4 teleconverter, 700mm at f/5.6, 1/2500s, ISO320
If there is some competition for the food on the beach you will often be able to capture some interactions between the eagles (or eagles and turkey vultures, ravens, or gulls). In these cases a slight increase in your aperture value to increase the depth of field can help to get a shot with most of that action in focus. Determining the amount of increase in depth of field depends on the focal length of the lens, the distance from the subject and the sensor type. Having a tool on your phone like PhotoPills can help you to determine how much extra depth of field you can achieve but it is always going to mean that you have to give in to either higher ISO or lower shutter speed. I much prefer to deal with a bit more noise in these situations that to have blurry action due to slower shutter speeds but this is something you will need to determine for the situation you are in. If you have the time (and can move around the scene) you can improve your chances of getting things in focus by moving around until the birds are closer to the same plane of focus. This may not be possible if the action if happening quickly or you are on a cliff/waters edge.

As this eagle circled about I was able to get in a location that gave me nice light, and what I considered a nice background since the other directions were pure blue sky or houses along the shore.
If you have a choice of location then there are a couple other things to consider. The first for me is the direction of the sun, most of the time I prefer not shooting into the sun (there are always exceptions to this). The second for birds is the wind direction. Most eagles will tend to take off into the wind so if you want those shots you will have a higher chance if you put yours slightly upwind of the bird so that it takes off towards you. The last major thing I consider is the background and foreground of the shot. Once the other two conditions have been given me a general location then determining a nice background (and sometimes interesting foreground) can take a clean shot and make it a much more interesting one.
With the salmon leftovers on the beach quite a few eagles were fighting over the spoils. In this case I did not have many options for shooting locations as I had only a small spot on the beach to observe. With only a prime lens I had to choose for close up action shots at a high shutter speed.
I hope some of this helps anyone who is interested in photographing eagles. Here on Vancouver Island in the summer you will get many chances to practice and hopefully capture some fantastic shots.
A bit different shot with the wings half cocked and the cedar bows as a close background. This background isn’t too distracting since it is all one set of textures and colour shades.

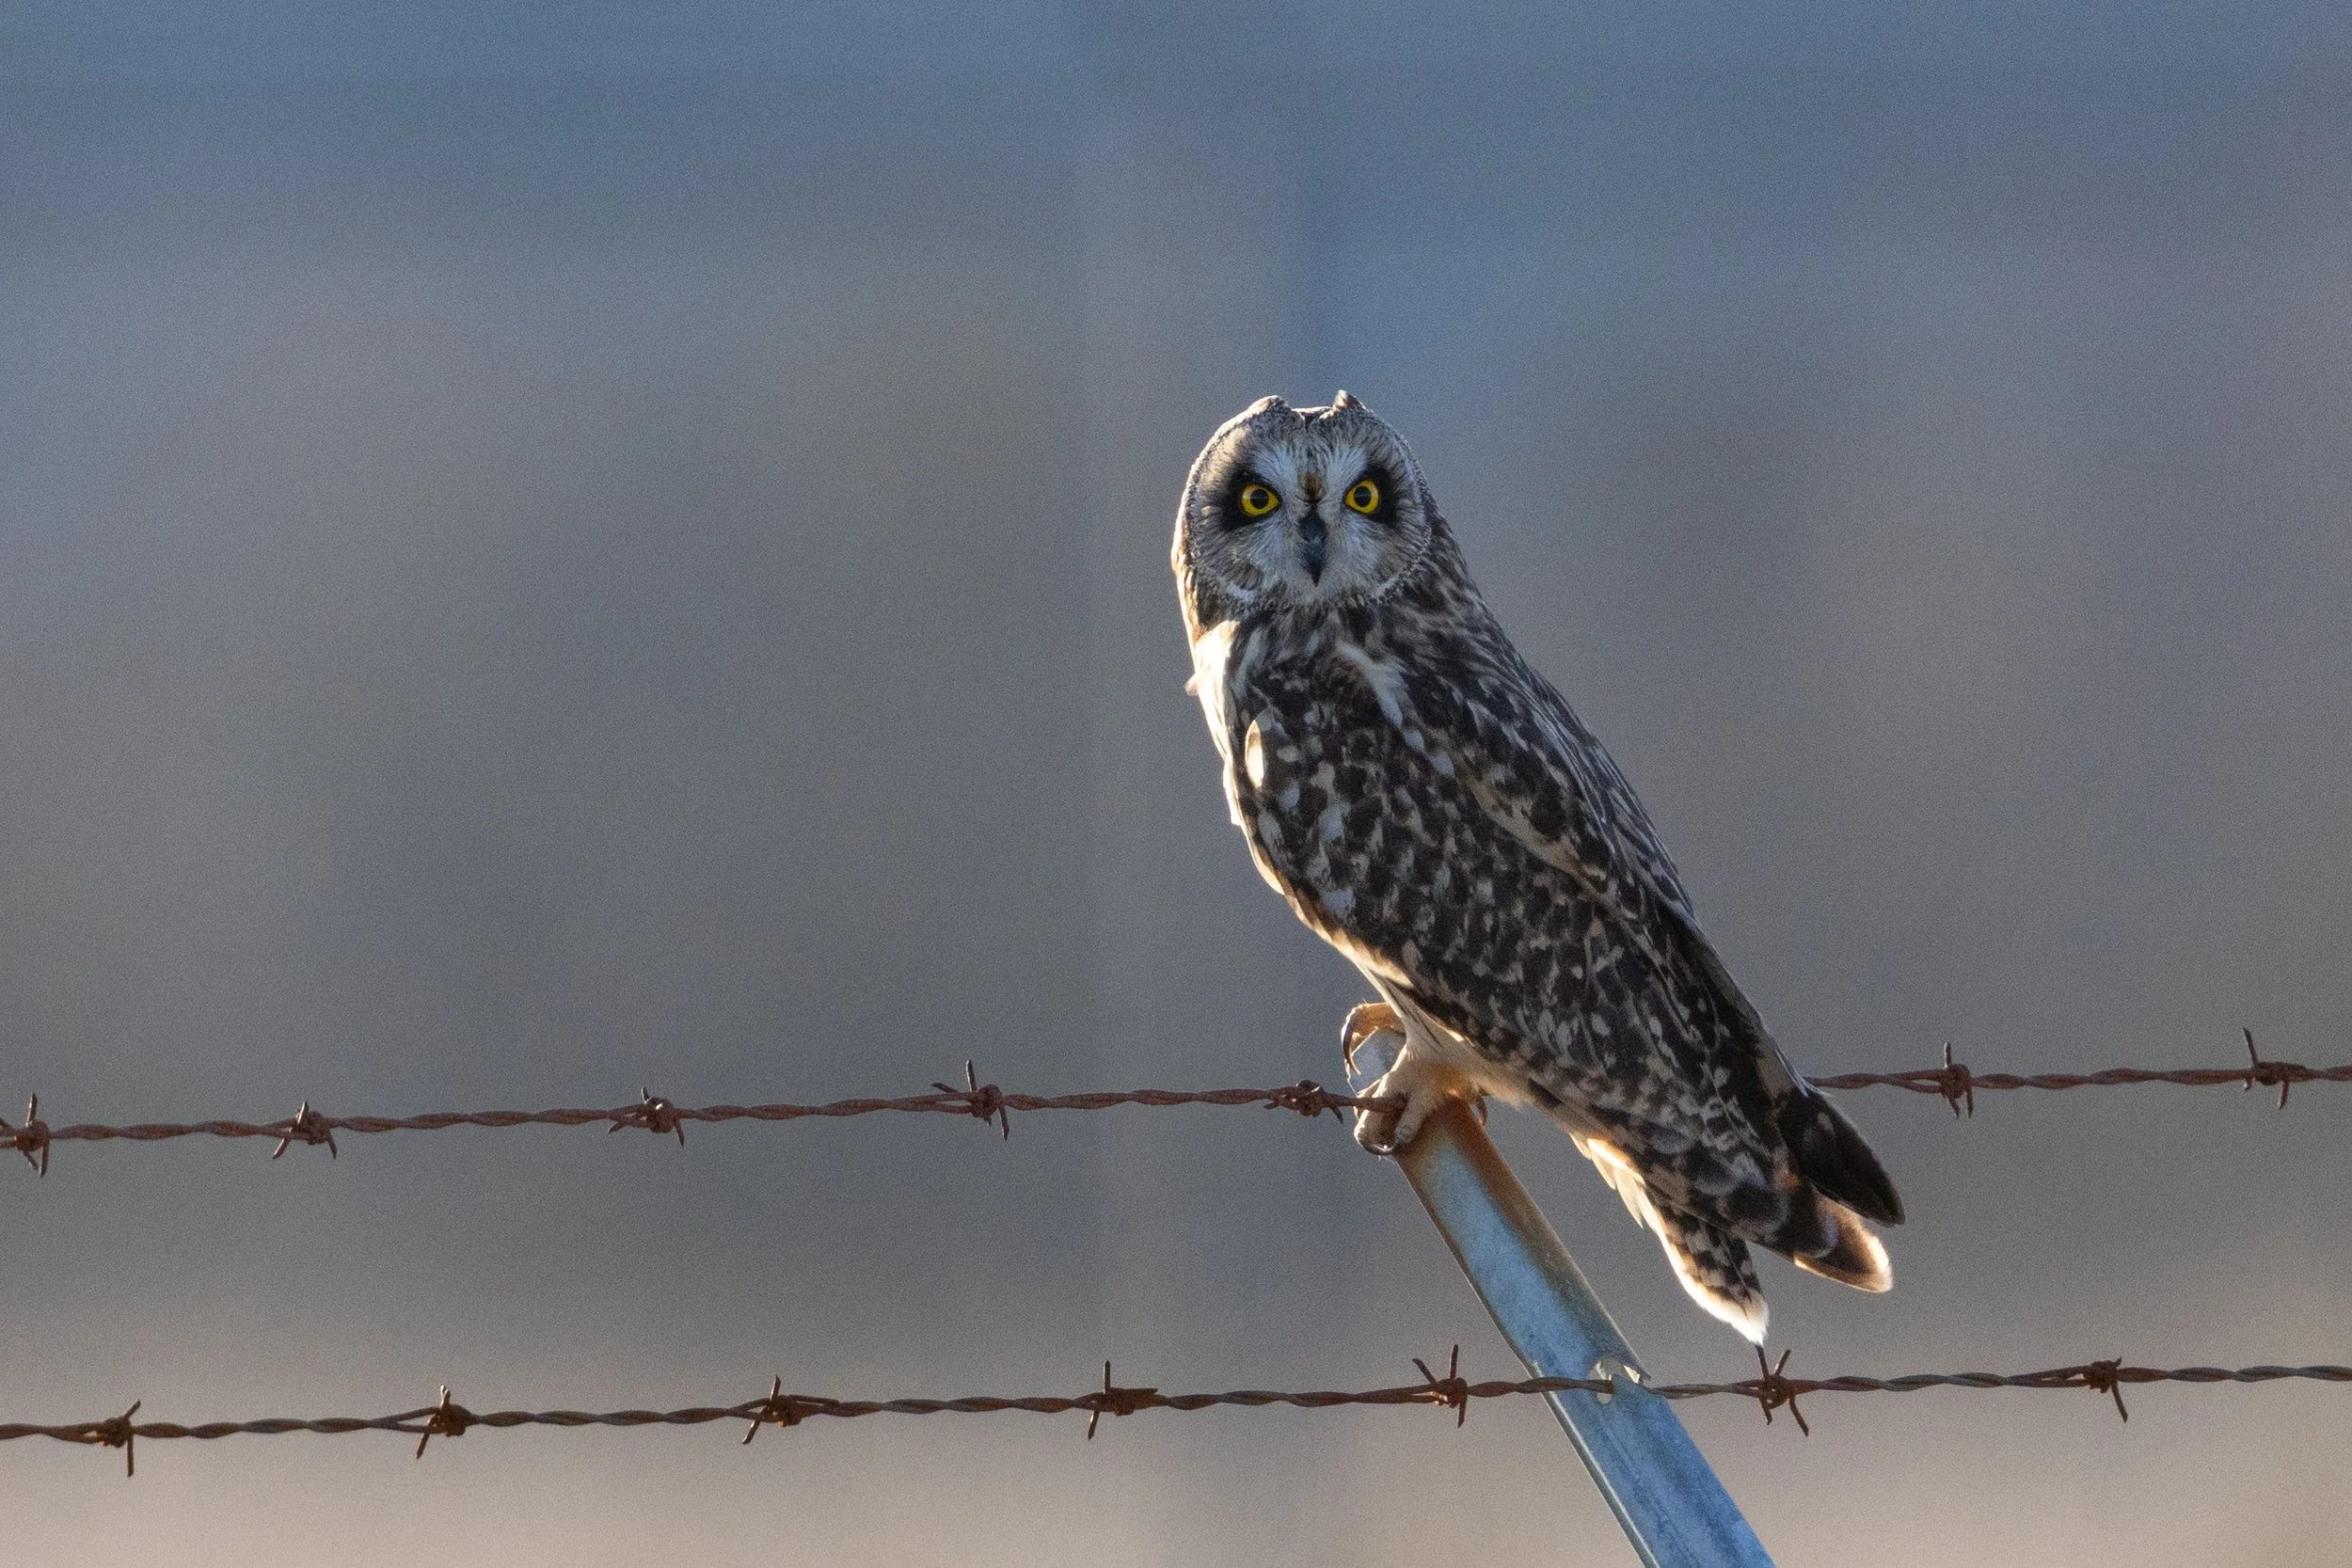
Persistence and Patience - Short eared owls
Sometimes there are dry spells, sometimes months between interesting moments when you do nature photography. After the Salmon spawning season last fall I have been experiencing one of those times. Three months of rain nearly every day then a cold spell made it difficult to get out much in a time of the year when there often isn't much to shoot. Even when there may be something out there you still need a good deal of patience.

Sometimes there are dry spells, sometimes months between interesting moments when you do nature photography. After the Salmon spawning season last fall I have been experiencing one of those times. Three months of rain nearly every day then a cold spell made it difficult to get out much in a time of the year when there often isn't much to shoot. Even when there may be something out there you still need a good deal of patience. Since moving to Vancouver Island just around a year and a half ago I have been looking into areas in which I might be able to find different types of owls and other birds of prey. Eagles are very abundant here and there are some very good times of the year to photograph them but other birds of prey are a bit harder to find here than in other areas I have lived. Determining where to find birds can take a long time if you don't have any local knowledge and I'm building that slowly but surely. Barred owls are in the area and I've seen a few but don't currently know of any good spots to reliably find them. Great horned owls are less abundant on the island but can be found. This will take some footwork getting out in the evenings and mostly just listening for them at dusk.

Pygmy owls have been kind of elusive, I have seen a couple but currently do not yet understand their habits to reliably figure out where to find them. Short eared owls, however, are a bit easier to figure out. These owls tend to like to hunt over open fields with good trees to hide in nearby. There are often found in fields that northern harriers also hunt in. I also had some intel on a couple of locations that they had been seen. Short eared owls are a bit more predictable in terms of when they like to hunt, they will hunt anytime during the day but tend to prefer to come out an hour or two before sunset. This is a good thing from a photography perspective as it is the nicest light to catch them as they swoop along the fields and drop down on unsuspecting rodents.

This is where persistence comes to play. Knowing where they have been and when they usually start hunting is a good starting point but like most animals they don't tend to put up a schedule so the best you can do is try to be in the right location at the right time. This year it took me 5 separate trips to 2 different locations to finally get a chance for some shots. For most people spending 20-30 hours standing outside often in the cold and rain for a few minutes of being able to capture some interesting shots of a owl in flight seems silly but for me it was all part of the fun and I will almost certainly spend significantly more time in dry spells hoping to be able to see that interesting moment that I have in my mind or one that I never expected. In fact I have just recently spent a good 8 hour day searching for pygmy owls and came up with nothing and am already planning my next road trip to try again.

For me, the time with those creatures is well worth all the time, walking, cold, and even sometimes the boredom. The photography is the reason that I do it, but even before I did photography I used to spend almost the same amount of time out in nature just watching and trying to understand it a bit more. Hopefully the pictures I have shown today are worth the few minutes of reading this article, they were certainly worth the time I took to get them! See below for a small gallery of pictures from an afternoon shooting 3 short eared owls and their interaction with a north harrier.


Second tier Nature photography setups from each brand.
If you are, or want to be, a nature photographer there is a bit of gear that is actually necessary to be able to do so. Most of us are aware of the high-end gear, those huge lenses that cost as much as a small car, and the high speed, high resolution cameras that the companies show off with all the latest tech (or so we are told), and if price was no object, or if it is your full time job and can write the expenses off, then this article isn’t for you!

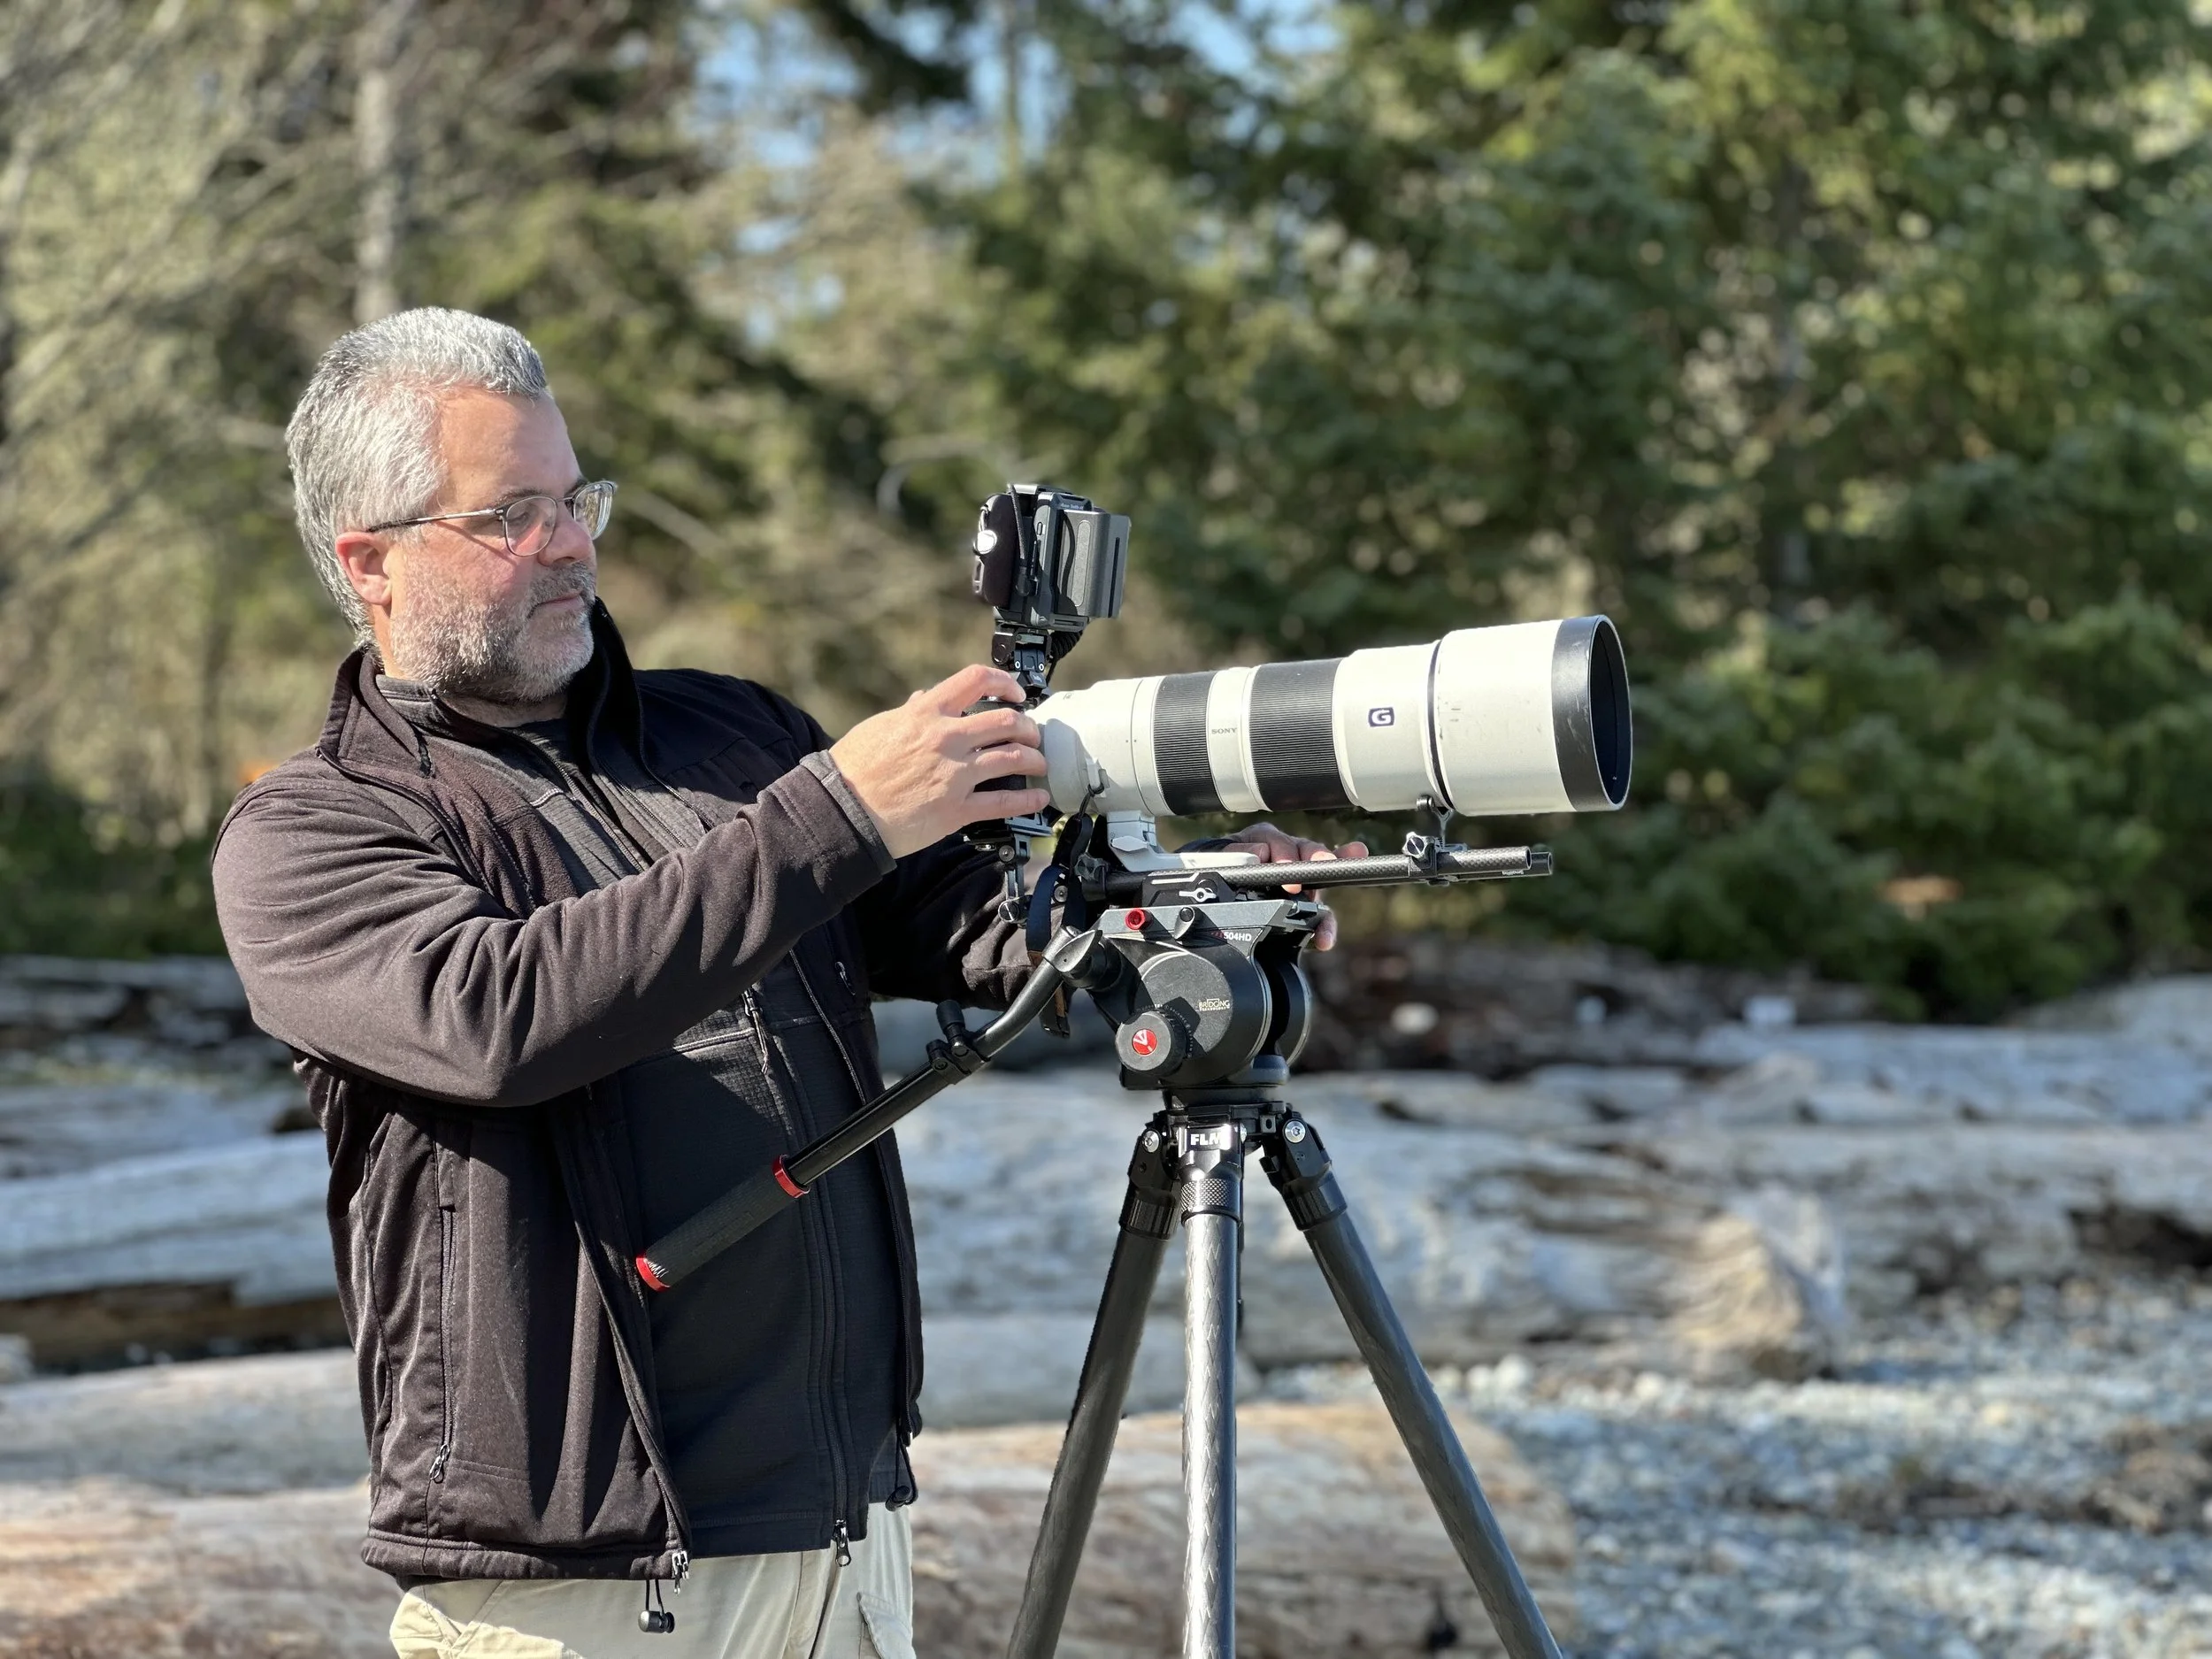
From a few years back carrying both Canon and Sony gear while shooting elk in the Cataloochee Valley
If you are, or want to be, a nature photographer there is a bit of gear that is actually necessary to be able to do so. Most of us are aware of the high-end gear, those huge lenses that cost as much as a small car, and the high speed, high resolution cameras that the companies show off with all the latest tech (or so we are told), and if price was no object, or if it is your full time job and can write the expenses off, then this article isn’t for you!
For those of us who do this as a hobby (or slight obsession) we can't always afford the biggest and most expensive even if we might dream big. 20 years ago this meant that what you could produce with mid-range gear was unlikely to be on par with what was produced by that from the top tier. Over the past 5 years, with the improvements in autofocus, frame rates and noise levels of current sensors along with the massive improvements in sharpness of almost all lenses, the gap between a 2nd tier set of gear and the best of the best is not nearly as wide as it used to be.
There is still a lower, more inexpensive tier that when I started was very slow and not very sharp. Even beginners looking to get into nature photography can find "reasonably priced" long telephoto lenses along with useful crop sensor cameras that are adequate enough, that is until they start looking in depth at the details. The lowest tier is how many photographers get into nature photography. They either already have a camera that they may use for other genres of photography or they are just looking to purchase their first camera. At this point most will figure out they need a longer telephoto lens to be able to capture birds or animals and they often start with a typical 70-300 or 3rd party superzoom. Back in the early days of digital photography these lenses were really subpar both in terms of sharpness and with how well they could focus on a moving target. This didn’t matter too much at this point, as getting those first shots was a huge part of getting hooked on this type of photography. You could finally get a reasonable closeup shot that at least resembled what you may have seen on National Geographic back when magazines were a thing.
Over time, if you kept on with nature photography, you may have started the incremental journey to better gear. This is where the 2nd tier fits in and it basically consists of all of the options for nature photography except the cost prohibitive top tier cameras and the big super telephoto lenses. Below I’ve summarized the useful gear combinations I would have in my camera bag and the reasons why I made those choices depending on what I'm actually shooting.
Canon
Let's start with Canon since that is also where I started my journey.
First off let's start with the camera. My current choice for a second tier nature camera would be the R5 mark II and up until recently I used the original R5. This camera is not considered the top of the line by Canon but I think for many nature photographers it may well be their first choice. Currently the first tier is the R1 and R3 which may be comparable but neither has the resolution of the R5 II which, for me, has almost always been more important than how many shots I can take per second. There will be some people who like the larger camera and battery in the field, but I have found that it is just as easy for me to carry a few batteries (warmed in my pocket) and I actually prefer to have the smaller body since I mostly hold the gear by the lens. I do not find balance to be an issue as much as weight.
Now this camera and its predecessor have fantastic autofocus for animals and birds, and the new R5 II has a stacked sensor to allow for silent shutter without artifacts due to that quick sensor. If you are moving up from a crop sensor camera or lower resolution full-frame camera, you will find the results to be pretty amazing and you will be able to crop into your shots significantly when you can't quite get close enough to the subject (which happens more often than we would like).
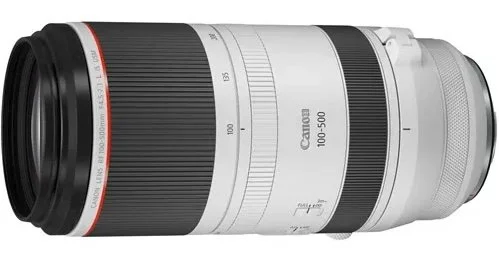
Now the issue at the moment on the Canon side of the world is with finding good but not too expensive second tier lenses for nature photography. The 100-500 RF lens is good and sharp but quite slow at the long end and is a challenge to use with the teleconverters since you don't get the full zoom range when teleconverters are attached. This may not be a big issue if you mostly don't shoot in low light. This is also not an inexpensive lens coming in just under $3000 USD. A good alternative is the EF 100-400 f4.5-5.6 IS II which is very sharp and a little brighter but doesn't have that extra reach. It does however handle the 1.4x teleconverter very well and gives you a full range of 140-560 at around f/6.3-f/8. There is also a new RF 200-800 f/6.3-f/9 which gives a significantly long range but at the expense of being a very slow lens and it extends with a very long zoom throw. Now the leap from this second tier to the top tier lenses on the Canon front garners a huge price increase and there are not any choices between these lenses currently and the big white primes or the 100-300 f/2.8. If you find the 2 Canon RF lenses useful then you have a solid base system but your choices are a bit limited at the moment unless your budget is closer to top tier. There are currently no 3rd party lenses for RF that can be used and 3rd party EF lenses are more on the beginner side of things (except for a few older Sigma lenses that you might be able to pick up relatively cheap).
The two major options on Canon for 2nd Tier are below.

Canon R5 II
Canon R5 II, RF 100-500 f/4.5-7.1 approximately $6900 USD

Canon 100-500mm
or slightly lower cost option:
Canon R5 II, RF 200-800 f6.3-9 approximately $6200 USD

Canon 200-800mm
Sony
Sony on the other hand does have their long telephoto lenses in a similar range to Canon but the options are quite different. There are however not as many choices on the camera side at the moment. The best choice from my perspective is the A7RV which has a 60 MP back side illuminated sensor but does not have a stacked sensor like the Canon (or Nikon). This camera can shoot at up to 10 frames per second with the mechanical shutter and has an electronic shutter which is basically useless for anything other than static subjects as the readout time of this sensor is one of the longest of any current camera. For the same price range, there is also the A9II which does have the stacked sensor but has "only" 24 MP sensor and does not have the latest autofocus algorithms which I also use. For the most part, the A7RV is, for what I do, the best 2nd tier choice at the moment from Sony.
Unlike their competitors, Sony doesn’t currently have a high-megapixel stacked sensor camera at a 2nd tier price point, and likely won't for the foreseeable future now that they have just released the A1 II for their top tier option.
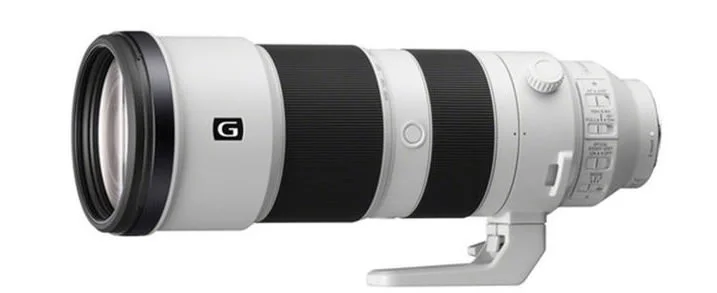
On the lens side of things we have the standard 100-400 f4.5-5.6 that is very sharp. This lens is still not cheap but has a good range and has been a staple for nature photographers for a long time. The standout lens for me is the 200-600 f/5.6-6.3 and is likely my most useful lens. This is a relatively slow lens but has a bunch of features that make it amazing. The internal zoom and short throw on the zoom make it really easy to use. It is not quite as sharp as the 100-400 at 400 but is sharper than using a 1.4 teleconverter on that lens at the top end of the zoom range which is really where I use the lens the most. There are a number of other options depending on your requirements from 3rd party lens makers that are very high quality. The Sigma 500mm f/5.6 is a reasonably priced very light and small prime lens that is a fantastic option. Keep in mind that Sony will not allow you to use teleconverters with 3rd party lenses. I would consider the Sigma and Tamron 150-600 options to be more of a beginner lens option but Tamron does have a really useful 50-400 f/4.5-6.3 which may be a little slow but is great for those times that you may need more zoom range in the field. If you are doing more environmental nature shots, Tamron also has a really fantastic 35-150 f2-2.8 lens which is rather unique in the market compared the to usual 70-200 f/2.8 that all companies have.
The two options I would look at currently for Sony E-mount are ( I currently own both lenses and the A7RV):

Sony A7RV
Sony A7RV, FE 200-600 f/5.6-6.3 approximately $5300 USD

Sony 200-600mm
or
Sony A7RV, Sigma 500 f/5.6 approximately $6100 USD

Sigma 500mm f/5.6
Nikon
Nikon has probably the most interesting options at the moment for 2nd tier gear with a reasonably priced Z8 stacked 45 MP camera with some fantastic features for nature photography and after some of the latest firmware updates, has much improved autofocus that at least is close to what Canon and Sony currently have. This camera is similar to Nikon’s top tier Z9 camera but with a smaller body at a price that is much lower than the Canon R5II and equivalent to the Sony A7RV.
On the lens front, Nikon has the typical 100-400 option and much like Sony now has a 180-600 f5.6-6.3 which also is an internally zooming and relatively inexpensive option that provides very similar quality as the Sony option. That lens and the Z8 are likely the least expensive high quality option out there at the moment and would be the combination I would likely advise people to choose if they were not currently already using gear from one of the other companies even though I have never really used Nikon gear for any length of time myself.
Nikon also has some options for prime lenses that no one else currently has that are considerably less expensive than the usual big primes. There is a 400mm f4.5 for around $3000USD, a 300mm F mount f/4 at $2000, a 600mm f/6.3 at $4000 USD, and if you really want to go big an 800mm f/6.3 at $5700 USD. These are all Phase Fresnel lenses which make them significantly smaller and lighter than other options (much like Canon's older diffractive optics lenses) and give lens options with prices in between the normal 2nd tier and the $10000 plus top tier primes that currently no other camera system offers. Tamron is also starting to produce some of their lenses for the Z mount including that 50-400 that I mentioned earlier.

Nikon Z8
Nikon Z8, Z 180-600 f5.6-6.3 approximately $5400 USD

Nikon 180-600mm
or
Nikon Z8, 600 f6.3 approximately $7500 USD

Nikon 600mm f/6.3
Other Options
There are few other companies that really try to offer good options for nature photography and are close to but not quite the same as the 2nd tier options above. OM systems is definitely showing some promise but is held back a bit by the lower resolution sensors on the micro four thirds platform even though there are some very good lens options that are relatively small for the effective focal length. They have telephoto lens options from 70-300 all the way to 150-600 at many different price points. The examples I have shown below are rather expensive but if you want relatively small and light gear these are some of the better options currently.
OM Systems
OM system is a great option for those who want long effective focal lengths (narrow field of view) but with a smaller and lighter set of gear.
OM1 II, Olympus 300mm f/4 approximately $4600 USD

OM 300mm f/4
up to
OM1 II, OM 150-400 f/4.5 with 1.25 teleconverter $9400 USD

OM 150-400mm
FUJIFILM
Fuji has a couple of options now with the H series cameras and their higher end lenses that can compete with the full frame cameras but have no room to move to top tier later. Fuji also has a new 500mm option for their medium format cameras which may be an option for certain types of nature photography but that system is still a bit behind in terms of autofocus even though the image quality would be superb.
Fuji X-H2, 150-600 f/5.6-8 approximately $4000 USD

Fuji 150-600mm
up to
Fuji X-H2S, XF200mm f/2 approximately $7500 USD

Fuji 200mm with teleconverter
and
Fuji GFX 100S II, GF 500mm f/5.6 approximately $8500 USD

Fuji GFX 500mm
There is a lot of superb gear out there at the moment that allows a photographer to do things now that only the highest end gear could do a few years ago. None of this gear is cheap but over time you can build up a pretty useful setup that should continue to give you excellent shots for years to come. If you currently are invested in one of the companies above it is likely best to stay in that system from a cost perspective since you can get fairly close to the same level of gear on all of them. If you are currently looking to move up to this level of gear and are not invested heavily already then Nikon offers a compelling set of options at the moment to get up and running. Sony and Canon may make changes to their line up in the near future to change that perspective but Nikon looks pretty good right now. Seems like an interesting conclusion from someone who has been using Canon gear for 35 years and Sony for around 12 years. A venture to another system, at this point, is unlikely.

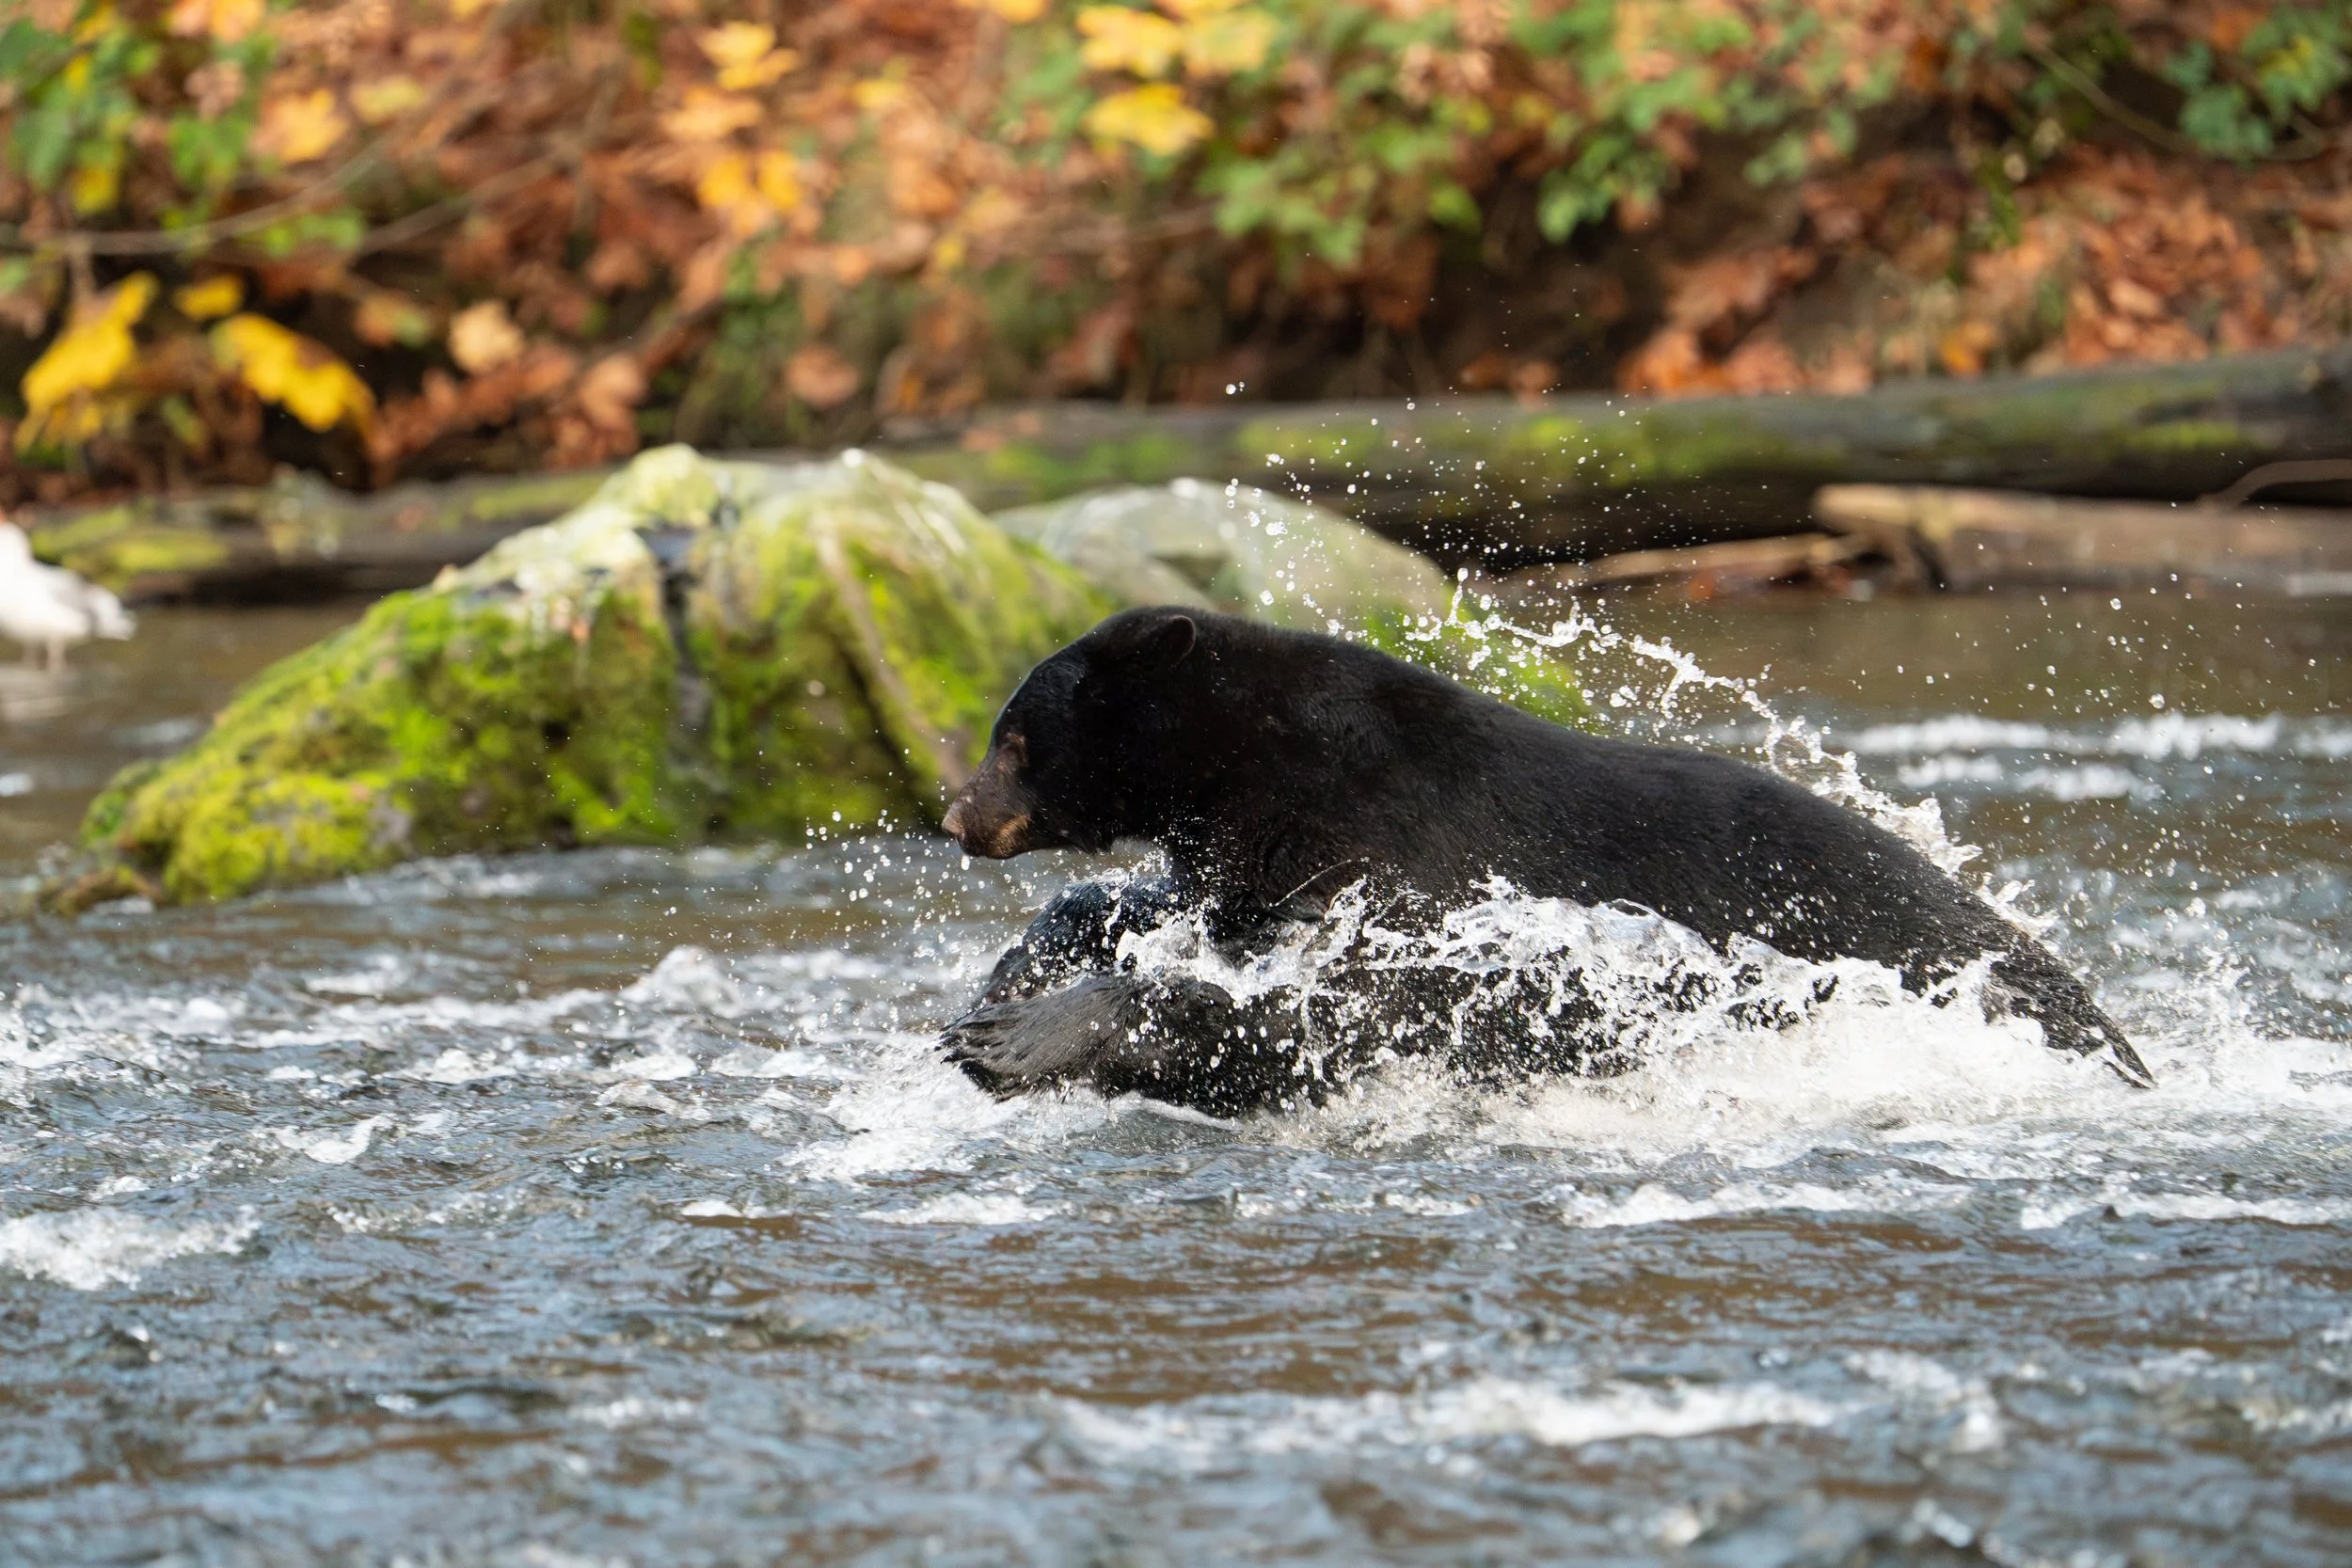
Salmon run on Vancouver Island - How to get Good shots while Watching Black Bears get Fat
As fall approaches we wait for the first rains to help the water flow in the rivers along the coast of Vancouver Island. Here on the Island, the main species I like to photograph that benefit from this abundance are the Black bears….

A rather large black bear lunging after a salmon on the Quinsam River. Taken with Sony A9II and 200-600mm at 448mm, f/6.3, 1/640s,ISO 12800
As fall approaches we wait for the first rains to help the water flow in the rivers along the coast of Vancouver Island. This increase in water flow is one of the signals for the Pacific Salmon to start their spawn migration upstream to the locations they originally hatched. This is not only an important time for the salmon but also for the people that live (and have lived here for well before it was ever referred to as Vancouver Island) here and also for many species of wildlife that need the salmon for their own survival. Here on the Island, the main species I like to photograph that benefit from this abundance are the Black bears and the eagles. Of course, there are many others that directly or indirectly benefit from the salmon run.
This is then a time for nature photographers to also get out with those long lenses to try to capture some of the action. For me this means getting out daily and walking along the river trails, quietly waiting for some interesting action to happen. At first, I focus on capturing pretty pictures of bears, eagles, herons, mink and other animals. Once I have those in my back pocket, I start looking for action shots and the interactions that really make a picture tell an interesting story. Sometimes it is best to find a good location and wait for the action to come to you, other times I have to go find the action, either way if you aren't out there, you're not going to get the shot.

Brownish Black bear taken near dusk. Taken with Sony A7RV with Sigma 500mm f5/6 at 1/2000s, f/5.6, ISO 12800. I turned a corner and saw this bear fishing, this was one of the first few shots I got. Luckily my camera settings were good for getting a quick and sharp image even if we could likely have reduced the shutter speed considerably and still gotten a sharp image once we had time to consider the light more.
The best time to see bears is near dark, as most black bears spend their day sleeping in a tree and only start fishing about an hour before the sunset. While there's a higher chance of finding bears at the river's edge at this time, the small window when there's enough light to get the shot at anything less than ISO 12800 means the likelihood of getting an exciting action shot it limited. Not all bears sleep during the day, and a few will try their luck during the day. They may be nervous of the bigger bears the fish in the evening, or much like me, they just can't sleep when they are hungry. Either way, this provides opportunities to capture shots in better light. Higher shutter speeds and lower ISOs means a better chance at a shot that I'll be able to print and not just use for a quick social media post. As always, there's a balance - sometimes the harsh midday sun combined with the deep shadows in the woods are challenging to capture all in one image. Isn't that what it's all about? Trying to get the right shot, in the right light to tell an interesting story. I do have to say that with the latest camera image sensors and the improvements in noise reduction techniques, we can get much better results at high ISOs than ever before.

More light makes a significant difference in the details of the shot. In this case I was lucky to find this bear in the afternoon but the shadows could be a challenge if it turned the wrong way.
What Lens Should I Use?
When it comes to gear, I've found a combination of lenses and settings that best work for the variable light conditions. The best lenses I've found would be somewhere between 100-400 maximum, and if you can afford it, a large aperture of about f/2 to f/2.8. That's out of reach for most of us, but a 70-200 f/2.8, 70-300, or 100-400 would likely do the trick in most cases. While the 70-200 may be a little short in some cases, the extra light gathering capabilities of the f/2.8 will allow you to continue to shoot at higher shutter speeds and lower ISOs longer into the evening. The 70-300 and 100-400 lenses that are common for each of the brands have a great range for capturing the bears up close and still being able to get the environmental shots at the wider end, but you'll find that you're often shooting at double the ISO of a f/2.8 lens which can quickly make the shots noisy. If you can afford it, there are a couple of very good lenses that can be found. The best in my opinion would be the 100-300 f/2.8 for Canon and the 120-300 f/2.8 for Nikon (Sigma used to have a 120-300 f/2.8 that I would love to see updated for mirrorless but that is another story). These two lenses have both the large aperture and the versatility of range that are excellent for close conditions.

Momma black bear bringing a huge salmon over to an expectant cub. These are the types of shots that tell a more interesting story than just a pretty portrait. These moments I will remember for a long time thanks to these pictures.
My Photo Techniques to Capture the Best Bear Photos
Back to technique for capturing bears. Get down low, sitting is a good position for bears. There are 2 reasons for this. The first has to do with being at eye level. I think this is a well-known concept, but it really is a good way to make sure you aren't always seeing bears with their eyes looking down. It also changes the background behind the bear so that you often get foliage instead of just water. The second reason is more for the bears and that has to do with the fact that animals notice a person standing as much more of a threat or worry than if you were to have a smaller, lower profile. This definitely applies to other animals and birds. While a hide would be your best option, I've found that animals ignore you more when sitting (or lying down). Much of this also has to do with how much movement there is and keeping fairly still without a lot of large gestures is also a good idea This doesn't mean that the bears don't know you're there. They likely knew about you well before you even saw them (depending on the wind and noise). It has more to do with an animal feeling like it can continue with what it's doing without constantly looking towards you. There are a few ways to tell if the bear is not comfortable; one is by constantly looking towards you, usually followed with a yawn. When I see this behaviour, I back away and find a better place or even back off entirely and let them continue on their way. Even with my more than 25-years of experience with black bears, I don't consider myself an expert and there are better forums out there that delve into this topic. Having said that, bears have their own unique personalities, and even general tendencies in one area may not be the same for other bears in other conditions. The bears around Campbell River are more used to fishing alongside people, but by no means does that make them tame.

When a black bear is not concerned about us photographers it may even sit and eat lunch right in front of you.
In my experience shooting wildlife, I have a few basic camera settings that may be helpful to others. First, my in-camera set up as a starting point (on the M1 memory on camera). I set the camera to this position before I head out as it usually will get me a first shot or two that's going to be in focus, sharp (even if moving quickly) but may be noisy depending on the light. I set it up with auto ISO (with a maximum of 12800), 1/2000 sec shutter speed, lens set with it's most open aperture, autofocus set to animal subject tracking and wide (all focus points). This setup is great if you happen along a situation where action is happening in front of you and you need to get a shot before you miss the moment. This has allowed me to capture fleeting moments that I may have missed otherwise. In these cases I may not get a perfect shot as I haven't had any time to think about composition, lighting or optimal settings, but I most often get a shot that I can use and sometimes these quick shots are the only opportunities I get with that subject.

Shadow and light are critical components of a composition and help to give a feel for the actual conditions on the river.
If you have more time with the subject, this is when you start to adjust for the "better" shot. First I try to get a few shots at lower ISOs and with better consideration for the composition. If you have more time or can set up prior to the animal coming to you, then there are more choices. As I'm walking, I am always thinking about where the sun is with respect to the subject but you can't always put yourself in the best location right away. When time does permit, the light and the environment around the subject become the next thoughts. Most times shooting with the light behind you or to the side of the subject is better than having the sun in line with the subject (except in very specific situations where you might want a silhouette or faded look). Many animals will be ok with you moving sideways to them in a slow manner but do keep an eye if their mannerisms change as you move. The background behind the subject is the next consideration. A busy background that is relatively close to the animal compared to the distance you're from the subject will often make the subject blend in. A background that's simple will be easier to manage and bring out the subject in certain cases, but also consider if the surrounding environment is part of the story. No one method is correct, so try different options and take multiple shots.

It was really exciting to watch this sow come down to the river with her 2 cubs. The interaction in this case lasted a long time so I was able to get a number of interesting shots of all three and each individual as well as a number of action shots. This doesn’t happen often but when it does I can go through most of the ideas I have been talking about here. From the initial quick grabs to the low noise shots and then get the shots with different environmental conditions and different angles.
If you're lucky, you might even have a number of shots. The initial quick shot of the subject (sometimes some unique action that you happened to witness), some cleaner shots of the subject, and maybe some ongoing action with camera setting that will ensure better results. More time with the subject means that you may have a chance to make different choices around the background and the light, and if all goes well, possibly a shot or two to add to your portfolio.
Some other things to think about when out with black bears.
Keep the noise to a minimum mostly for the bears but also for others who may be trying to enjoy the moment.
Do not make fast movements if possible. This will inevitably distract the bear from what it's doing.
Try not to have anything near you that smells. Cologne/perfume and smoking are the worst as bears can smell that from a significant distance and may avoid you entirely.
Try not to crowd the animal. I know it is difficult as often I will see a group of 10 or more people trying to get close enough for a shot, but if possible, it is best with 1 or 2 people at most at a distance that you will need a fairly long telephoto lens to allow for the best observations. This will also ensure the bear has a higher likelihood of going about it's business of catching fish.
If a bear is looking uncomfortable with your presence back away (slowly) if you can until it goes back to more normal activity. You may just have to leave that bear alone. Not only will you not get good shots if the bear is uncomfortable, but the bear may miss an essential meal if it is concentrating on you instead of fishing.

Sometimes you don’t have to work hard to have a picture tell a story
Being able to watch these bears in this area is a fantastic way to get a better understanding of nature. My intention is to encourage others to do the same in a respectful way that minimizes direct interaction with the bears and where people remain at a safe distance. Even though I always carry bear spray, I hope I never have to use it, particularly as a response to my own interactions with a bear. Bear interactions in this area of Vancouver Island are inevitable if you walk regularly in nature areas. I only hope that with better understanding, and through observation, we can live with them and not feel like we need to remove them from their own territory due to our fears and ignorance.
Action shots at high ISO but a fast enough shutter speed to get a reasonably sharp image. New noise reduction algorithms definitely help to reduce the colour noise in these shots.
Sigma, Please bring it back!
For many years my go to lens for nature photography, especially for lower light conditions, was the Sigma 120-300 f/2.8. This was by far the sharpest lens I had ever owned at least until the Canon 500 f/4 II.

Sigma 120-300 for Canon EF mount. I do miss this range of telephoto goodness.
For many years my go to lens for nature photography, especially for lower light conditions, was the Sigma 120-300 f/2.8. This was by far the sharpest lens I had ever owned at least until the Canon 500 f/4 II. At the time on my 5D II and 1DIV the autofocus was pretty reasonable, at times a little slower to track than my Canon lenses but even with the 1.4 and 2 times teleconverters it was very usable.

Great Grey Owl hunting in a farmer’s field near dusk on a very cold winter day. Taken with Canon 1D IV with Sigma 120-300 f/2.8 and 2x teleconverter.
At the time I was shooting owls and needed something that was capable of keeping the ISO down to a maximum of 1600 for as long as possible as those cameras really started to get noisy past that point. My Canon 100-400 push-pull at the time was a much lighter lens, and the focus was a bit faster but the image quality just was not in the same ballpark and the smaller apertures made it not as useful at dusk or dawn.

Canon 1D IV with Sigma 120-300 and 2x Teleconverter at 600mm. Even cropped in this lens made the best out of the APS-H 16Mpixel sensor.
As I moved to mirrorless cameras over the last 10 years or so with the improvements in low light capabilities I was able to get away with current 100-400 and now the 200-600 lenses in many conditions. Recently I moved to the west coast of Canada into an area where nature photography often takes me into deep woods or leads me down narrow river basins in search of bears and other fun stuff. The light in these areas is challenging at best and the sun disappears behind mountains to an extent that I'm finding that to get a reasonable shutter speed for the action I'm shooting at 10000 ISO or greater at F/5.6 or 6.3 depending on the lens I have. I have also found in these situations that I don't as often need >400mm and am often less than 300mm for most shots. This is a range where having a large aperture telephoto zoom would really come in handy again.

Some very low light as the sun was dropping low in the sky on a cold winter day. This shot has been brightened considerably but I was able to get the shot at 1/2000 second and still have a usable ISO.
Now Canon has recently come out with a 100-300 which looks to be a spectacular lens but they have also typically priced it out of reach for most of us who aren't as daffy duck would say "I'm rich,I'm wealthy, I'm comfortably well off". Nikon has also a 120-300 f/2.8 but for their older mount which you can pick up a bit cheaper than the Canon but they don't have one for the Z mount. So this brings me to my opening statement....Sigma could you make a new 120-300 f/2.8 lens? I'm certain that you can make it much lighter than the original, and hopefully still make it for a "reasonable" price. With the improvements in Sigma lenses over the last few years I could see this being an amazing lens. I did recently purchase the Sigma 500 f/5.6 which is a fantastic lens for the E mount (although I would really love to be able to use it with teleconverters....not Sigma's fault it would seem). This light super telephoto lens gives me hope that they could produce the lens I want and likely make it significantly lighter than their original and with the new autofocus and even just the same optical capabilities it would quickly become my goto lens again.

Some of my favourite images were taken with the Sigma 120-300 and even though this was a heavy lens it was still very useful for action shots. Not bad tracking for a bird coming straight towards me with that Canon 1D IV and a third party lens.
Now for the dreamer - to make this lens perfect for my use it would either need to be usable with the teleconverters or even better come with a built in 1.4 or 2 times teleconverter. That would likely boost the cost a bit but I have a feeling that lens would rarely come off my camera at that point.
So Sigma, if you happen to read this, get in touch if you need someone to help you test out this lens in the field :)

Winter trip - Stage 2 - Quickly down the US west coast
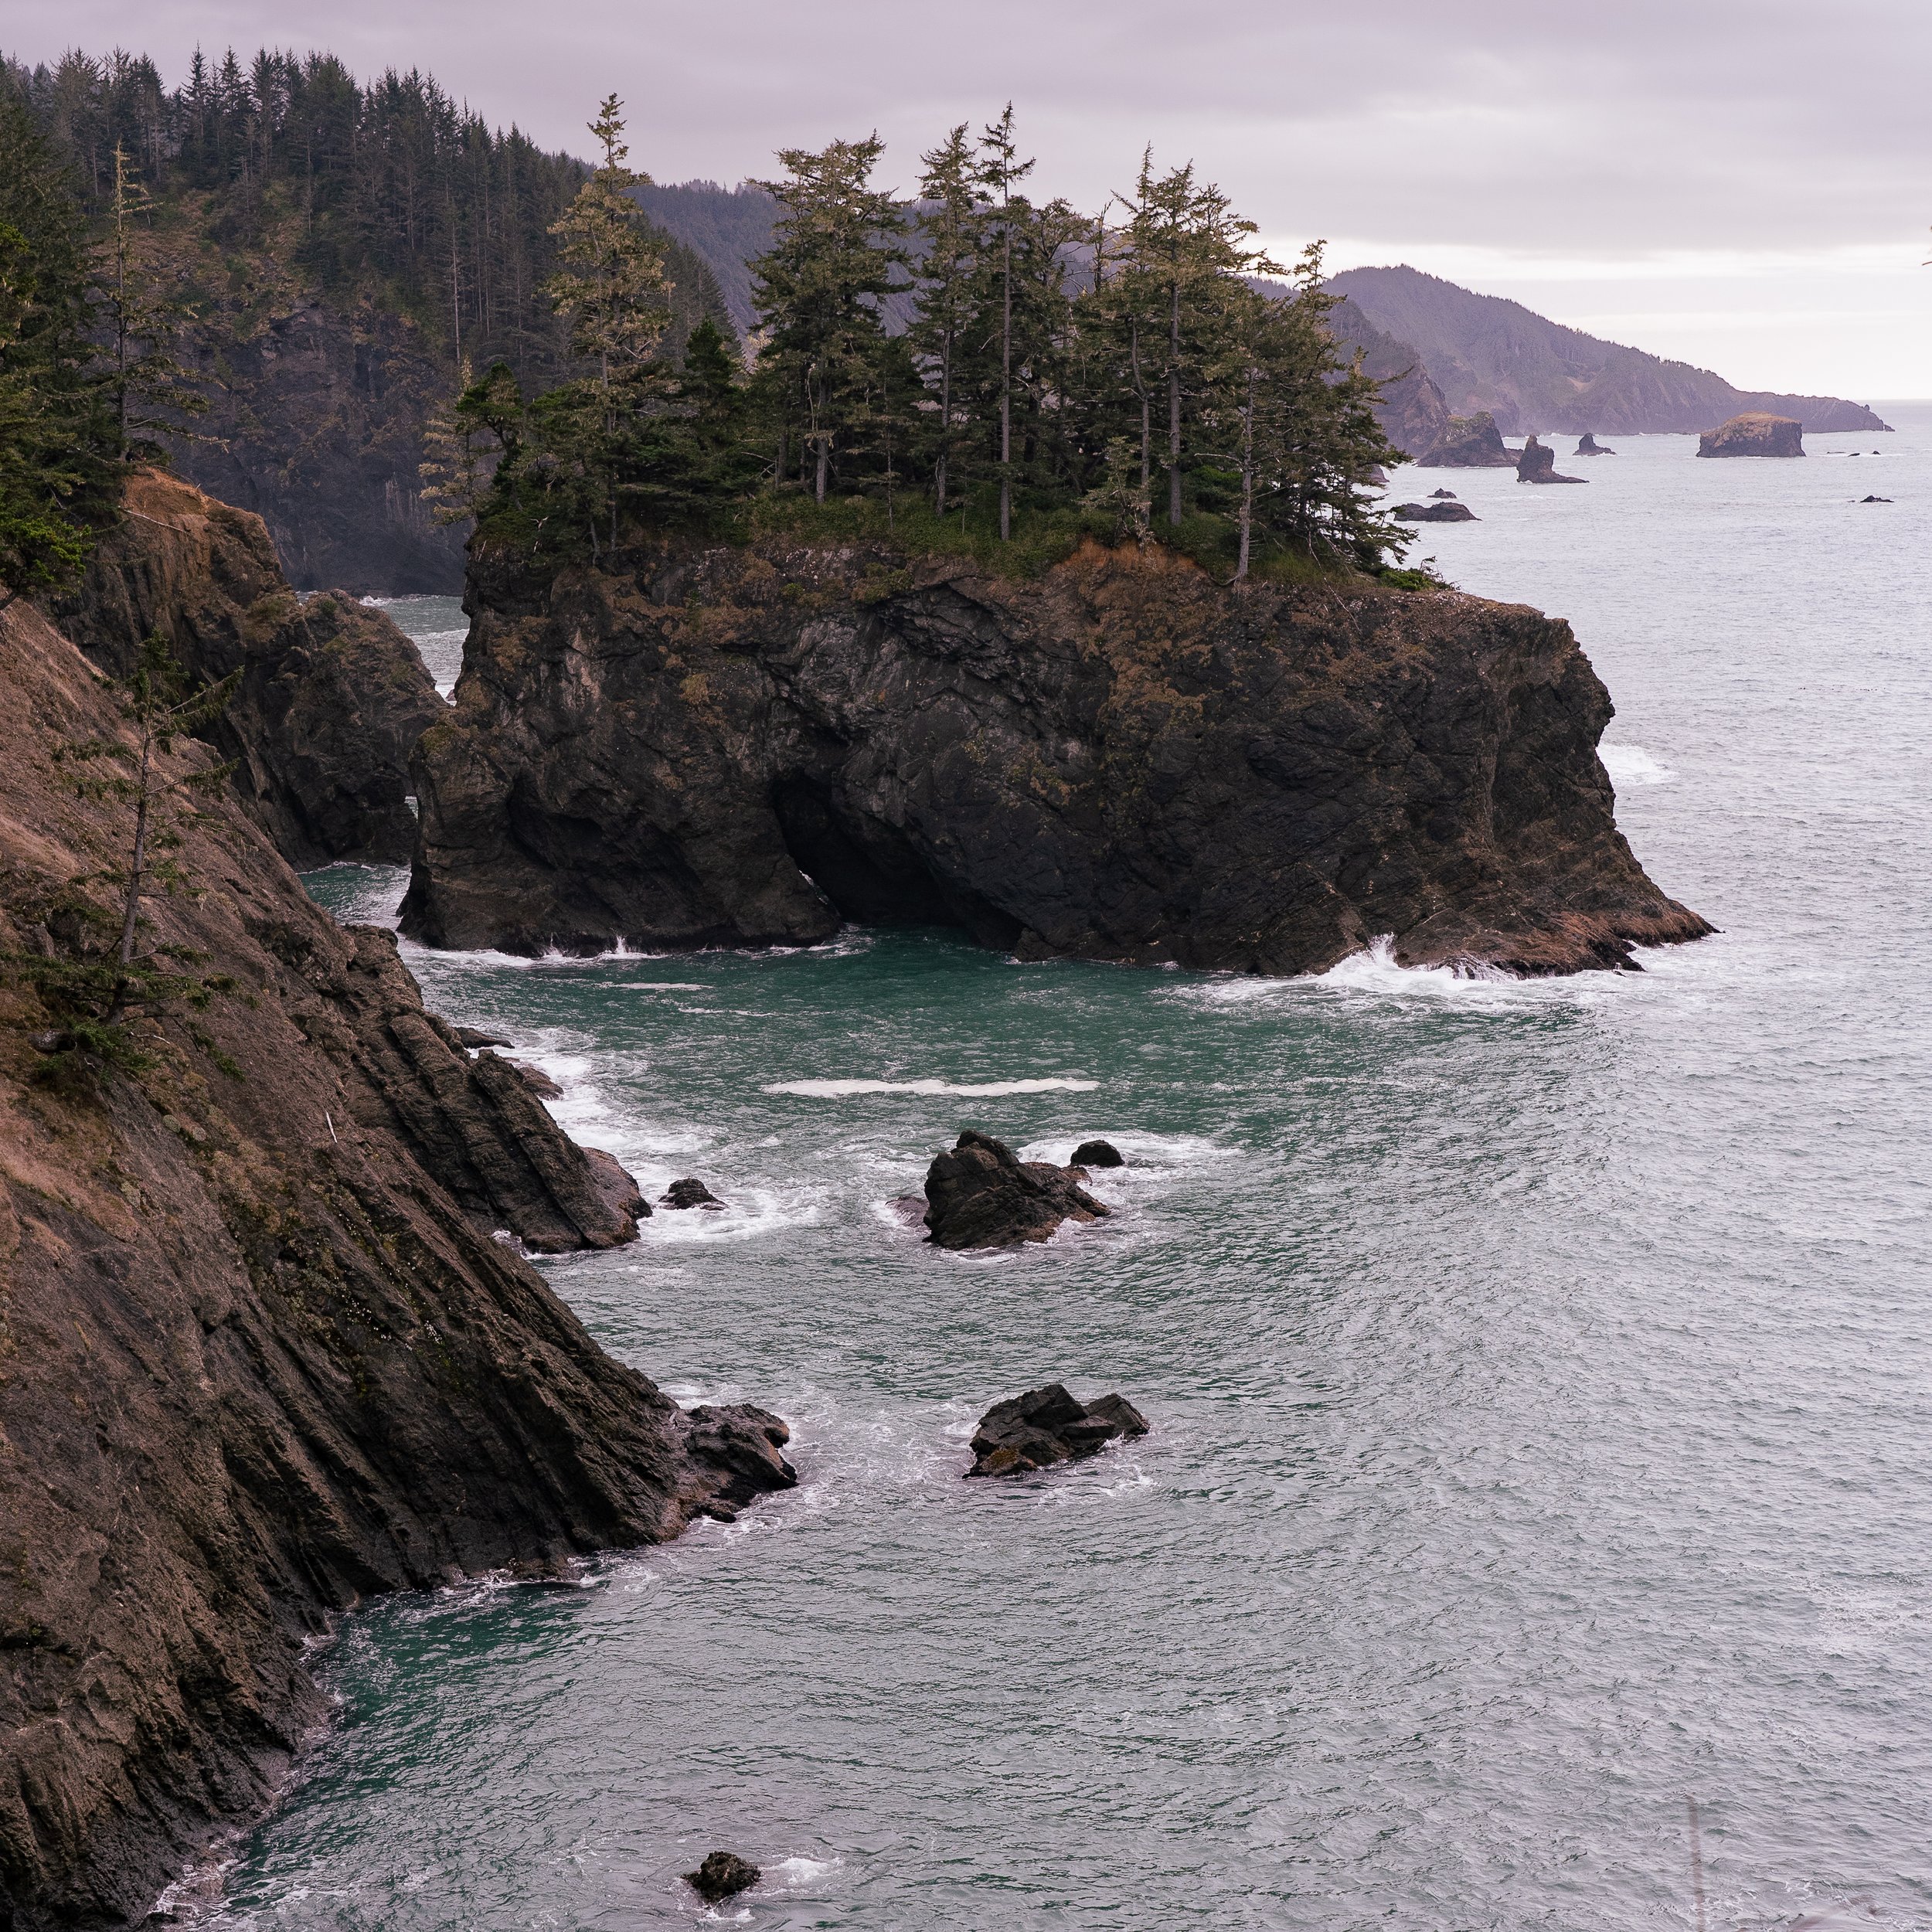
Coastal photography, we have spent a great deal of time shooting on the east coast of the US when we lived in South Carolina. The west coast is a different beast altogether. Rocky coastlines, big waves crashing, fantastic tidal pools all make for very different shots and of course the fact that the sun goes down over the ocean instead of rising again makes shooting very different.
Coastal photography, we have spent a great deal of time shooting on the east coast of the US when we lived in South Carolina. The west coast is a different beast altogether. Rocky coastlines, big waves crashing, fantastic tidal pools all make for very different shots and of course the fact that the sun goes down over the ocean instead of rising again makes shooting very different.
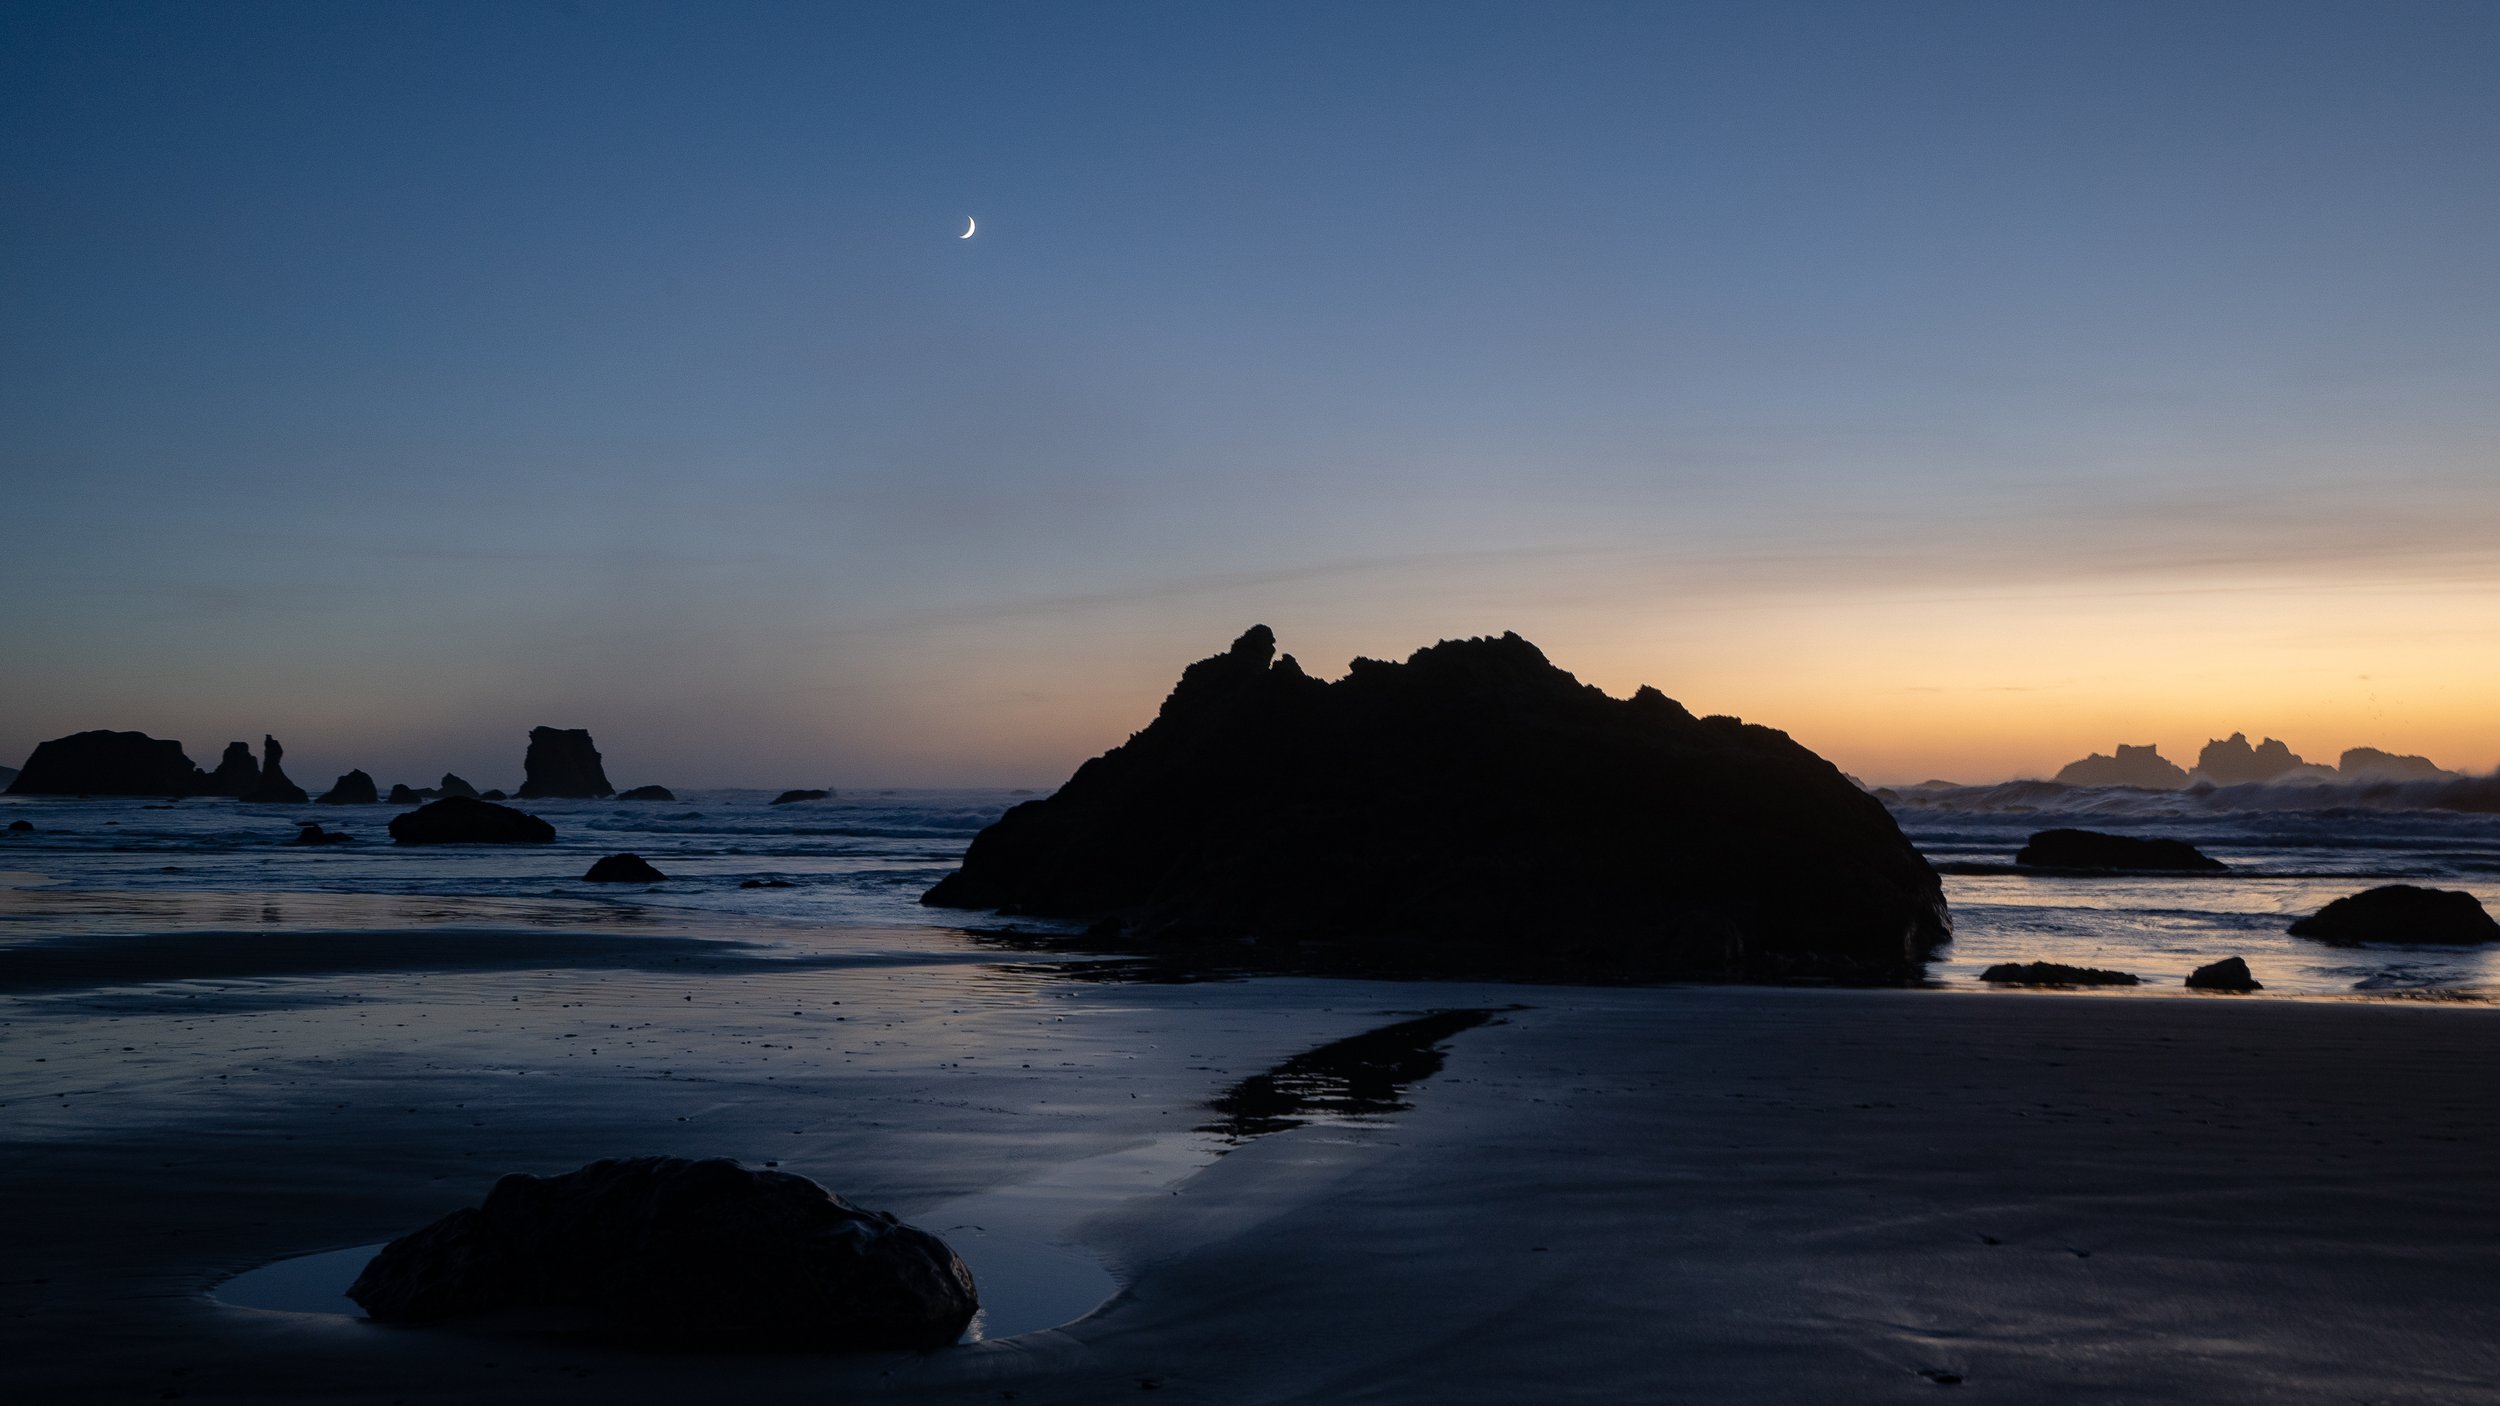
The view from “Secret Beach” one of many stops along the Samuel H. Boardman State Scenic Corridor.
Nature along this coast is also very different, we don’t see many different types of herons or egrets and gators are not something we need to worry about but we can look forward to sea lions, elephant seals and sea otters.
Since we are on the road continuously we are at the whim of the weather for the few days we were at each location. This means that whatever conditions we see that day is likely what we have to shoot. In that sense we often stopped at many locations during the day with the hope that one of those locations would be a good sunset shot…with the hope that conditions at sunset will be good or at least interesting enough. With storms and rainy weather following us down the coast it did make for some interesting seascapes and sunsets.

Photo taken with Sony A7RIV and 70-200 f/4 lens at 82mm, ISO 1000, f/4, 1/2000s. This was just a quick stop at a lookout along the highway where we saw waves crashing from a distance.
Writing these articles helps to ensure I look back at the photos I’ve taken. I usually pick what I think are the best photos from that day when I download them into Lightroom but what I have found is that if I go through them again a few weeks or even months later I find quite a few shots that I overlooked when I first downloaded them. I’m not sure what it is that changes how I look at them but I’m glad I do this once in a while.

I almost overlooked this shot on my first pass. After a couple of months I looked back through the library and this one stood out for some reason.
Our first real taste of the coast was at Cape Disappointment as the south end of Washington State. We basically didn’t get much of a chance to see anything else due to two full days of rain that kept us on the road from Port Angeles along hwy 101. I’m hoping that we will get a chance to revisit the Washington coastline but grey and rainy is not the best way to see any of that area.
Disappointment was definitely not disappointing. In fact as our first real taste of this rocky coastline it had a pretty big impact on us. One of the first sights was the Lighthouse and with the first bit of sunlight we had seen in many days it was the first time we wanted to get out with the cameras. One of the best small hikes we did was to head into Deadman’s Cove which turned out to have a cool island in the middle with a lone tree….an interesting subject to do a bit on long exposure photography and after the trip I still think it gave me one of my favourite shots of the trip.
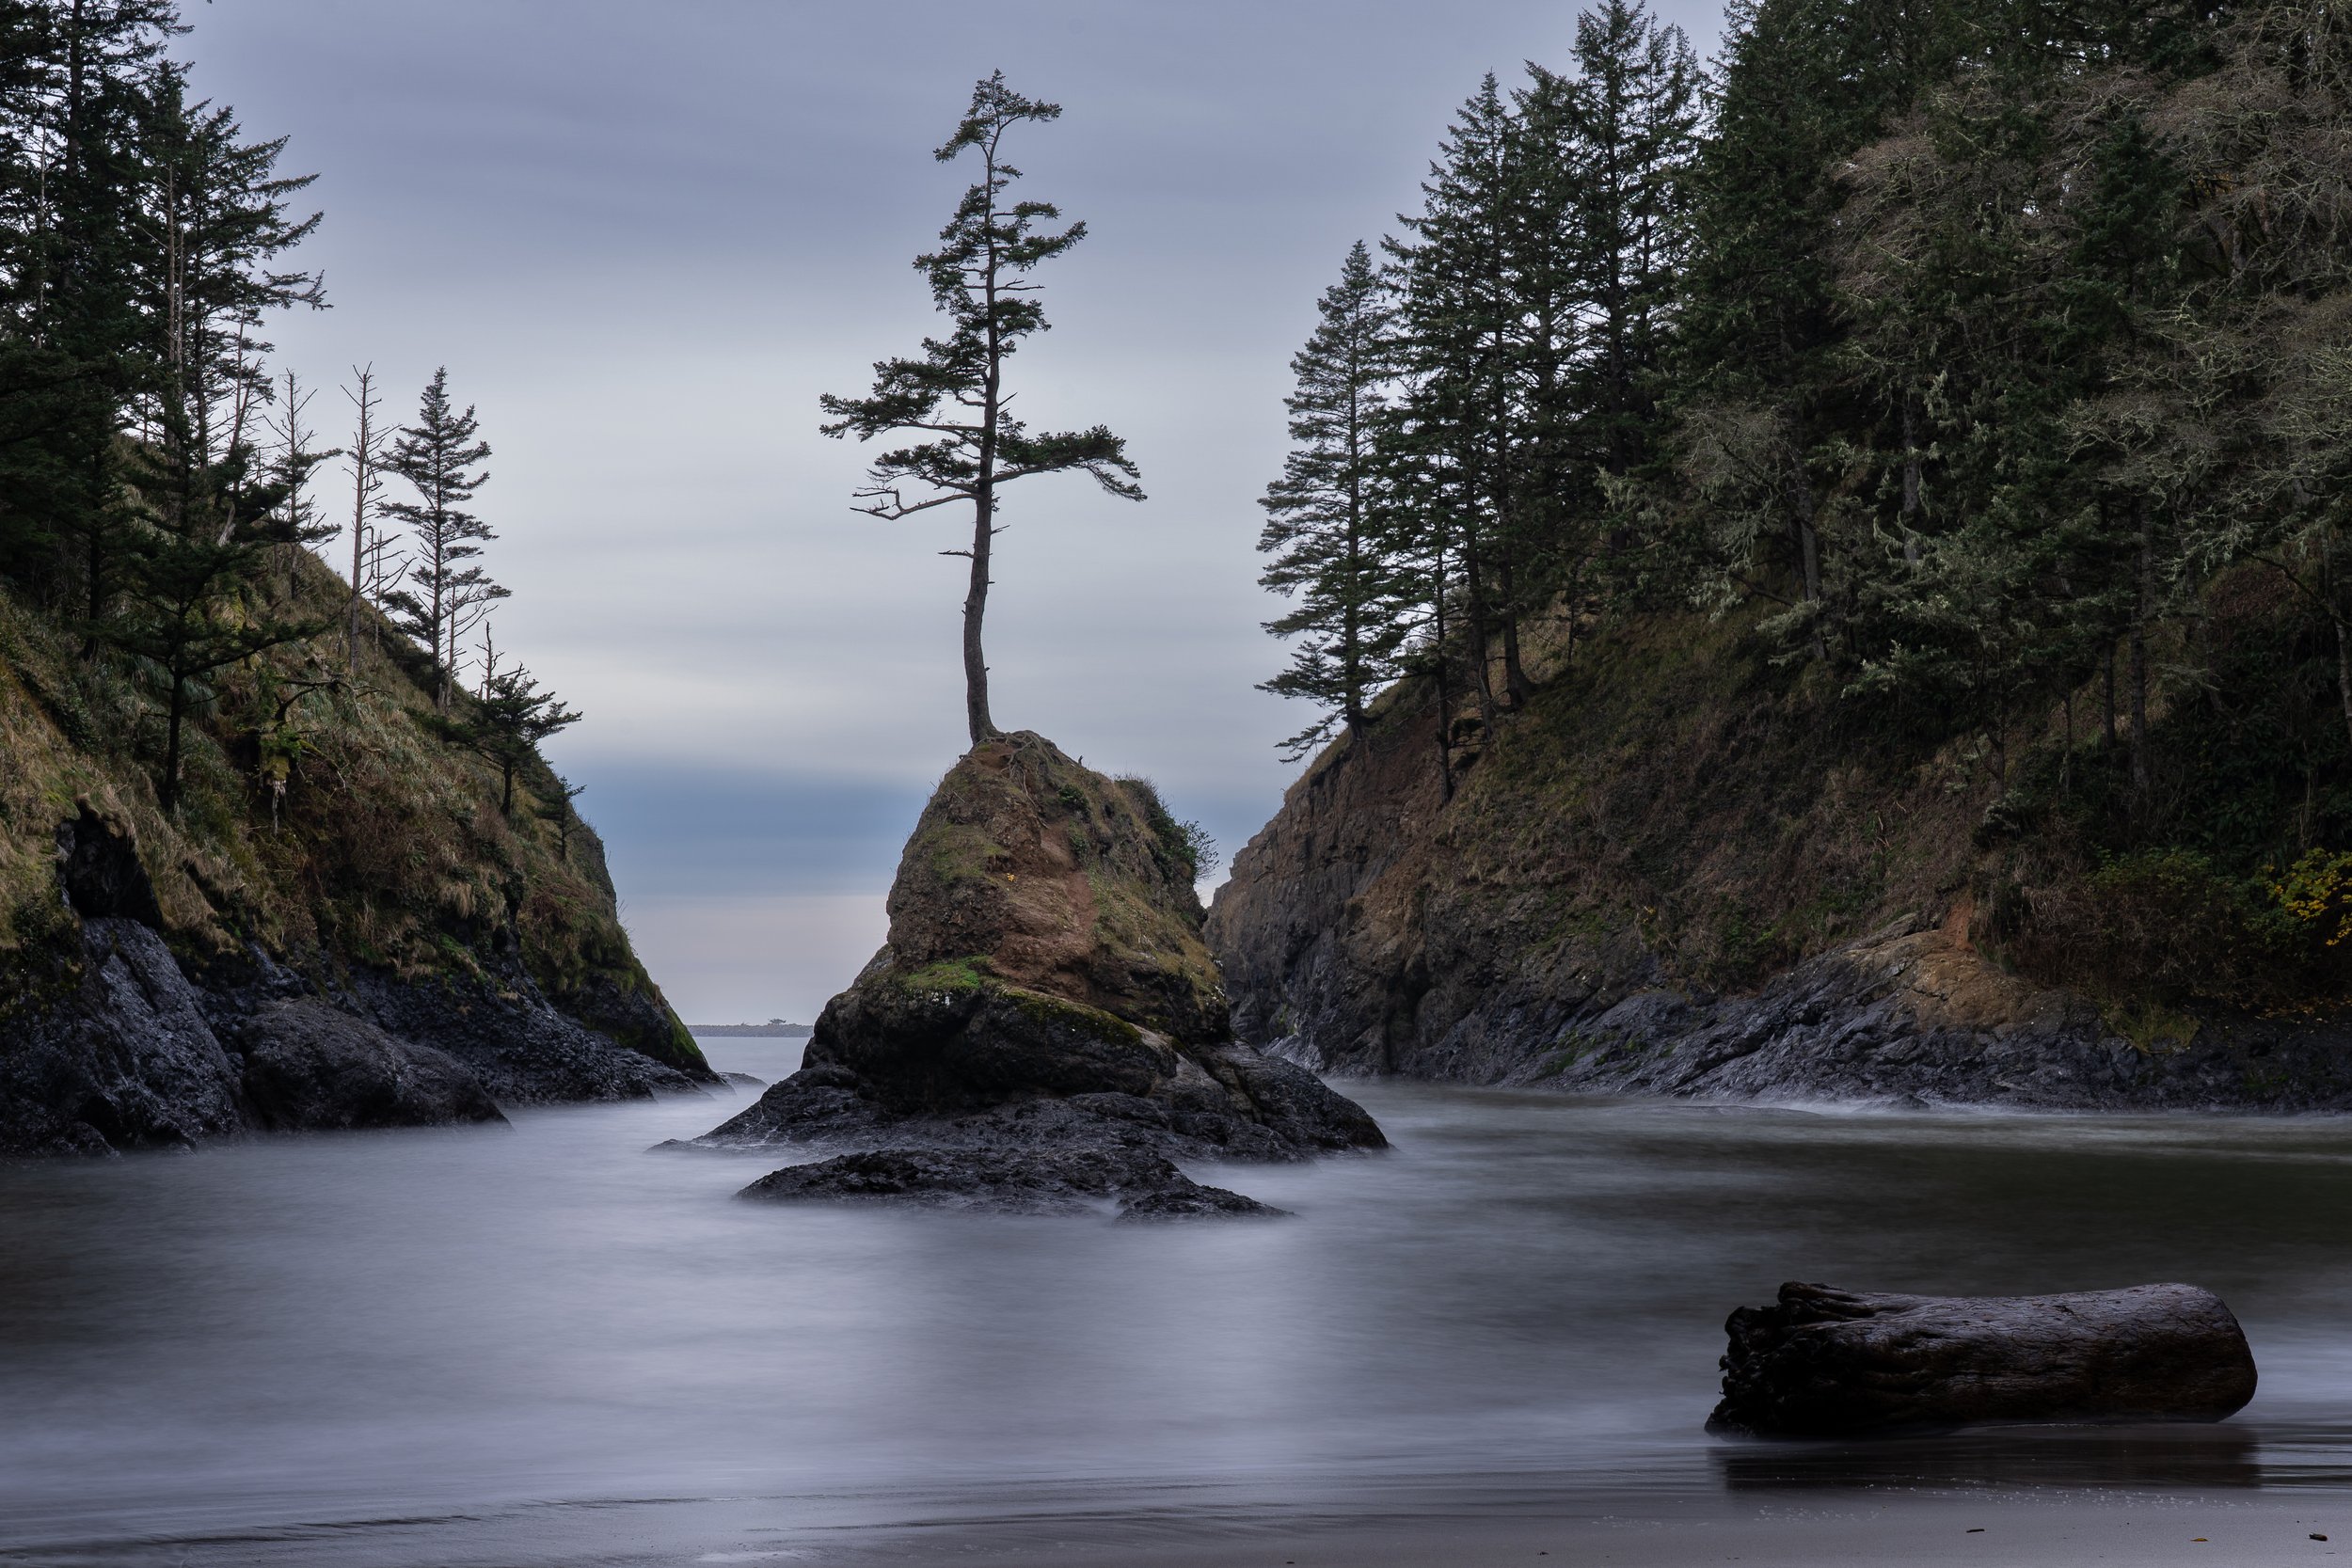
It took some time to get this shot just right. With a 6 stop filter we were trying for long enough exposer to smooth out the waves but that log to the right moved when the waves were too large. This was one of my favourite shot of the trip. Photo taken with Sony A7III with 24-105 lens at 50 mm, ISO 100, f/13, 30 seconds.
Oregon has been on my list of places to visit for a long time. I’ve been watching a landscape photographer on YouTube named Nick Page (https://www.youtube.com/@NickPage) so I had some ideas of what was possible, although I knew it was unlikely I would be lucky enough to get an opportunity to get shots that were as good as his when our window was usually one or possibly two days at any one area. I just hoped that we would get some weather windows at dawn and dusk with interesting weather…not pure grey skies and drizzling rain or pure blue skies. If you are looking on a map some of the spots we stopped at are Bandon Beach, Shore Acres State Park near Coos Bay, Cape Blanco, and Secret Beach near Brookings. This is just a few as we stopped many times along the highway all the way through Oregon.

Bandon Beach as the sun was getting low. Very little colour with the grey clouds and mist from the sea so I thought black and white would give a better feeling. Photo taken with Sony A7RIV and 70-200 f/4 at 100mm, ISO f/13, at 1/640s.
Turned out we did get some really windy days but we managed to miss a king tide with those winds by just a couple of days. That being said we did manage to get some nice shots around Bandon and scoped out a few areas around what is referred to as secret beach?? This is a place I would like to come back and spend some time near so that I could find a better spot to take shots from. The places I stood made me feel like I was just missing the shot.
We did manage to get very lucky on one of our coastal walks. By lucky I mean we ended up with a storm coming right over us as we wandered down the beach and got absolutely soaked but as this storm moved off we got one of the most amazing rainbows that I have seen with dark skies in the background and sunlight hitting the rocks. It was worth the painful rain/ice hitting us as we tried to get these shots.
A wet and cold walk on Lone Ranch Beach through a very windy storm was all worth it for these shots as the storm passed through. It was a fleeting moment but one I’m glad we caught. Photo taken with Sony A7RIV with 24-105 f/4 lens at 27 mm, ISO 160, f/11, 1/200s.
Before heading inland we took a little time along the California coast.
Along Highway 1 we continuously saw hawks hovering above the cliffs over the grassy hills hunting. At times they would go into another hawks territory and that would cause some interesting interactions. If we didn’t need to get to our campsite I could likely have stayed for hours waiting and watching those hawks.

A pair of Red-tailed hawks fighting above Highway 1 in Northern California. This was a quick stop on the side of the road as we saw numerous hawks hunting in the grass above the ocean. Photo taken with Sony A7RIV with the 200-600 lens and 1.4 teleconverter at 840mm, ISO 250, f/9, 1/1250s.
I am always eager to find some wildlife and we hit the jackpot with a sea otter that was getting ready to sleep, rolling in the kelp and fluffing up its fur for a good half hour only 20 feet from us on the beach. It finally settled in to sleep, seemingly without a worry in the world.
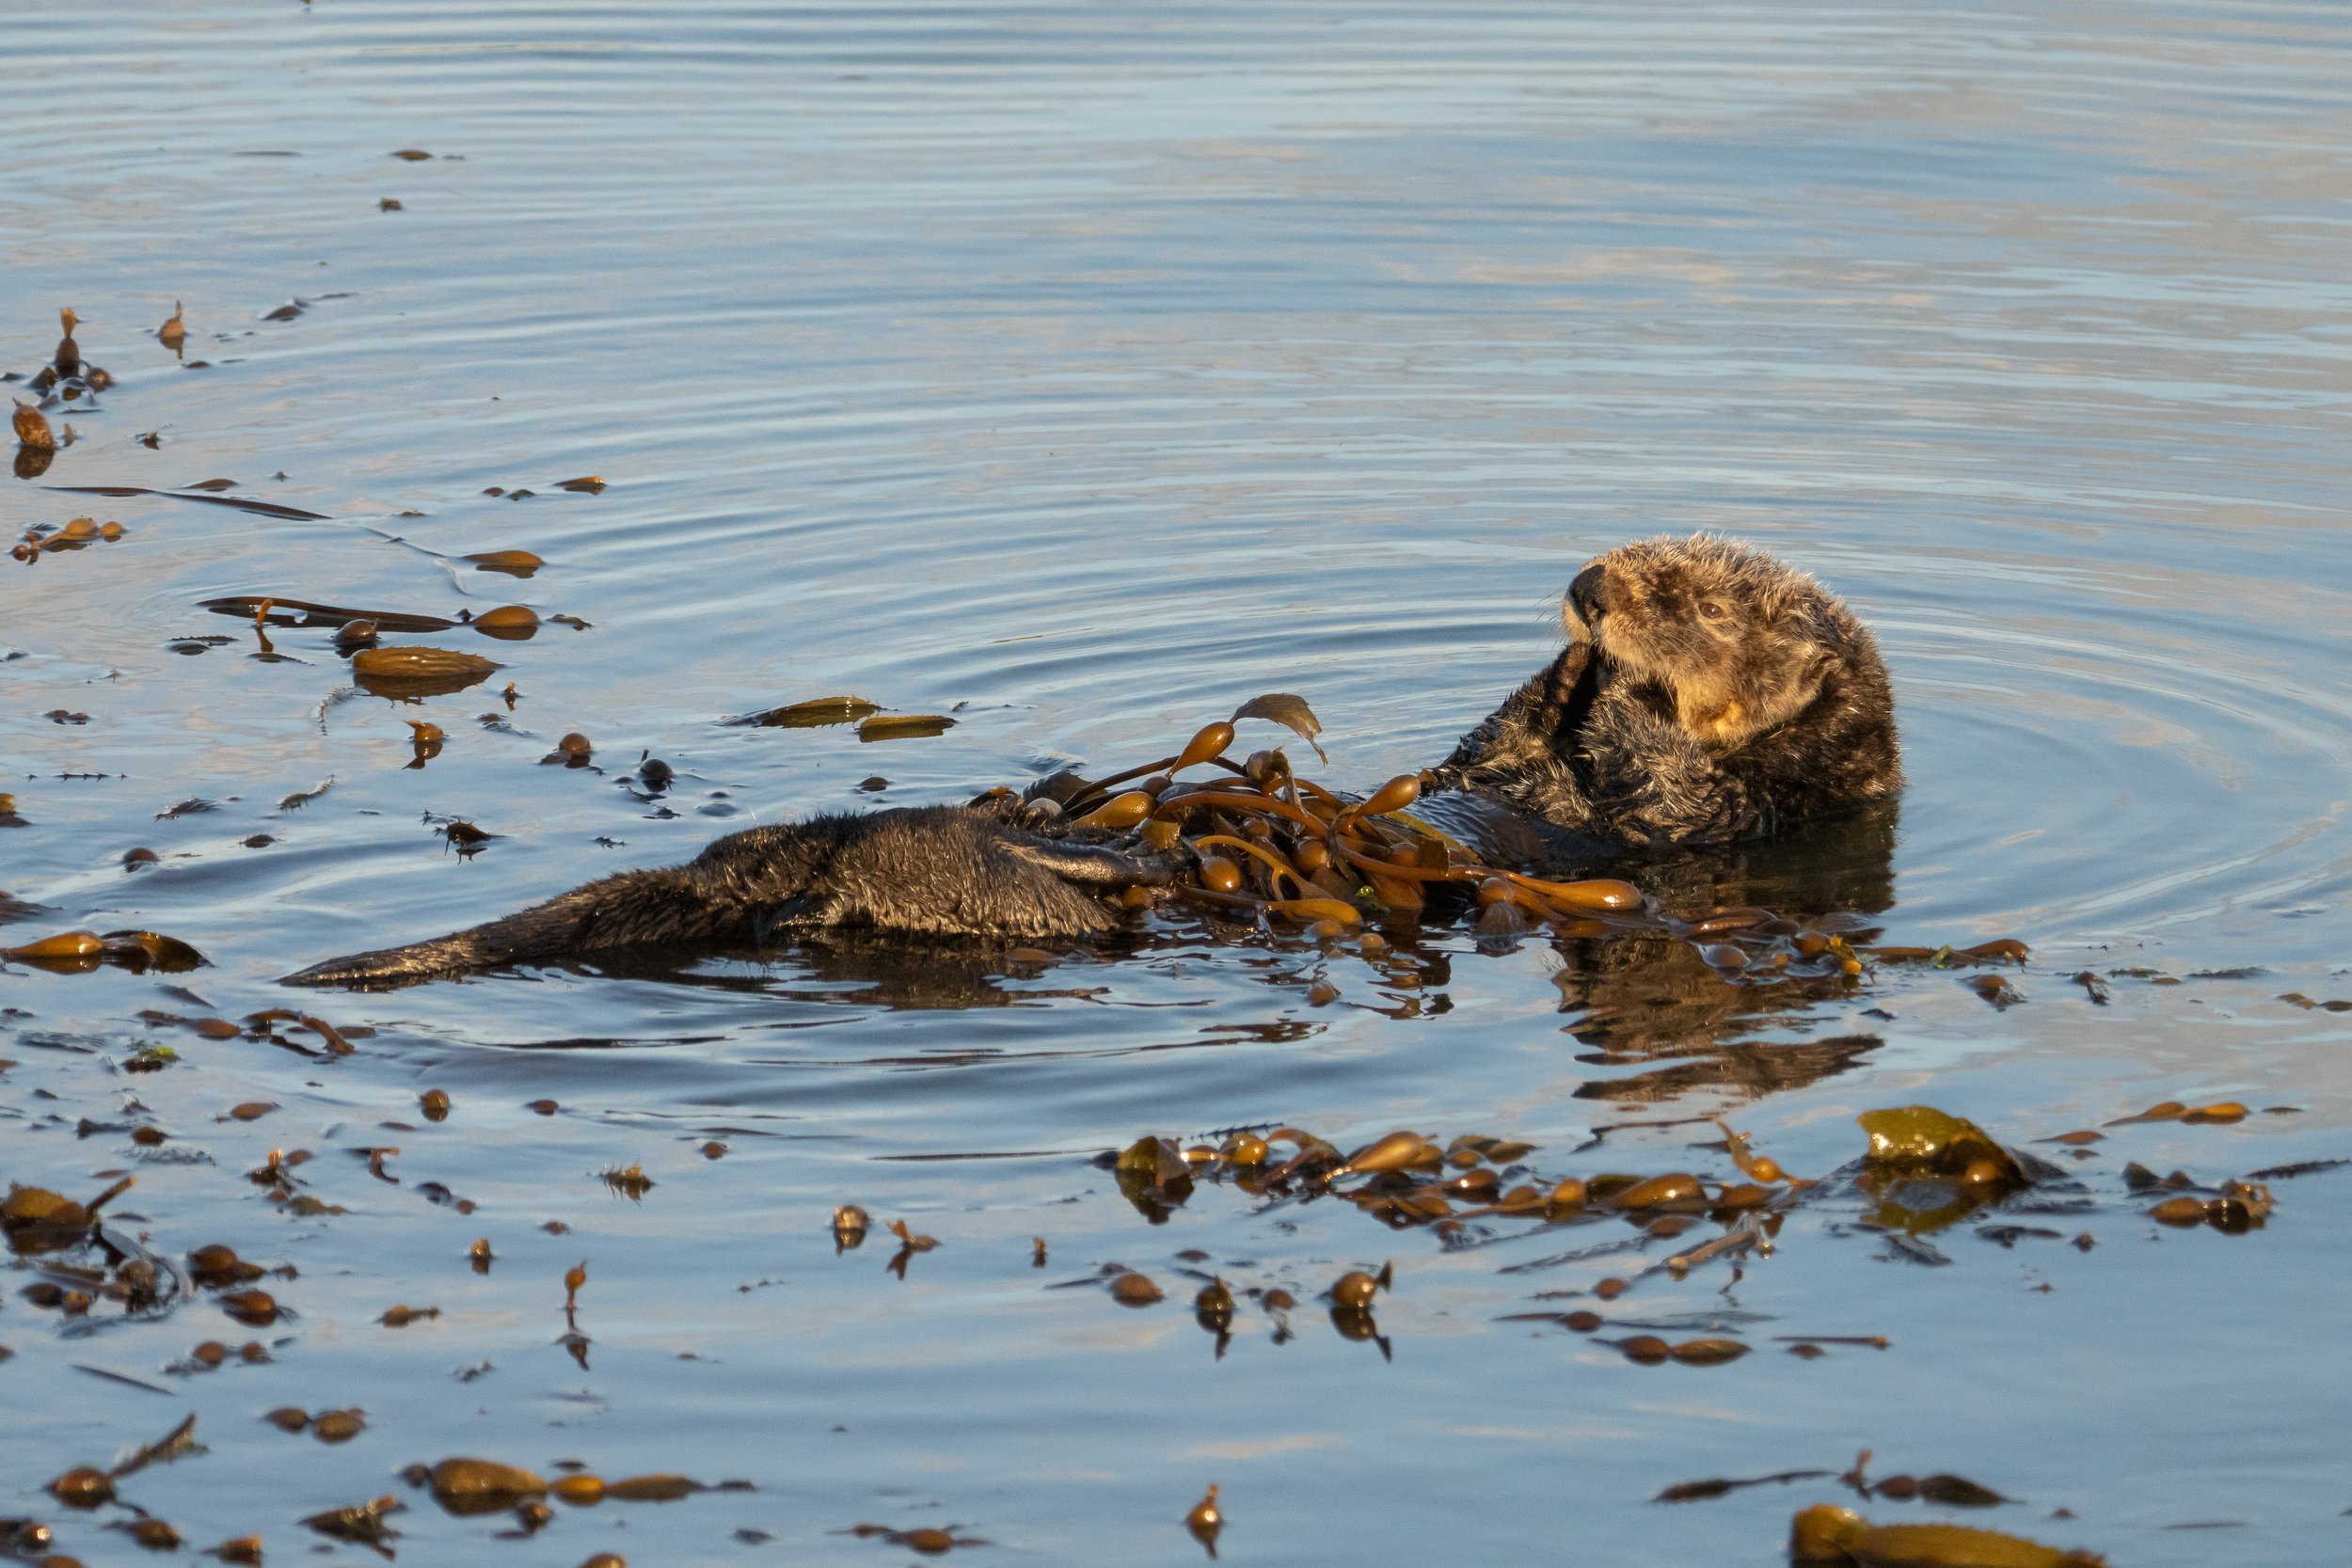
Sea Otter wrapping itself in the weeds and starting to puff up and clean before settling down for a nap. Photo taken with Sony A7RIV and 200-600 lens at 400mm, ISO 2000, f/9, 1/1250s to ensure I stopped the motion and was able to get the whole otter in focus.
You can see more of this cuteness in our vlog on no.fixed.plans on YouTube, you can also look directly at the West Coast Gallery for more pictures.
With horrible weather always just one step behind us, we really did not spend the amount of time we wanted to on this trip. It was a good sampler and now that we have some ideas I think that we can make some more trips down to the Oregon coast especially and hopefully get to spend more quality time behind the camera. With that cold and wet weather coming for us again our next step was to head inland towards Death Valley, but that will be in the next post.
Nature photography on the road - Chasing the sun (blog version) part 1.
I had a plan. This plan was to reduce the amount of time I spend working in my real job (I am a physicist who migrated to the financial world to build computer software and systems for mathematical modeling). If I did this right I would be able to take some long trips to do the types of photography I love in new places for extended periods.
I had a plan. This plan was to reduce the amount of time I spend working in my real job (I am a physicist who migrated to the financial world to build computer software and systems for mathematical modeling). If I did this right I would be able to take some long trips to do the types of photography I love in new places for extended periods.
My plan has come to fruition, but of course not everything goes to plan the way you think it will. I have been working on contracts that last about 18 months and then I take 6 months to do other things. The first of these “sabbaticals” was during the pandemic and we moved ourselves from southern Ontario (where we landed for a job in Buffalo, NY) to south central British Columbia. This in itself was a challenge as we had hoped to buy a small acreage and look towards building a tiny house as a base. Housing and land prices skyrocketed during the pandemic so that part of the plan turned into a long term rental in the Okanagan Valley and a second 18 month contract working from home.
With the pandemic slowing (not entirely) and travel being allowed again into the United States we decided to prepare for our next 6 month excursion by purchasing a camping trailer and a pickup truck and set out to photograph the west coasts of both British Columbia and the United States.

Ford Ranger and Arkto trailer, ready for our photo excursion.
Our journey started one month after my contract completed and we were able to close out our lease and pack everything we own into a storage container and our little trailer. Of course the weather had plans for us that would change our well laid out plans completely.
One thing I had to learn quickly on these trips is to change the way I think about photography. When you are shooting nature or landscapes close to home (within about 6 hours driving) you have time to understand the habitat you are in, including where you are likely to see animals or birds and the best place to be to get the shot both without disturbing the subject and ensuring an interesting photo. You do not have that luxury when you are on the road unless you are with a guide that has that knowledge. In most cases we are only in a location for 2 or maybe 3 days. This usually means doing some work beforehand on the internet to see if we can figure out some good locations and then the first day is mostly about hiking the area to see for ourselves what is around and when and where we might come back for some shots. For the landscape shots we take this can be enough to get a good location but we need to get lucky for the weather to be just right to get some good shots the next morning or evening. For nature photography we have much the same conditions we would like to have but now we also need to get lucky and have something show up. Often we also need to choose whether we are going to do landscape or nature since the best times of day are sunrise and sunset for both. Although, some birds of prey are best shot in bright daylight, and that is one of my favorite things to shoot.

A pair of red-tailed hawks fighting over a hunting area.
What we do try to do is to make notes where we go, just in case we do manage to get back to those locations so that we might be able to capitalize on that knowledge when the conditions are looking good.
All that being said, when you are out each evening and morning you do still get some pretty fantastic shots. I guess what is different is if you can come back regularly you can refine you compositions until you get what you picture in your mind, whereas currently I try to take a number of different shots relatively quickly while the light is good so that I can look at them later to decide what composition was better.
We have also been doing significantly more video in the last couple of years. Some of this is to document our trip, but also just because video is one of the best ways to get yourself known out here on the internet, and there is so much potential in that medium.
This poses other issues, as we are shooting video while we are trying to take shots, looking at getting “B roll” that is interesting and trying to story board a cohesive video that we hope others may find interesting. That, of course, is not just twice the work but significantly more than just trying to get out there and produce some compelling photos as I’m sure many of the YouTubers that do these type of videos will attest.
The last thing that we always need to remember is to take some time to just enjoy the trip. Not everything has to be around getting a good photo and we do need time to relax or to do regular daily things. Since we do love taking photos it is sometimes difficult to remember to just relax.
Back to the trip.
The first leg of our journey was to be a month in British Columbia, starting from the Okanagan Valley to Vancouver and then over to Vancouver Island for what is usually a wet but mild November. We were looking forward to exploring the west coast of the Island along with some treks north to check out some smaller islands and the north west coast.

Sunlight tries to penetrate the canopy
Our first stop was near Vancouver in Golden Ears Provincial Park. The campsite was nestled under a canopy of huge evergreens with that typical west coast rainforest feel. Beautiful mountains surrounding us, a very large creek just below feeding into a long valley lake. In the summer this place would be completely full with campers and day hikers in from the city, but in November there was only a half dozen other people in the campground that had basic amenities of a pit toilet and not much else this time of year.

Plenty of water rushing down from the mountain in Golden Ears Provincial park.

Moss and ferns make the scene into a flood of greens
Our next stop was a campground near central Vancouver. We were here to meet some friends, do some shopping and eat at some nice restaurants before our ferry trip across to the island. It was also during this stay that we started to understand that we had a few leaking issues on the camper as one of those atmospheric rivers decided to descend on Vancouver. Despite the rain is was a good layover with good friends including one I had not seen in about 40 years. Not much in the way of photography was to be done here, other that the quick shot of the Lion’s Gate Bridge as we had our morning coffee.

Lion’s Gate bridge in Vancouver with a good bit of flare from shooting into the sun.
I love ferry rides, usually I stay out on the top deck with cameras looking for coastal shots and maybe even a whale or some dolphins. This trip was indicative of much of our time on the island as it was cold, wet, and overall uninviting. It didn’t stop me from getting on deck for a bit to get a few shots off.

View from the ferry on our crossing to Vancouver Island.
The eastern coast of Vancouver Island is a very interesting landscape. You can nearly always see the coast of the mainland with white capped mountains but in between there are many smaller islands. Many of these island are worth a trip in themselves as we have found out on previous trips. Wildlife is more abundant on the island and especially on the coast. The first place we camped was near Parksville where a number of resident bald eagles could be heard at any given point and the seals and sea lions are constantly poking their heads up as I try taking pictures of some of the shore birds coming in for what is left as the tide recedes. These are some reasons that we would love to come back to some of these areas not just for photography but to find that little piece of land so that we can explore the area much more.

Bald Eagle watching the shoreline as the tide goes out in Rathtrevor Provincial park, Parksville, BC.

Great Blue heron fishing along the coast with the BC mainland in the background.

shorebirds taking off as a wave disturbs their feeding.

Seal keeping an eye on us two legged things on the shore.
Our next trip was directly across the island to an area that has always been on my list of places to go. Ucuelet and Tofino are rather remote but definitely a tourist destination not just for the beautiful scenery but also for the surf as a choice destination for many surfers in almost any weather. As you can see by many of the photos this area is rich in coastal scenery and fantastic if you enjoy “long walks on a beach” with a significant other.

View from the lookout of Cox bay. The hike up to this point is quite a muddy climb but well worth it.
We stayed at the Surf Grove campground, which as the name suggests was filled with surfers waiting for the November storms to bring in the big waves. This was a great campsite for a base but can be rather expensive. This time of year the choices were few and there are not really any places to camp that are off grid on this part of the coast. Be sure to make plans ahead of time to stay in the area.
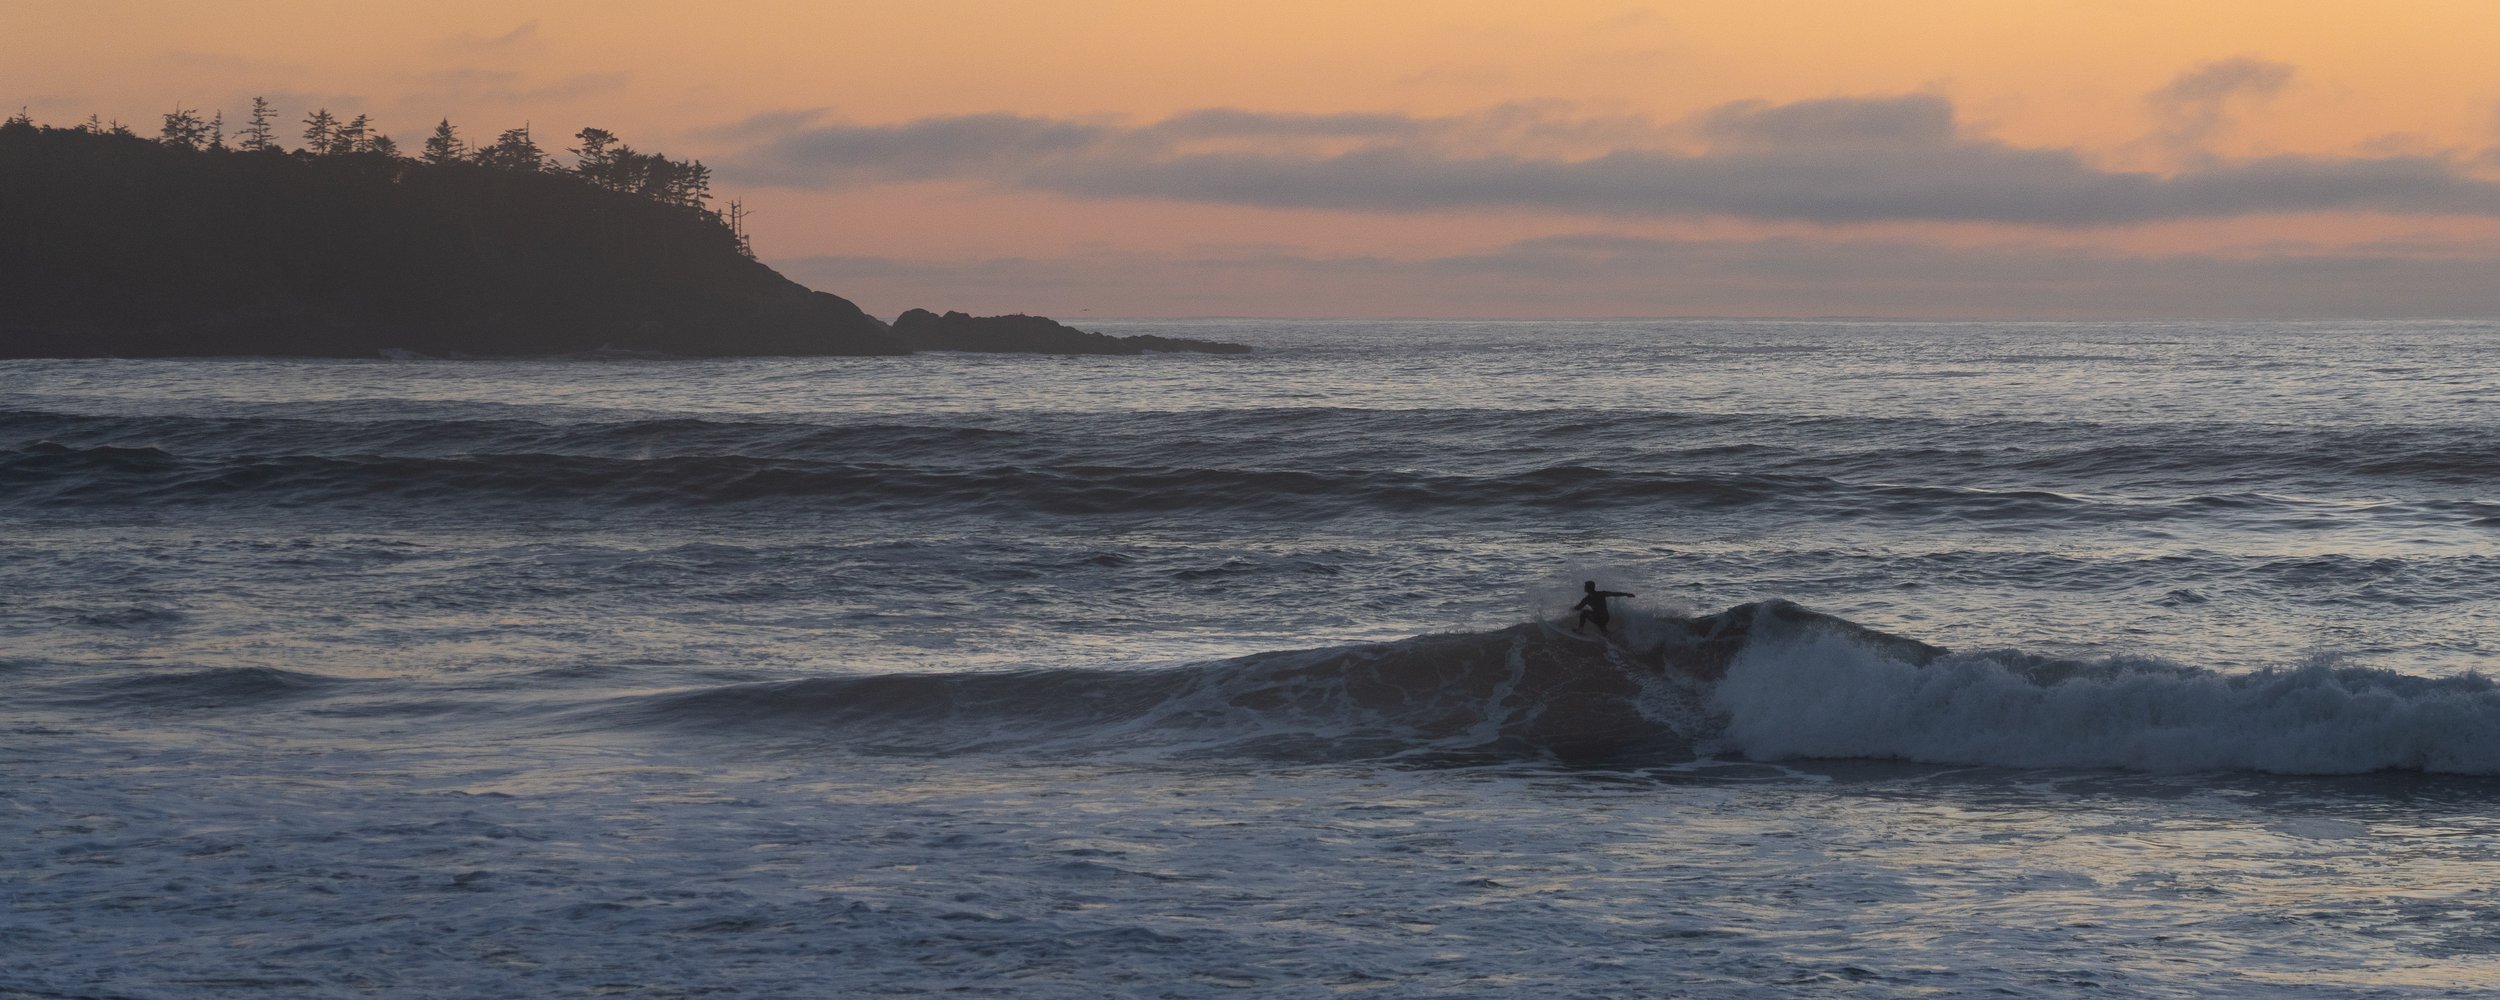
Lone surfer getting the last waves before the sun finally sets on Cox Bay beach.

Foggy morning as we walked through the trees to get to the beach, Cox Bay.

Just after sunset on Cox Bay beach, the surf was still rolling in with the rain heading our way.
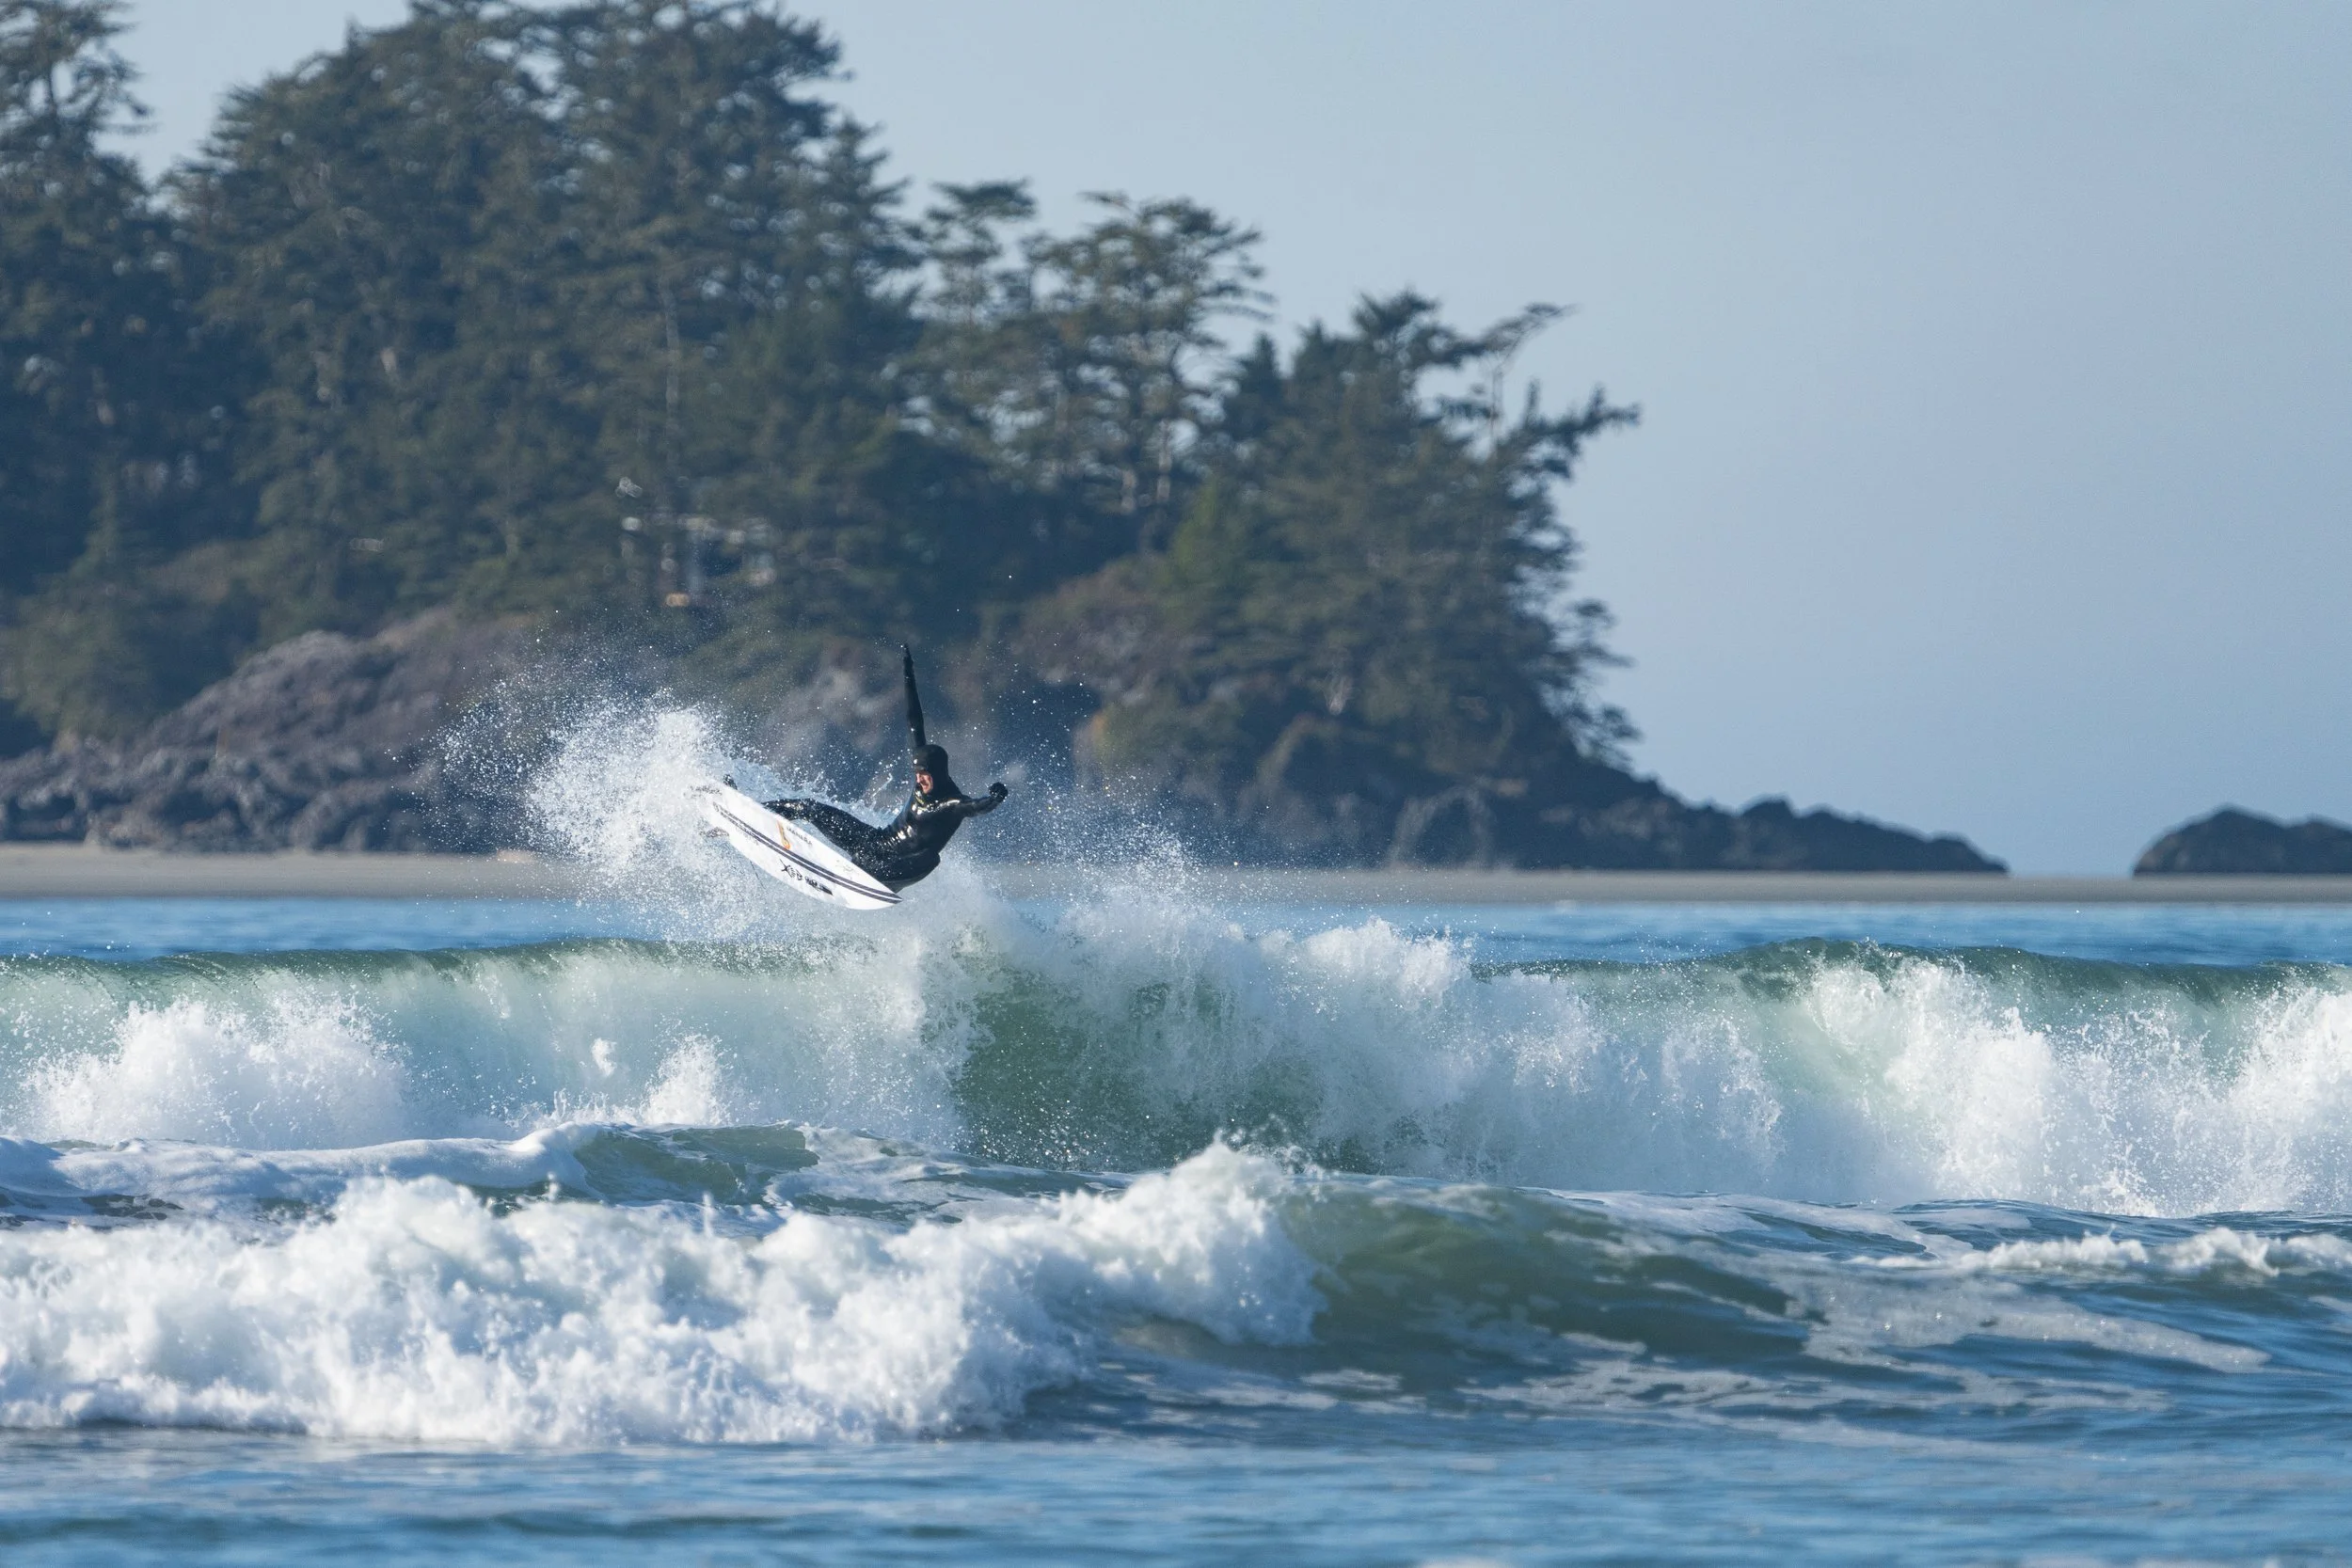
Surfer getting a little air. Good practice for when I might get to see some dolphins riding the waves.
The hikes in Ucuelet should be high on any list, but the beaches along the coast especially Cox beach shouldn’t be missed. If you are there during tourist season, there are many boat tours for marine and coastal life. I will definitely go back hopefully with a boat at some point.

Panoramic view from Ucuelet. Looks like a fantastic area to explore by boat.

Sunset looking out to the west from Ucuelet near the lighthouse.
Our time on Vancouver Island was cut short by a weather forecast that showed not just a ton of rain but one of the coldest and snowiest Novembers on record. With a 3 season camper we were not at all prepared for that.

Pine martin in Goldstream provincial park just outside of Victoria.
We ended up camping in the city near Victoria, mostly a parking lot but with a great view of the harbour and our neighbours were a collection of boathouses that looked very inviting.

Our little camper trailer and the house boats on the harbour in Victoria, BC
Our best choice was to head down to Victoria, spend a bit of time again with some friends and then take the ferry to Port Angeles to start the next stage of our tour through Washington and Oregon. Our first few weeks was definitely high on the learning curve. Figuring out the ins and outs of the trailer, dealing with plenty of rain and wind, and just learning what it means to try to do photography on the road. I am finding that flexibility is going to be the key. Take the shot even if you aren’t sure it is the one. When I have been looking back at my pictures it the shot I finally decide to work on is often not the one that I thought was my best one when I was out there.

waiting for the Port Angeles ferry to start the next leg of our journey.
Go to No.fixed.plans on Youtube for our trip vlogs and a bit more footage of Vancouver Island. Hopefully we will get back to this area in the summer.
Latest Gear - Sometimes you can get what you wish for.
Technology moves ever forward, and the improvements that I have seen in capabilities of cameras for photography and more specifically for nature photography just in the last few years are pretty amazing.
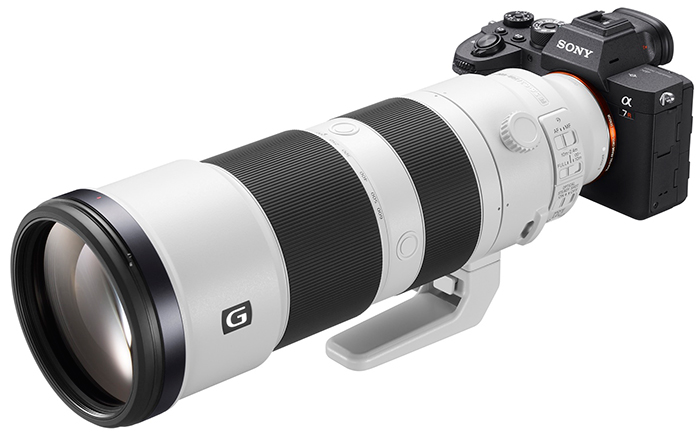
If you were to ask me what improvements I would like to see in the gear I have, I would likely tell you that I want a native super-telephoto lens that is reasonably affordable and a little sharper at the long end than the Sigma and Tamron equivalents. To go with this lens I would like to have a bit more resolution but still with the ability to shoot at a burst rate that beats my Canon 5DS and my Sony A7RII. Really, I’m pretty happy with what I have but that would be the icing on the cake at least until I win the lottery. I would also say I’m pretty lucky to be able to afford to enjoy my hobby to a level that I have gear that I wouldn’t have thought was possible back 20 years ago. But technology moves ever forward, and the improvements that I have seen in capabilities of cameras for photography and more specifically for nature photography just in the last few years are pretty amazing.
So it looks like I can now get just what I’m asking for at a price that, although not cheap, is within the realm of an active hobbyist.
First to come out is the new Sony 200-600 f5.6 - 6.3. This is a pretty interesting lens. The relatively small aperture is a consequence of building a 600mm lens that can be both hand-held and affordable to people who could never justify more than $12,000 on a f/4 prime. The big surprise to me was the internal zoom, something I have seen in the very expensive canon 200-400 f4 with the internal teleconverter and the 120-300 f2.8 Sigma which I did own and used almost exclusively with a 2x teleconverter for a number of years. This is a feature I’m very fond of even if it makes the lens a little more challenging as carry on luggage.
I have not yet tried this lens since I’m not on anyones radar as someone who influences other photographers….at least not so far. If the reviews of this lens continue to be positive I will likely pick one up before my next trip out to Vancouver Island this fall. I will obviously do some comparisons to the 100-400 Sony and Canon lenses that I use regularly as well as my 500 F/4. We shall see if it becomes my go to hiking lens.
The latest announcement from Sony is the second part of the equation for what I picture as the best combination I can get for the money for nature photography (at least until the competition manages to catch up/or push past). If you are not aware of the latest news, this would be the Sony A7RIV. This looks to be a camera to match or beat the resolution of my 5DS but also have 10 frames per second and I’m hoping autofocus tracking as good as the Sony A7III.
This may not be the camera for everyone, but I currently love the resolution of my A7RII and would like it to have the autofocus capabilities of my A7III and that lovely 10 fps and a buffer big enough for the types of bursts that I tend to do. That would be 5 or 6 shot bursts as the action happens….usually not more than a couple of those bursts in a row so this camera should be more than sufficient for me.

If you have read any of my previous blog posts you will know that high resolution is something that I really like to have. I won’t go into all the reasons it is important to me, but it really is. I’ve relied on the Canon 5DS for this resolution for a number of years now.
The biggest question is not whether or not I will buy this camera, the question is will I replace just the A7RII or will the A7III also end up sitting on a shelf most of the time. I’m not going to get rid of my Canon gear….still waiting for Canon to come out with something that makes me want to upgrade the 5DS.
The only complaints I have seen about the new Sony A7RIV is the lack of improvements in the video department, the poor touch screen implementation, and the menu system. For me none of these are reasons to avoid this camera. I do most of my video on a Canon m50 on a Ronin S. I will use the Sony A7III as well and maybe more so if this new camera becomes my main photo shooter. It certainly would have been a bonus if the A7RIV would have 10 bit recording, 60p 4k recording and higher bit rates but I’m still pretty happy with the current capabilities.
The touch screen is something that I actually don’t use much even when reasonably well implemented like on the Canon m50. I really do prefer buttons most of the time, but I would imagine that I’ll change my mind as the implementations improve. I really do like the way the Sony A7III currently works as I can change almost anything I need to with my eye to the viewfinder….at least now that I have put a few features on the programmable buttons. This is a good segue to the menus. I’ve gotten used to both Canon and Sony menus now and if I had to go into either of them in between shots I would hate them both. In reality I almost never go into the menu systems while out on a shoot on either system….both Canon and Sony, although very different are pretty good once you have used them enough to register some muscle memory. I know this is not the case for many other photographers since I see this complaint ‘ad nauseam’ on the camera forums.
It will be interesting to see in a couple of months if both Canon and Nikon introduce new competition to both this camera and lens. Until then I’ll hopefully be happy shooting on some new gear as the fall migration hits and the owls come back.
ps: ordered and confirmed delivery of the 200-600 for August 9th. I will be able to get some practice with this lens before my trip out to Vancouver Island. Big thanks to our Camera Guy - Patrick.