
Photo locations, techniques and technology. Highlights of locations we frequent as well as features on how and why we shoot the way we do, including gear reviews specific to nature photographers.
High Resolution cameras and nature photography
I was often cropping my 16 MegaPixel pictures down to a point that they were ok on the internet but as soon as I tried printing them the details started falling apart.

Northern Cardinal - Canon 5DS with Canon EF500mm f/4L IS II USM +1.4x III. 700mm, f/5.6, 1/1250s, iso1600.
I used the Canon 1D mark IV for almost 5 years, it was a great camera and I loved the ability to get 10 frames per second to get a better chance of capturing interesting moments but I did very often find that I did not have enough reach. I was often cropping my 16 MegaPixel pictures down to a point that they were ok on the internet but as soon as I tried printing them the details started falling apart. As technology has been improving on all fronts in photography we started seeing higher resolution cameras that also had some reasonable tracking capabilities, although they were definitely much slower in terms of frames per second and how big the buffer was.
Moving to a higher resolution camera, I bought the Canon 5DS originally for landscape and detail shots. This camera with a 50 MegaPixel sensor was then as is still now the highest resolution full-frame camera on the market. It had the pretty much the same autofocus system as the 5D III which at the time was pretty top tier, and really only the 1DX and Nikon equivalent were significantly better/faster at that time. I started using it for high detail bird and nature shots and soon found myself using it for action shots. I really got hooked on the detail more than the ability to get more shots per second. This meant going back to what I used to do with older slower cameras trying to time my shots to ensure I got the precise moment in a action sequence….of course I missed moments that I might have gotten with the 5D IV but when I did get it, I often had a shot that was able to be printed much larger.

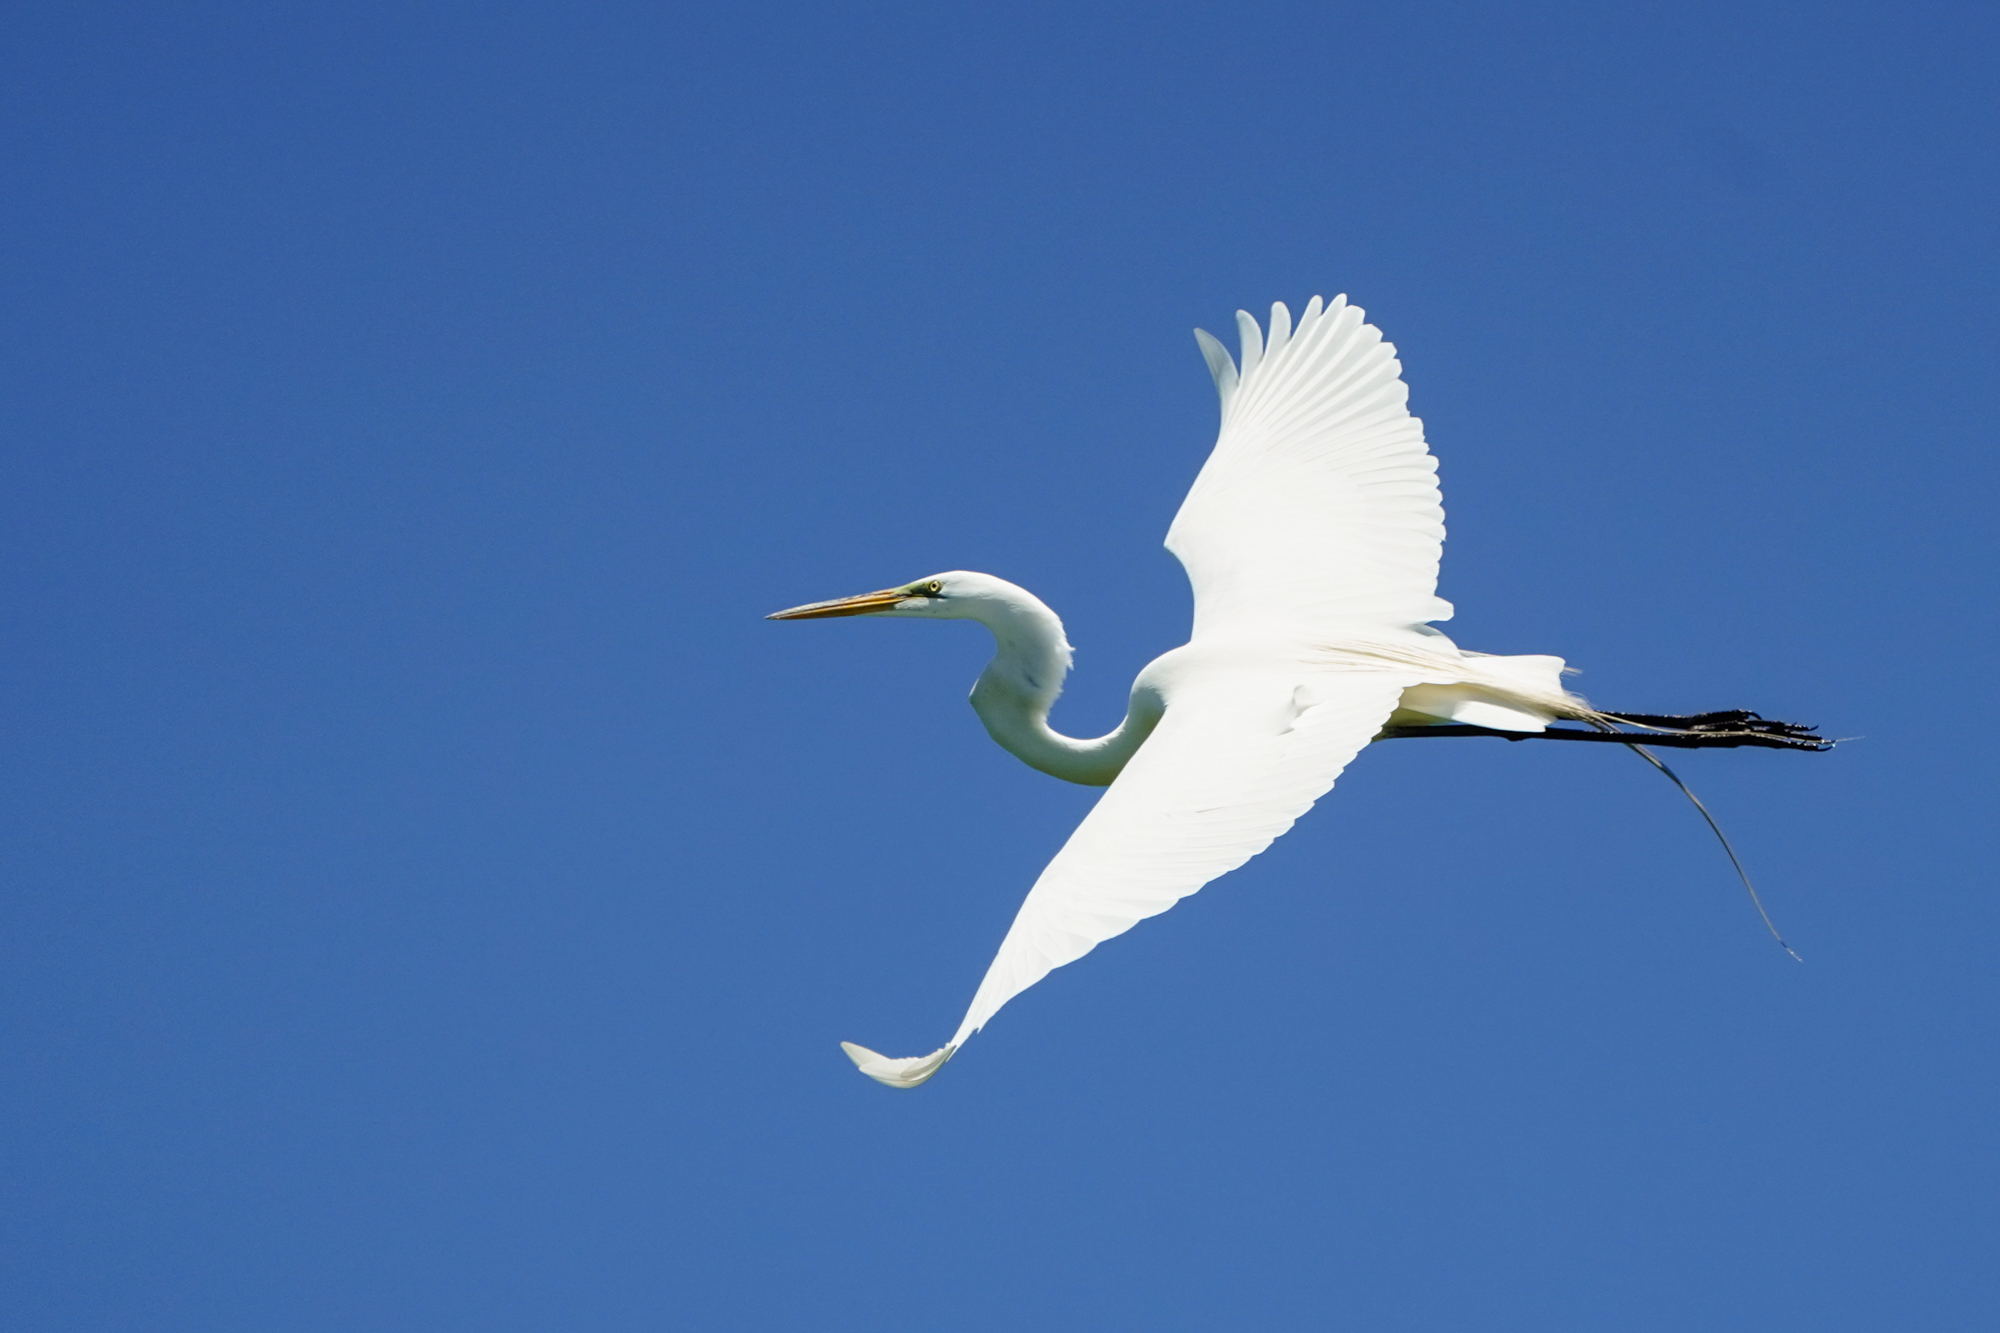
Red-shouldered hawk taking off. Canon 5DS with Canon EF500mm f/4L IS II USM +1.4x III. 700mm, 1/1250s, ISO 800. Original 8688x5792 cropped to 4178x4178. Printable at 300DPI to nearly 14 inches. Image posted at 2000x2000.
The ability to crop in on action is liberating since you can’t always get perfect composition while things are moving fast. This allows you to keep action close to the center for good autofocus tracking while shooting and crop the composition that fits the shot afterwards while still keeping enough detail for a good size print. This is starting to become less important with new mirrorless cameras that can focus just about anywhere on the sensor allowing easier composition while tracking, reducing the amount of cropping you need to do. It is nice to have both resolution and full sensor tracking, and nice to have the choices after the shot.

Highly cropped image of a red-headed woodpecker. Taken with Sony A7RII using Canon EF 100-400 F4.5-5.6 IS II and Metabones adapter. 400mm, f/5.6, 1/1000s, ISO 400. Original shot 42 MegaPixels cropped to 1543x1543.
To get a sharp image, you always need to think about technique while shooting. I shoot mostly hand held, even with the 500 and 1.4 teleconverter. You need to be close to or even faster than the reciprocal rule (see explanation below) but the image stabilizers do give you a bit more leeway. The other big bonus of this high resolution is in landscape photography and nature environmental shots. People have asked me why I didn’t go with the 5DSR and the answer is pretty simple….I saw a refurbished 5DS on the Canon web site for nearly $1000 off the list price at the time I was looking for a new camera. The difference to me was not worth another grand.

Osprey landing in Sparkleberry Swamp. Taken with Sony A7RII from a kayak. Sony FE 100-400mm F4.5-5.6 GM OSS + 1.4X Teleconverter. 560mm, f/8, 1/2500s, ISO 1600. Cropped from original shot below.
Once I became hooked on the resolution, I started seeing that I could get both high resolution and better tracking/faster shooting. I love the fact that technology is quickly improving to a point that I can do many things I thought were just not possible a few years ago. As new cameras come out, you no longer need to choose between high resolution or high number of frames per second. Sony A7RIII and Nikon D850 are already there, and I’m pretty sure that the technology in the Sony A9 will make it into higher resolution cameras within the next 3-5 years. So far Canon doesn’t have anything in this space but I would imagine it is just a matter of time now that they have the EOS R. They really just need to be able to process the data coming from the sensor a bit faster…..they have everything else in one camera or another.
Since getting the Canon 5DS I have also gone high resolution on the Sony side. Sony A7RII has also become critical for me, with the Sony 100-400 and 1.4 teleconverter I have reach and detail and can do tracking focus across nearly the whole sensor even at f8.
I do still keep a lower (funny how 24 MegaPixel can be considered low resolution to me now) resolution Sony A7III to get that 10 frames per second and great low light shooting when I do need it. That is a pretty great cheap way to get those capabilities.

Osprey landing in Sparkleberry Swamp. Taken with Sony A7RII from a kayak. Sony FE 100-400mm F4.5-5.6 GM OSS + 1.4X Teleconverter. 560mm, f/8, 1/2500s, ISO 1600. Original 42 MexaPixel image.
Technique
Reciprocal rule: Even with good image stabilization this is very important especially as you get to longer glass handheld. Even though there may not be any difference in the amount of movement you have, you will be able to detect that movement more as your resolution increases. Remember that if your subject is moving, you may still need a higher shutter speed to ensure that you stop the motion.

Cactus Wren taking off. Cropped image from Sony A7RII. FE 100-400mm F4.5-5.6 GM OSS. 400mm, f/6.3, 1/2500s, ISO 800.
Explanation: skip over this if old news to you.
In general for full-frame cameras the reciprocal rule is a good guideline for capturing subjects without ending up with some blur due to the cameras movement while the shutter is open. To ensure sharp images of moving subjects you may need faster shutter speeds still.
With no stabilization and reasonably good technique handheld you should be able to get sharp images with a shutter speed that is the reciprocal of the focal length of the lens. This is definitely a guideline to start with and it is a good starting point. So if you have a full-frame camera and a 400mm lens, a 1/400 shutter speed would be a good starting point for a subject that is not moving quickly. If you are using a camera with a smaller sensor then multiply this by the crop factor for the starting point.
Now with the latest lenses and cameras that have image stabilization you can get sharp images at shutter speeds that are much slower (longer duration of the sensor being exposed). I have found that on static objects I can get about 5 times (more than 2 stops improvement) on the Canon and closer to 10 times (more than 3 stops) on the Sony where there is both camera and lens stabilization. Both companies will advertise that you can get more than that but this is what I have experienced handheld in most conditions.

Great Horned Owl from a perch high in a White Pine, far enough that I had to crop in significantly. Shot handheld with Canon 5DS with EF500mm f/4L IS II USM +1.4x III. 700mm, f/7.1, 1/125s, ISO 1600.
Subject movement: In these cases we are not taking into consideration subject movement or camera movement while shooting.
For moving subjects I will try to never get below 1/1000s and for small birds in flight I will normal double that again. I do this not because they are smaller, but because they move very quickly and I have to be closer to them. This will often mean higher ISO than I would prefer but a little noise is something you can work with, a blurry subject is most often (unless you are specifically going for that) going to mean a lost shot.

Female Mallard taking wing. Using fast shutter to stop wing motion….still a little visible at wing tips. Canon 5DS with EF500mm f/4L IS II USM +1.4x III. 700mm, f/5.6, 1/4000s, ISO 1600.
Hand held technique: The longer and heavier the lens the more you will see the effects of your good or bad technique. Holding your breath as you focus and as you hit the shutter can reduce some shake and I have found to be a good way for me to concentrate on being steady. Find a way to stabilize your arms, elbows in to your body if standing. If you can stabilize your body or the camera against a tree, fencepost even better.

Young black bear in the fields in Cades Cove. I would often use fence posts to help steady my shots as I waited for action from these bear. Taken with Canon 5DS using EF500mm f/4L IS II USM +1.4x III. 700mm, f/5.6, 1/640s, ISO 1600.
Smooth motion while tracking: This gets more difficult as the lens gets longer and heavier. When I first got the Canon 500mm it took quite a few weeks of shooting to get used to keeping a subject tracked even though I had been using a 100-400 with the 1.4 teleconverter regularly. The length of the lens was a new challenge to keep steady as was the different weight distribution. Every lens and camera combination has a different center of mass, and you hold them at slightly different points. I have found that the only real way to adjust to this is more time practicing. Panning is a difficult technique to perfect and it only gets more difficult as your resolution increases. Smooth movements and smooth action on the shutter button will give you the best chance to get a sharp subject.

Barred Owl hunting for Vole. Canon 5DS with EF500mm f/4L IS II USM. 500mm, f/4, 1/2500s, ISO 1600
What I’m hoping for in the Future and what I think is coming.
There are still times that having 10 or even 20 frames per second is useful, I have missed what I think was the best moment in a string of shots. However, I have learned to work on the timing and when I get the shot I can do more with it than before. I keep a Sony A7III with a 100-400 within reach for those moments that look like they will turn into faster action.
What I would love to see in the next few years is a combination of what I already see either coming down from high end cameras or just putting a number of existing bits in one camera.
The Sony A9 and the Nikon D850 as well as the Sony A99II that has been mostly forgotten have a good deal of the technology that I think will be common in a couple of years. Currently and with the coming firmware updates the Sony A9 has most of the autofocus capabilities that I can currently imagine needing. I’m sure the first implementations of animal eye autofocus will not be perfect but that will be fantastic as it improves to a point that all I really need to do is choose the animal/eye I want and then I can purely concentrate on the composition and action.

White Tailed buck in the fields near Whitby, Ontario. Canon 5DS with EF500mm f/4L IS II USM +1.4x III. 700mm, f/5.6, 1/200s, ISO 1600.
I do think that the electronic shutter on the A9 is what I would like to see on a high resolution sensor the most. I realize that is also the most difficult and likely expensive thing to want. Silent shutter would be amazing for nature, however the implementation in any camera other than the A9 means that it is only really useful for static subjects. This is due to the amount of time it takes to access and push to memory all the the data from the sensor and currently means that you will notice motion artifacts in your shots on anything other that the A9.
Buffer is the next issue when looking at high resolution and high frame rates. The ability to get >100 raw images before the buffer slows you down may seem like a lot but when action happens in nature I often will take 3-5 shot bursts and may need to do many of these until the action stops. Examples might be bull elk fighting or herons chasing each other. The solution to this will come in faster memory cards and larger memory buffers…both of these will increase cost of camera and not everyone will want to pay for it.
Really what I’m hoping for is a combination of the Sony A9 and the Nikon D850 and I know if it comes out I’m going to not like the price. I do think a camera like this is coming, I just don’t know who is going to come out with one first. Sony has already shown most of the capabilities and the A9 shows they are willing to put something out there. Canon and Nikon both are likely to first try to come out with a fast 20-30 MegaPixel fast mirrorless camera for the upcoming Olympics and are unlikely to bother with a higher resolution one that also has high frame rates at this time since there are likely not that many sport shooters that are currently asking for that.
Beach Boneyards of South Carolina
The coast changes rapidly along the eastern seaboard. Weather makes new sand bars and takes them away over time and sometimes within one storm. One interesting part of this change are the beach boneyards…

Salwa shooting through the roots on the beach at Botany Bay Plantation
Growing up in the snow belt of Ontario we all dreamed of March break on the beaches of the South East coast. You thought of the sandy beaches, the warm water (or at least not frozen solid), golf courses and beach houses. Interestingly, now that I can get to those beaches in a few hours I look for things that are a bit different in my beach vacations.
The coast changes rapidly along the eastern seaboard. Weather makes new sand bars and takes them away over time and sometimes within one storm. One interesting part of this change are the beach boneyards, locations that don’t look like they have changed in years with dead trees on the beach that are exposed every 6 hours or so with the tide.
There are two locations in South Carolina that are fairly easy to get to wander along and are fantastic for landscape photography. Hunting Island State Park is a good starting point. You can camp on the Island or stay in the nearby town of Beaufort. The other location is Botany Bay Plantation close to Edisto Beach. Edisto Island also has camping or beach houses that can be rented.
Both of these locations have been hit hard by hurricanes in the last couple of years, changing the landscape and often making it a challenge to get out to these locations.

So many textures and details on the beach at Hunting Island state park
Hunting Island
Camping at Hunting Island State park will allow you access to the beach boneyard as well as the salt ponds and marsh areas at all times of day or night. You are going to want to walk this beach at sunrise, during the day, through sunset and even get night shots with long exposures.
Shore birds are plentiful wandering around the dead trees as the tide goes out, with plenty of herons and egrets looking for fish caught in tidal pools. Bald eagles and Osprey can be found along the salt marsh and in the big pond. Pelicans will be feeding just off shore and black skimmers flocks will fly by. In the woods there are plenty of small birds including the painted bunting….or at least that is what I have been told….still don’t have a good picture of one.

Snowy egrets playing and preening after the tide went out in the salt marsh on Hunting Island.
Late spring and early summer is a good time to chance upon nesting loggerhead turtles. Take a look at the website for when it is best to see the turtles nesting and the babies hatching.
One thing to be prepared for is the no-see-ums. These little bugs live up to there name and can be active to the point of frustration on the beach just at dusk. If you can make it through, they do disappear again leaving you to enjoy the night sky.

Sunrise on the beach at Hunting Island State park. Get out early, it is worth it.
For dusk and dawn definitely bring a good tripod, long exposures of the water swirling around the trees can look amazing. Astrophotography can be excellent as well, especially if you use some of the trees in the foreground.
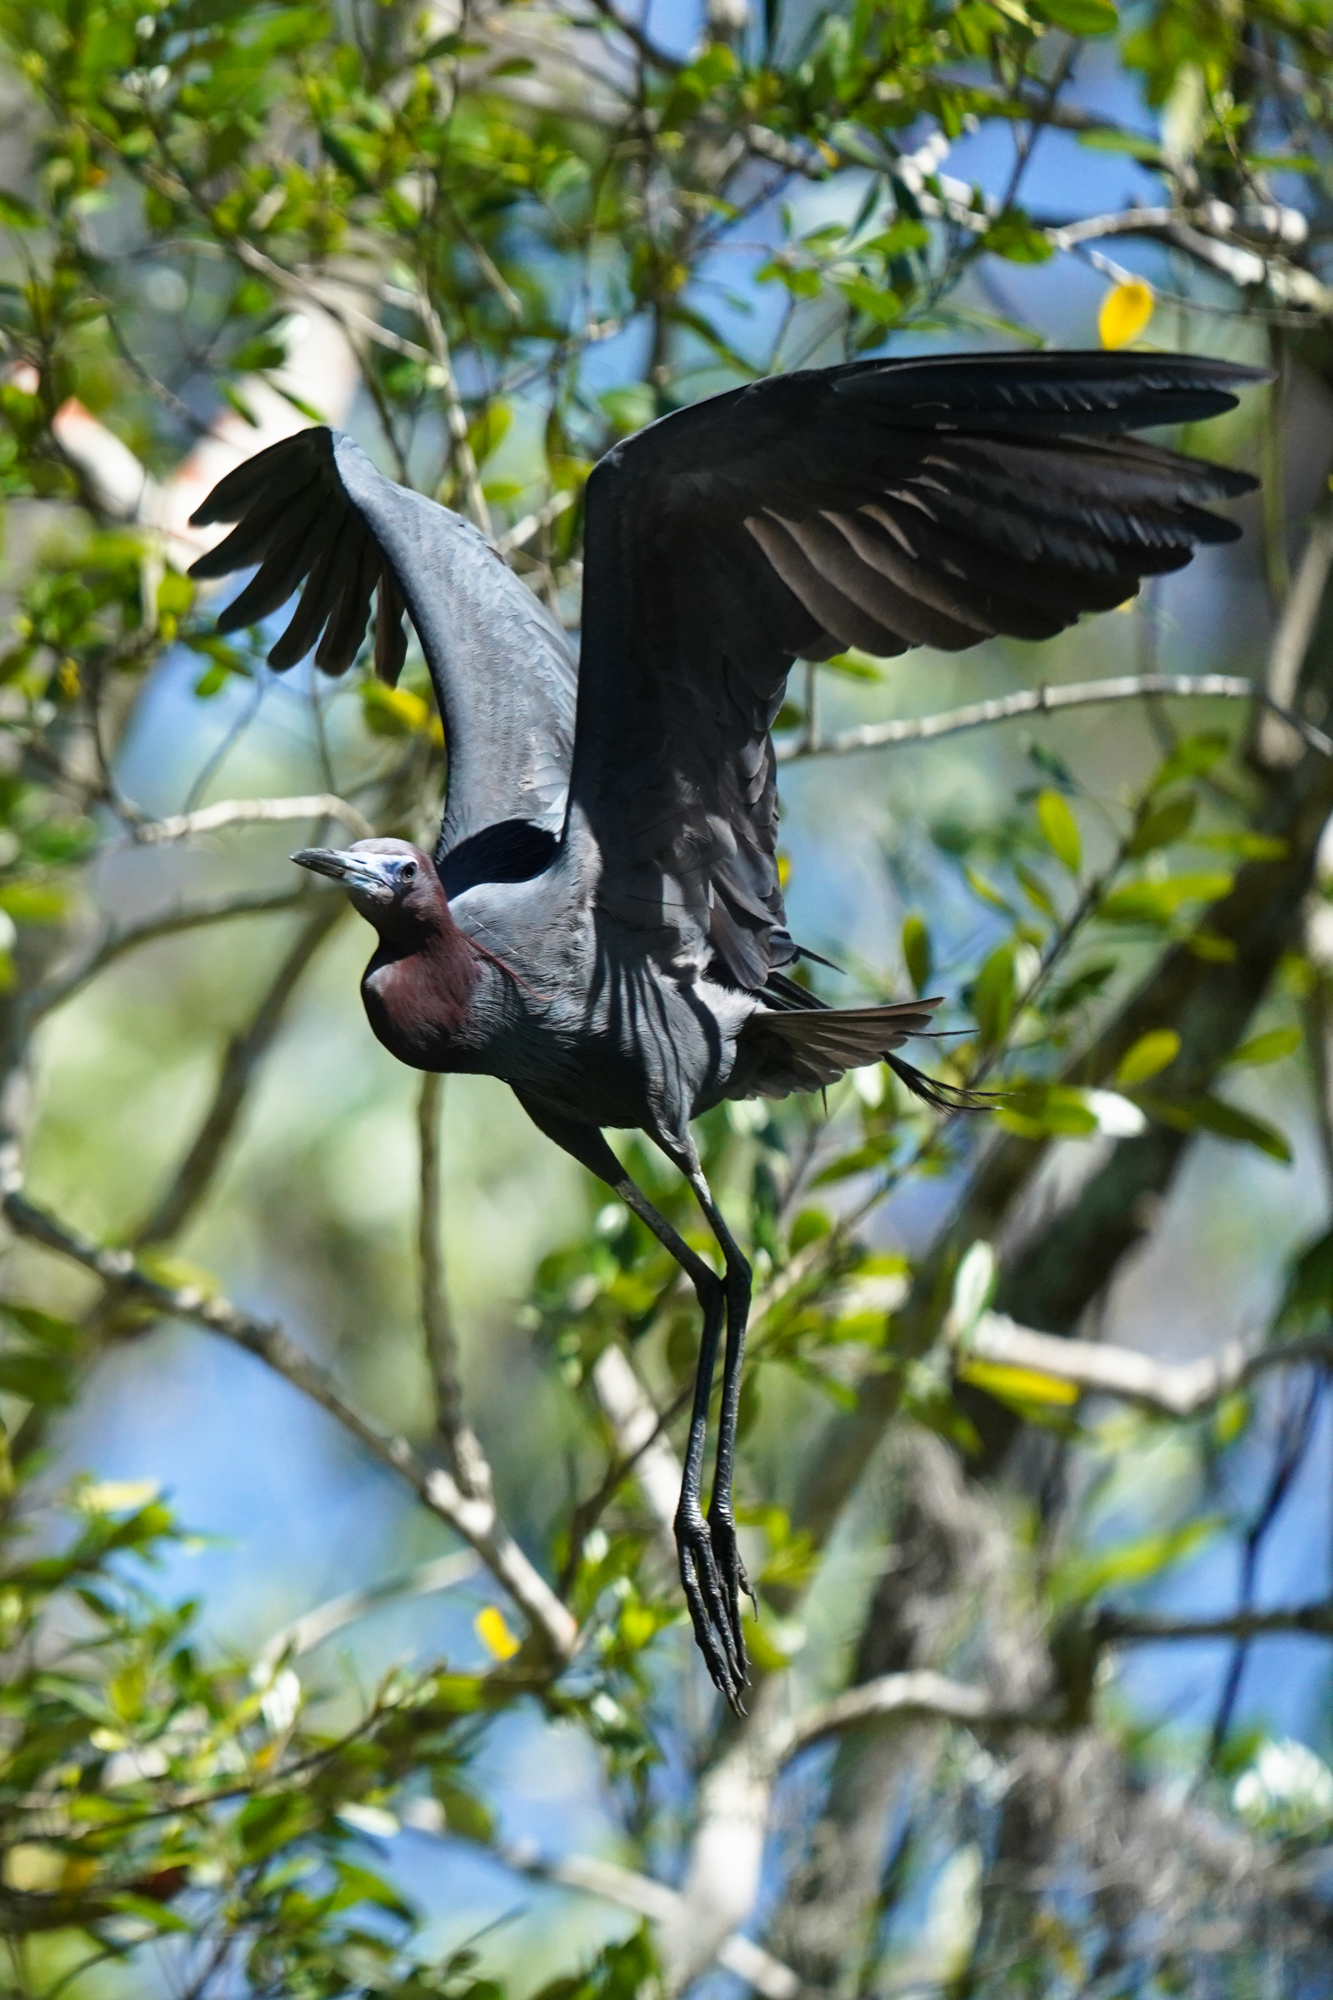
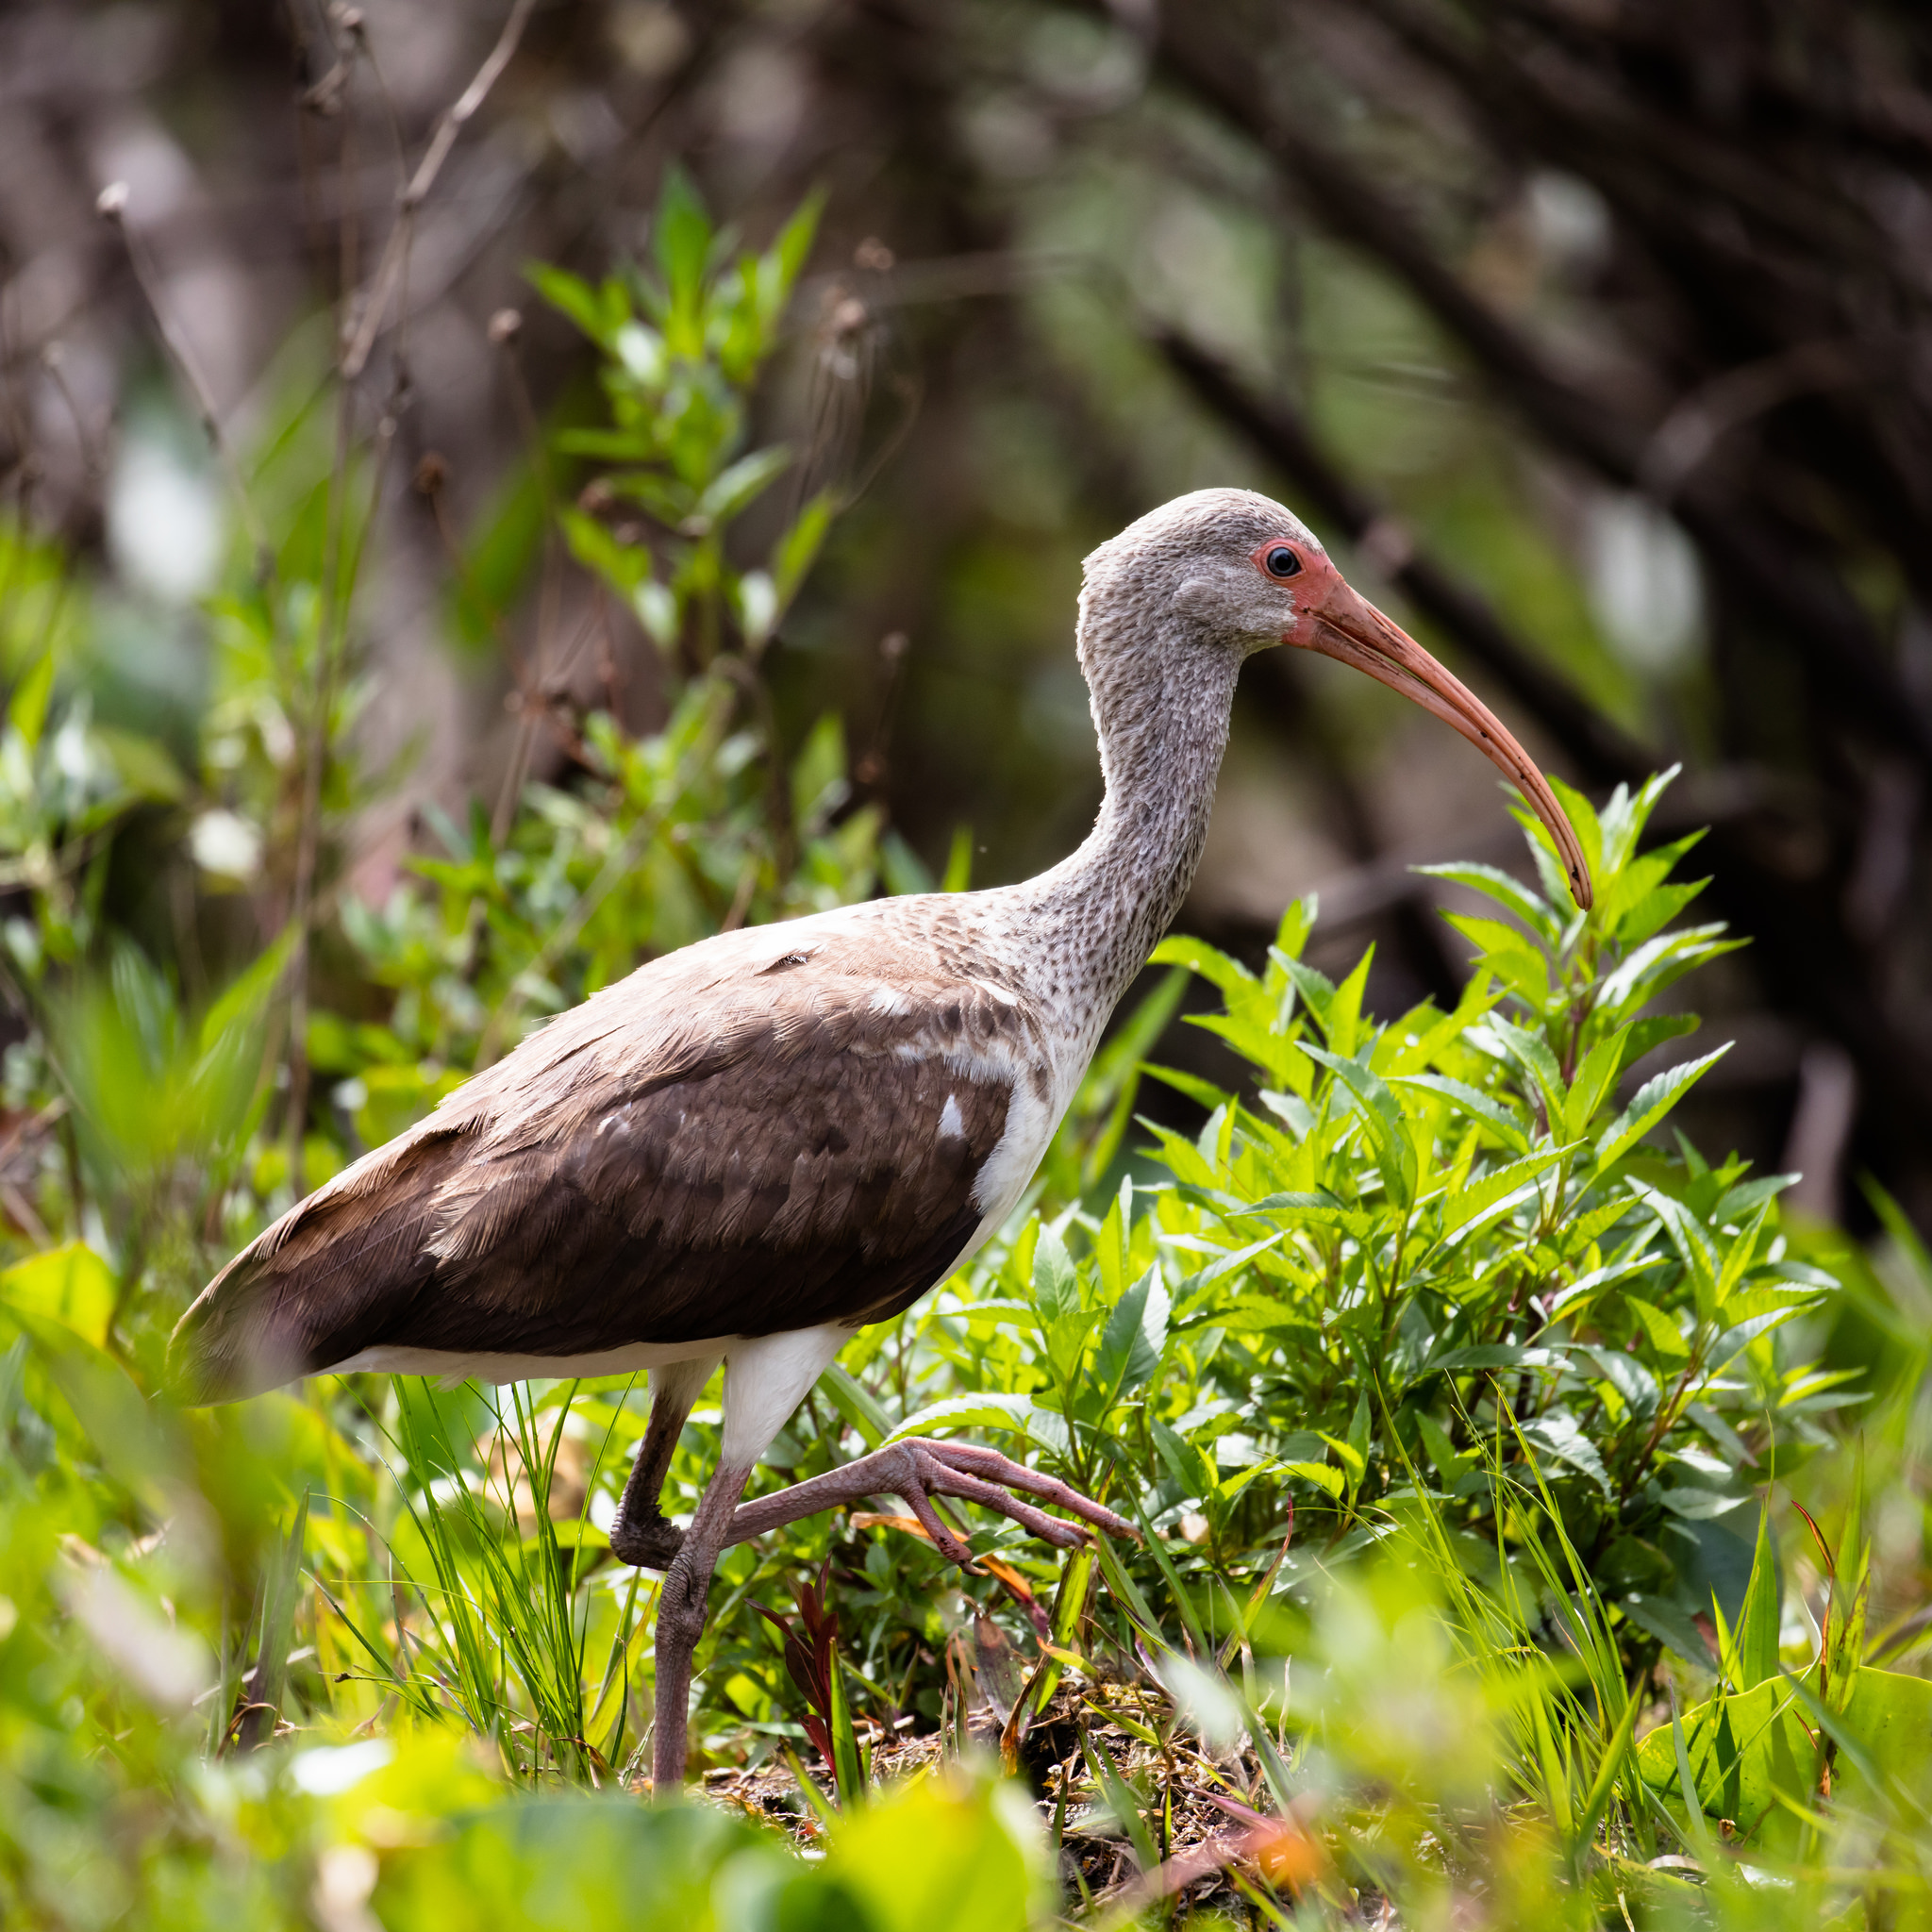
As the tide goes out take out your telephoto lens and start looking for birds. Ibis, tri-colored herons, little blue herons, wood storks and plenty of egrets can be found looking for what didn’t make it back to the ocean. This is a great place to get down low and shoot these birds feeding and fighting at eye level.

Tri-colored heron hunting on hunting island
Botany Bay Plantation - Edisto Beach
Edisto Beach State park has camping on the beach and a second area that is more protected on the other side of the salt marsh. Both locations make for a great place to relax. The beach is a “no light zone” or certain times of the year when the loggerhead turtles nest on this beach. There are organized night walks if you are there in June or July. If you want to take pictures you will need to do so without flashes, so high ISO capabilities will be important.

Sunset on the beach bone yard at Botany Bay Plantation
The beach itself is great for morning and evening walks with tonnes of seashells to pick through. The boneyard beach is a few miles away on Botany Bay Plantation which is accessible from dawn to dusk but check the schedule as it closes for hunters a few times a week. The drive in through the plantation is beautiful as the live oaks make a canopy over the road and the sun tries to make it through the leaves.
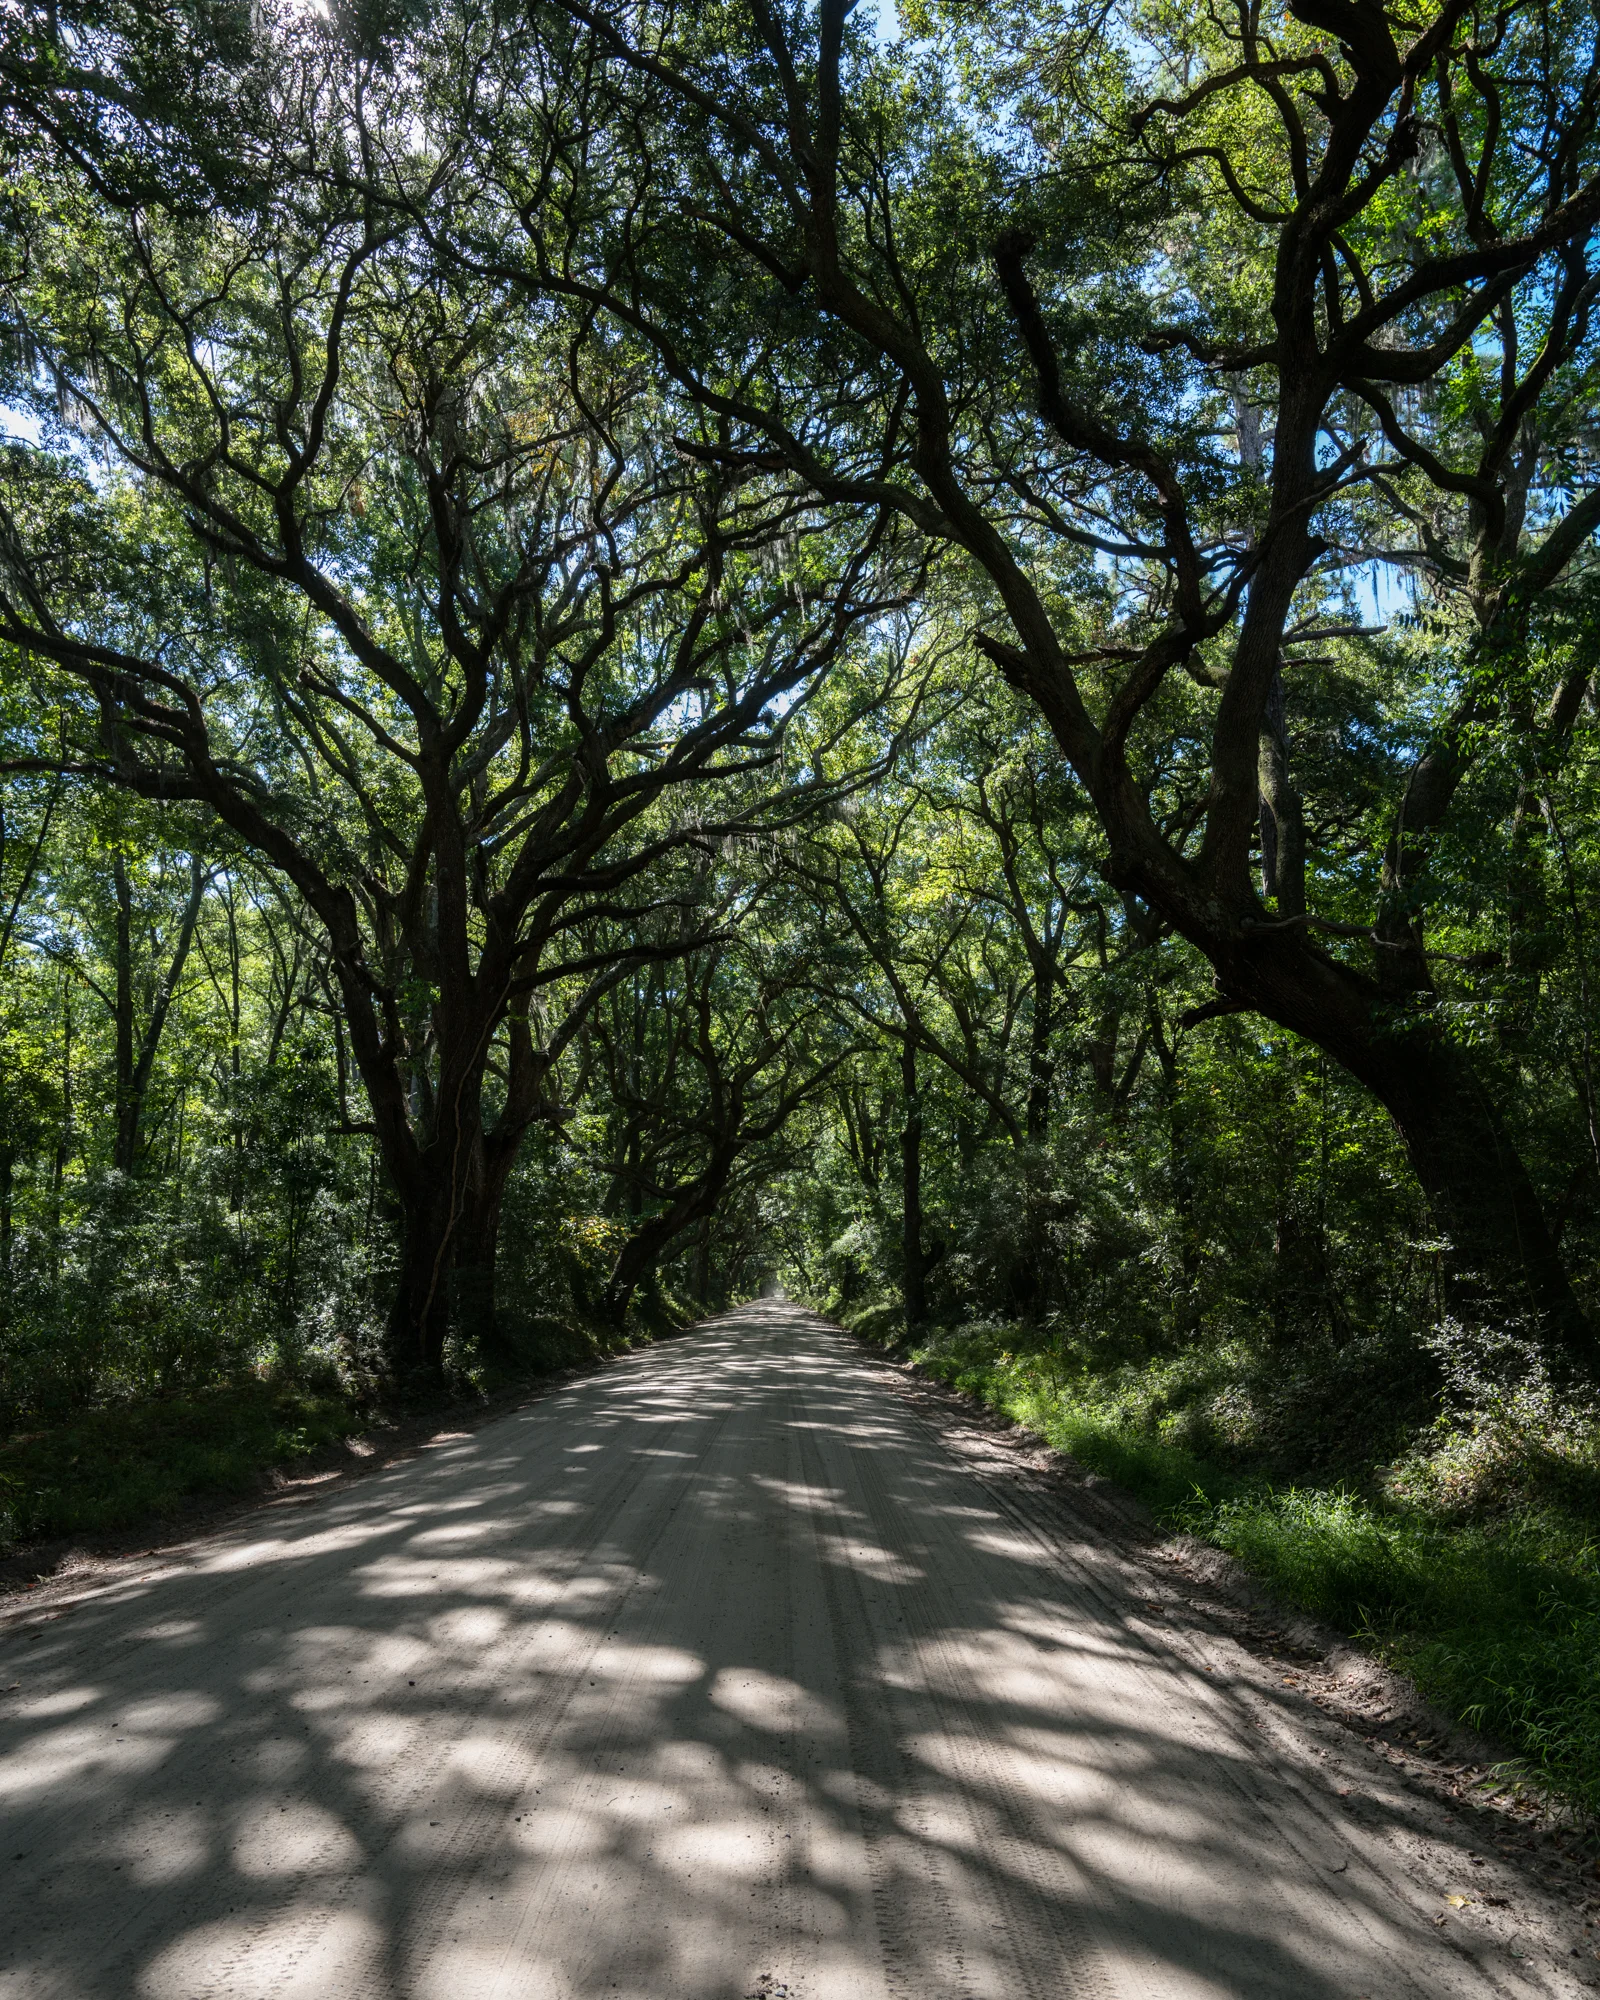
Live Oak canopy drive into Botany Bay Plantation.
To get to the beach itself you need to walk across the salt marsh and through a couple of hammocks (tiny islands with many small birds). As you walk over the last sand bank you come directly into the middle of a boneyard of trees in all directions. The best time to go is about an hour after high tide and up again until about an hour before the next high tide. Sea shells are everywhere as it is illegal to remove anything from the beach. This can make for some amazing foreground elements in your landscape shots. Each time we go we find new compositions based on the height of the tide and what the weather has brought in or moved around.

Shadows and silhouettes at sunset on Edisto Beach
During the high sun we look for details in the scene and wait for the sun to head down for some great shadows and less harsh scenes. If the tide is right, definitely stay for the sunset and have a couple of compositions picked out. The tide moves so quickly that you might need to change up even as the sun starts to set.

Getting down low with ruddy turnstones
There is definitely more to see on the Plantation, a number of places to hike along trails, tidal creeks with plenty of birds and even dolphins fishing along the creeks herding fish up onto the banks and almost beaching themselves to feed. Nearby there is Ernest F. Hollings Ace Basin National Wildlife Refuge with hikes along manmade channels and beautiful old live oaks surrounding an old plantation house.
There is always more to explore on the south east coast, and hopefully soon we will get a chance to tell you about the Georgia and North Carolina coastlines.
Sparkleberry Landing - Entry to a Cypress Swamp
From a nature lovers point of view, there is a hidden gem in central South Carolina that I kind of happened upon accidentally.
From a nature lovers point of view, there is a hidden gem in central South Carolina that I kind of happened upon accidentally. My first month in the south was on my own, and with a rental car and not much to do on the weekends, I began scouting for interesting locations to go to once Salwa joined me. On one of those day trips, I went looking for good locations for shooting birds along some of the larger interior lakes. I wasn’t inspired until near the end of the route on the way back towards Greenville when I noticed a boat launch sign on the north shore of Lake Marion. On the map, it didn’t look like there was much lake at that point for a launch, but I drove down a dusty dirt road lined with dilapidated single wides and rundown pickups until I saw a bunch of empty boat trailers and a concrete boat launch that lead to the water.

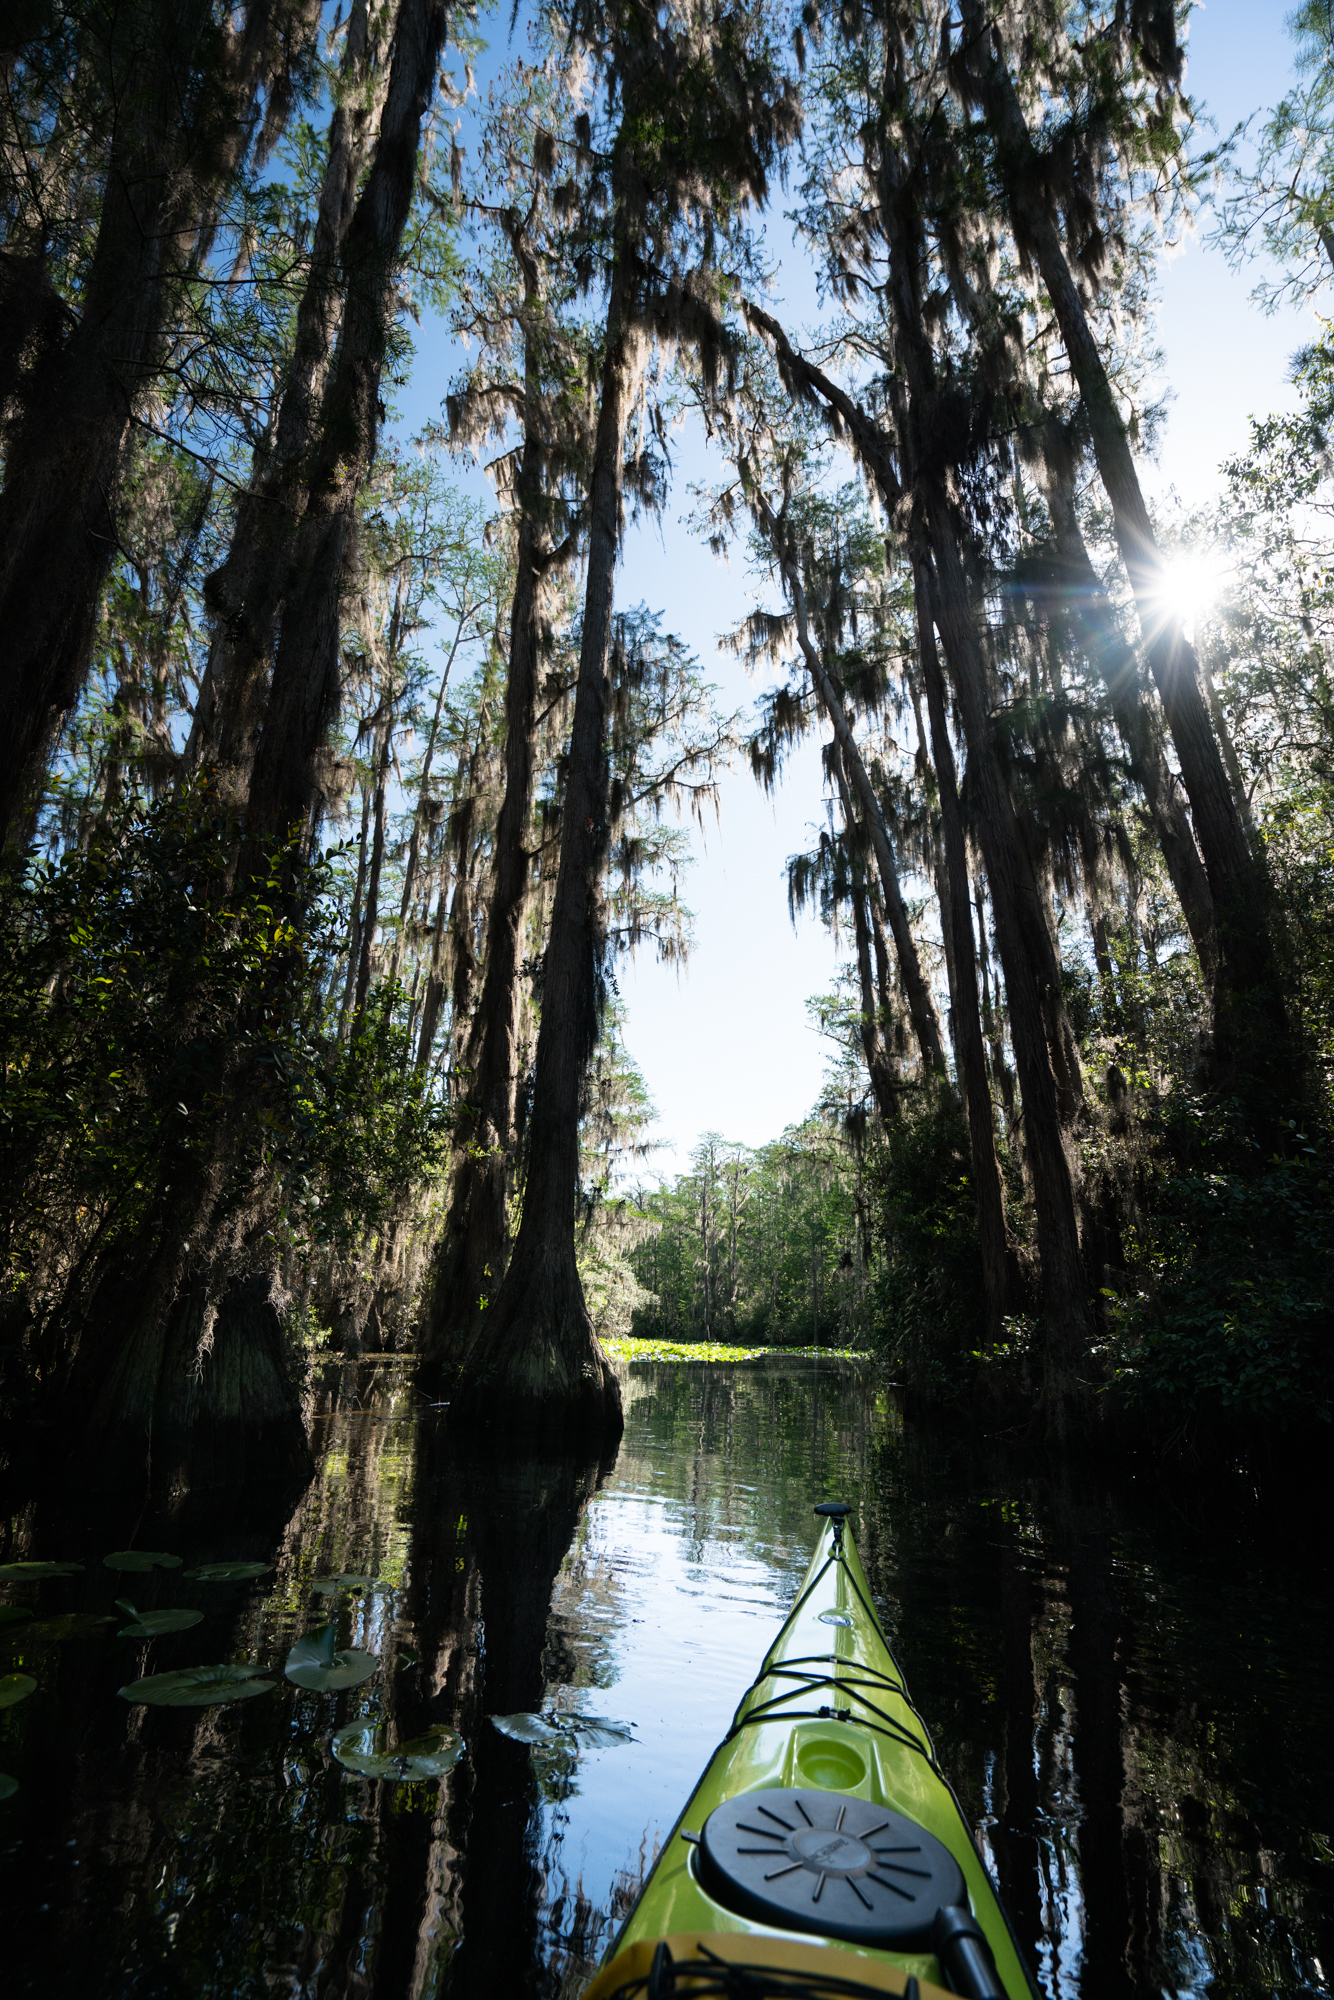
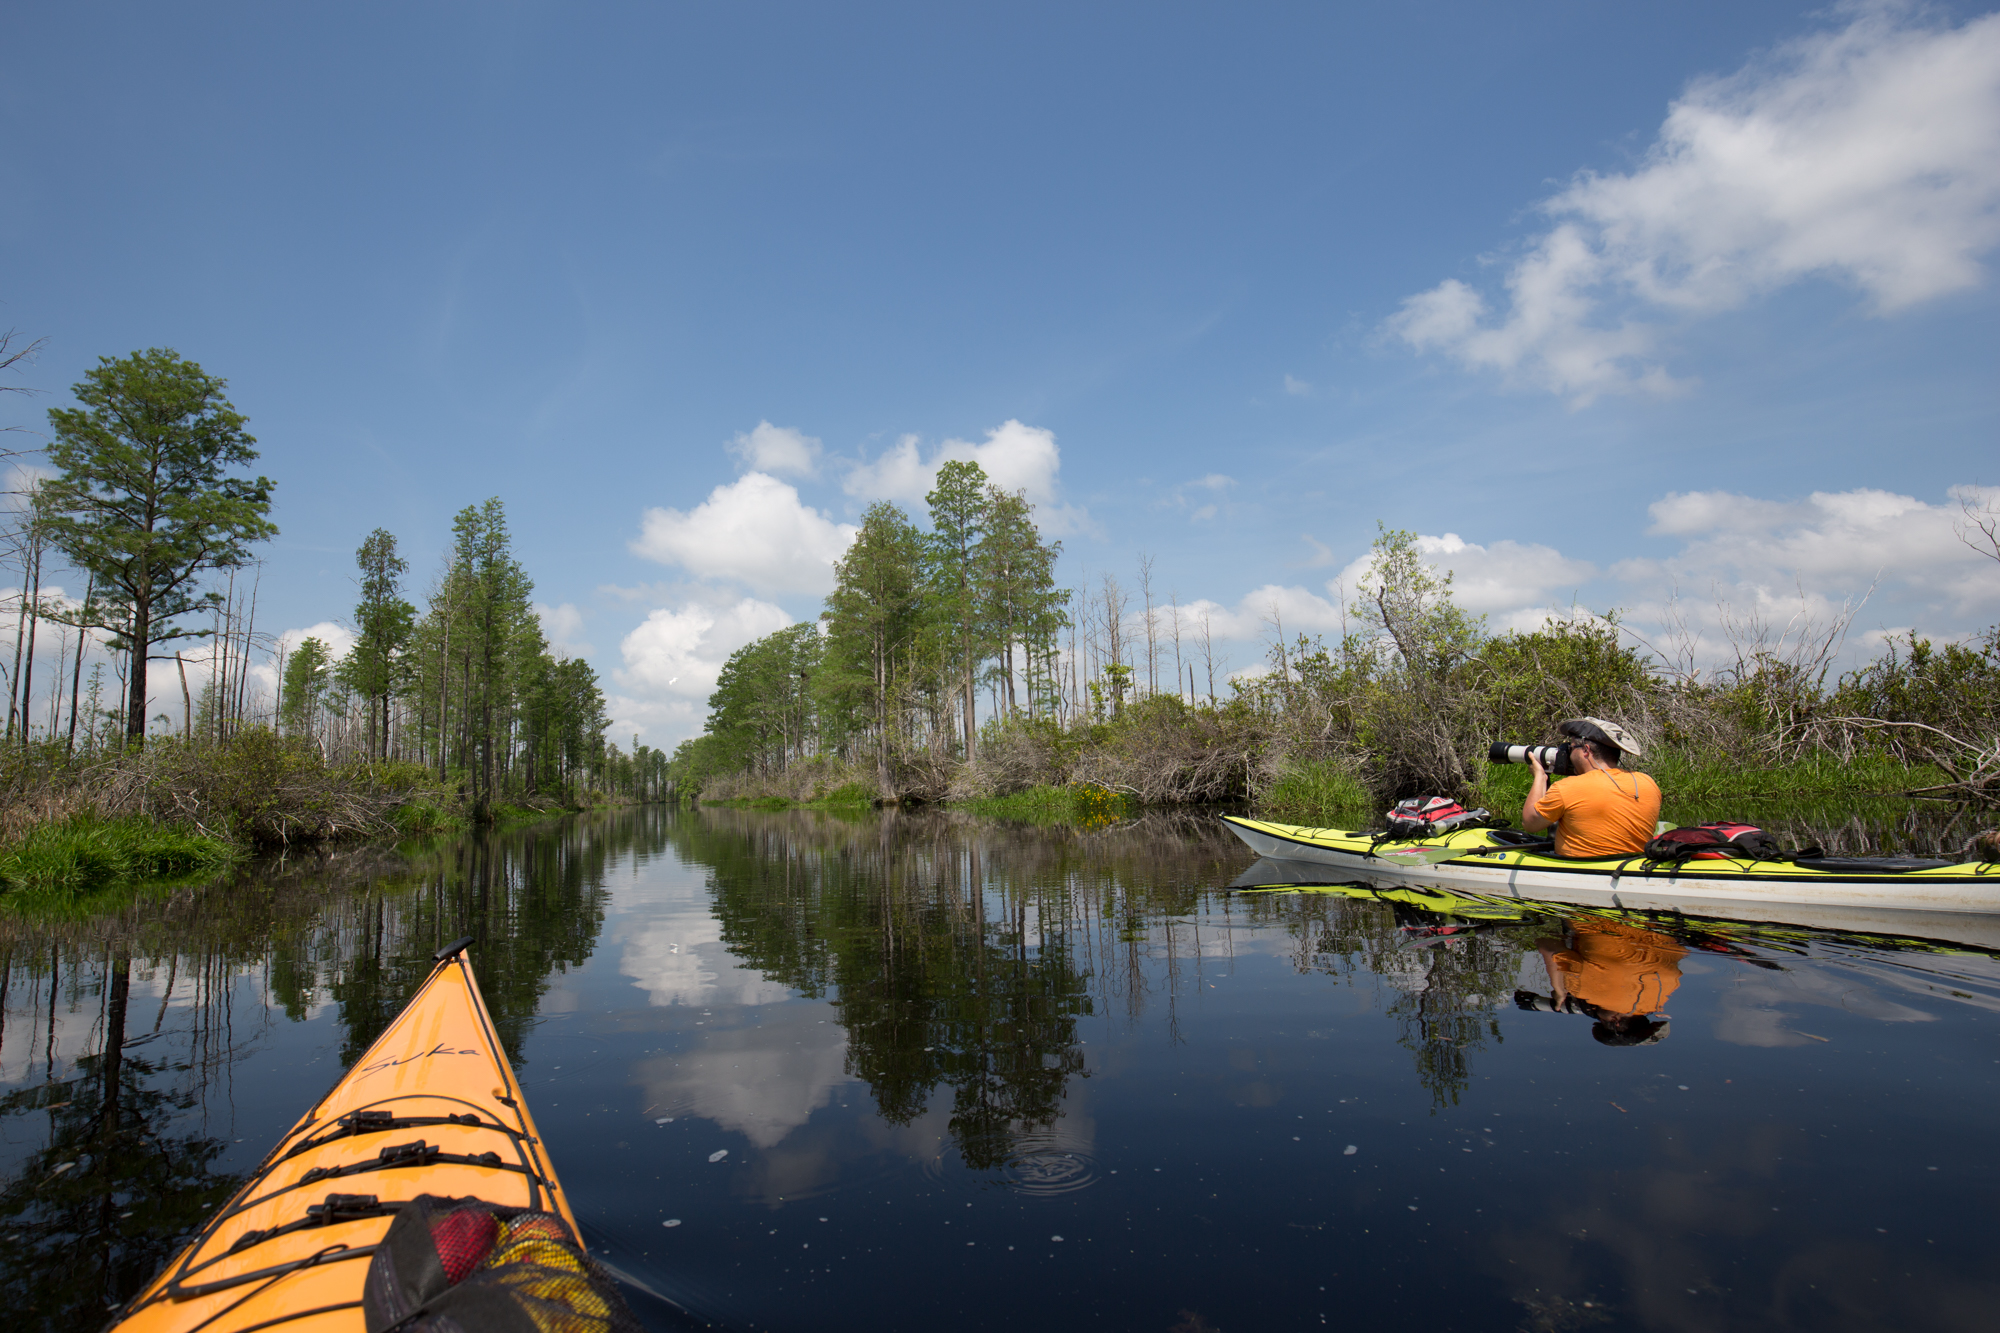
Paddling past bald cypress trees as we take off from Sparkleberry landing on the North-West end of Lake Marion, SC.
Getting out of the car, I wandered over to a guy pulling his little flat bottom fishing boat out and asked a few questions to make sure I was actually in a public spot. This is when I got my first real view of what might be the best little kayaking location in all of South Carolina. It would take another couple of months before the movers brought our kayaks, but once we put in here we were hooked and have gone back several times, each time presenting new and different sights and experiences.

Salwa in her Current Designs Suka Kayak with a backdrop of spanish moss
The landing looks out onto a small opening surrounded by beautiful cypress trees with a path at the end that heads out into the greater swamp. Depending on the time of year, you can follow that route out, or in the wetter seasons, you can just head straight into the trees and explore the maze (at least in a kayak or canoe).
The locals all seem to know the routes through the trees, and there are markers along the way, but if you do come down here I would suggest you have a GPS to plot where you start so that you can retrace your path if needed. We’ve gotten turned around a few times looking for alternate routes back to the launch without much luck.

It is so easy to wander off path, so many things to see
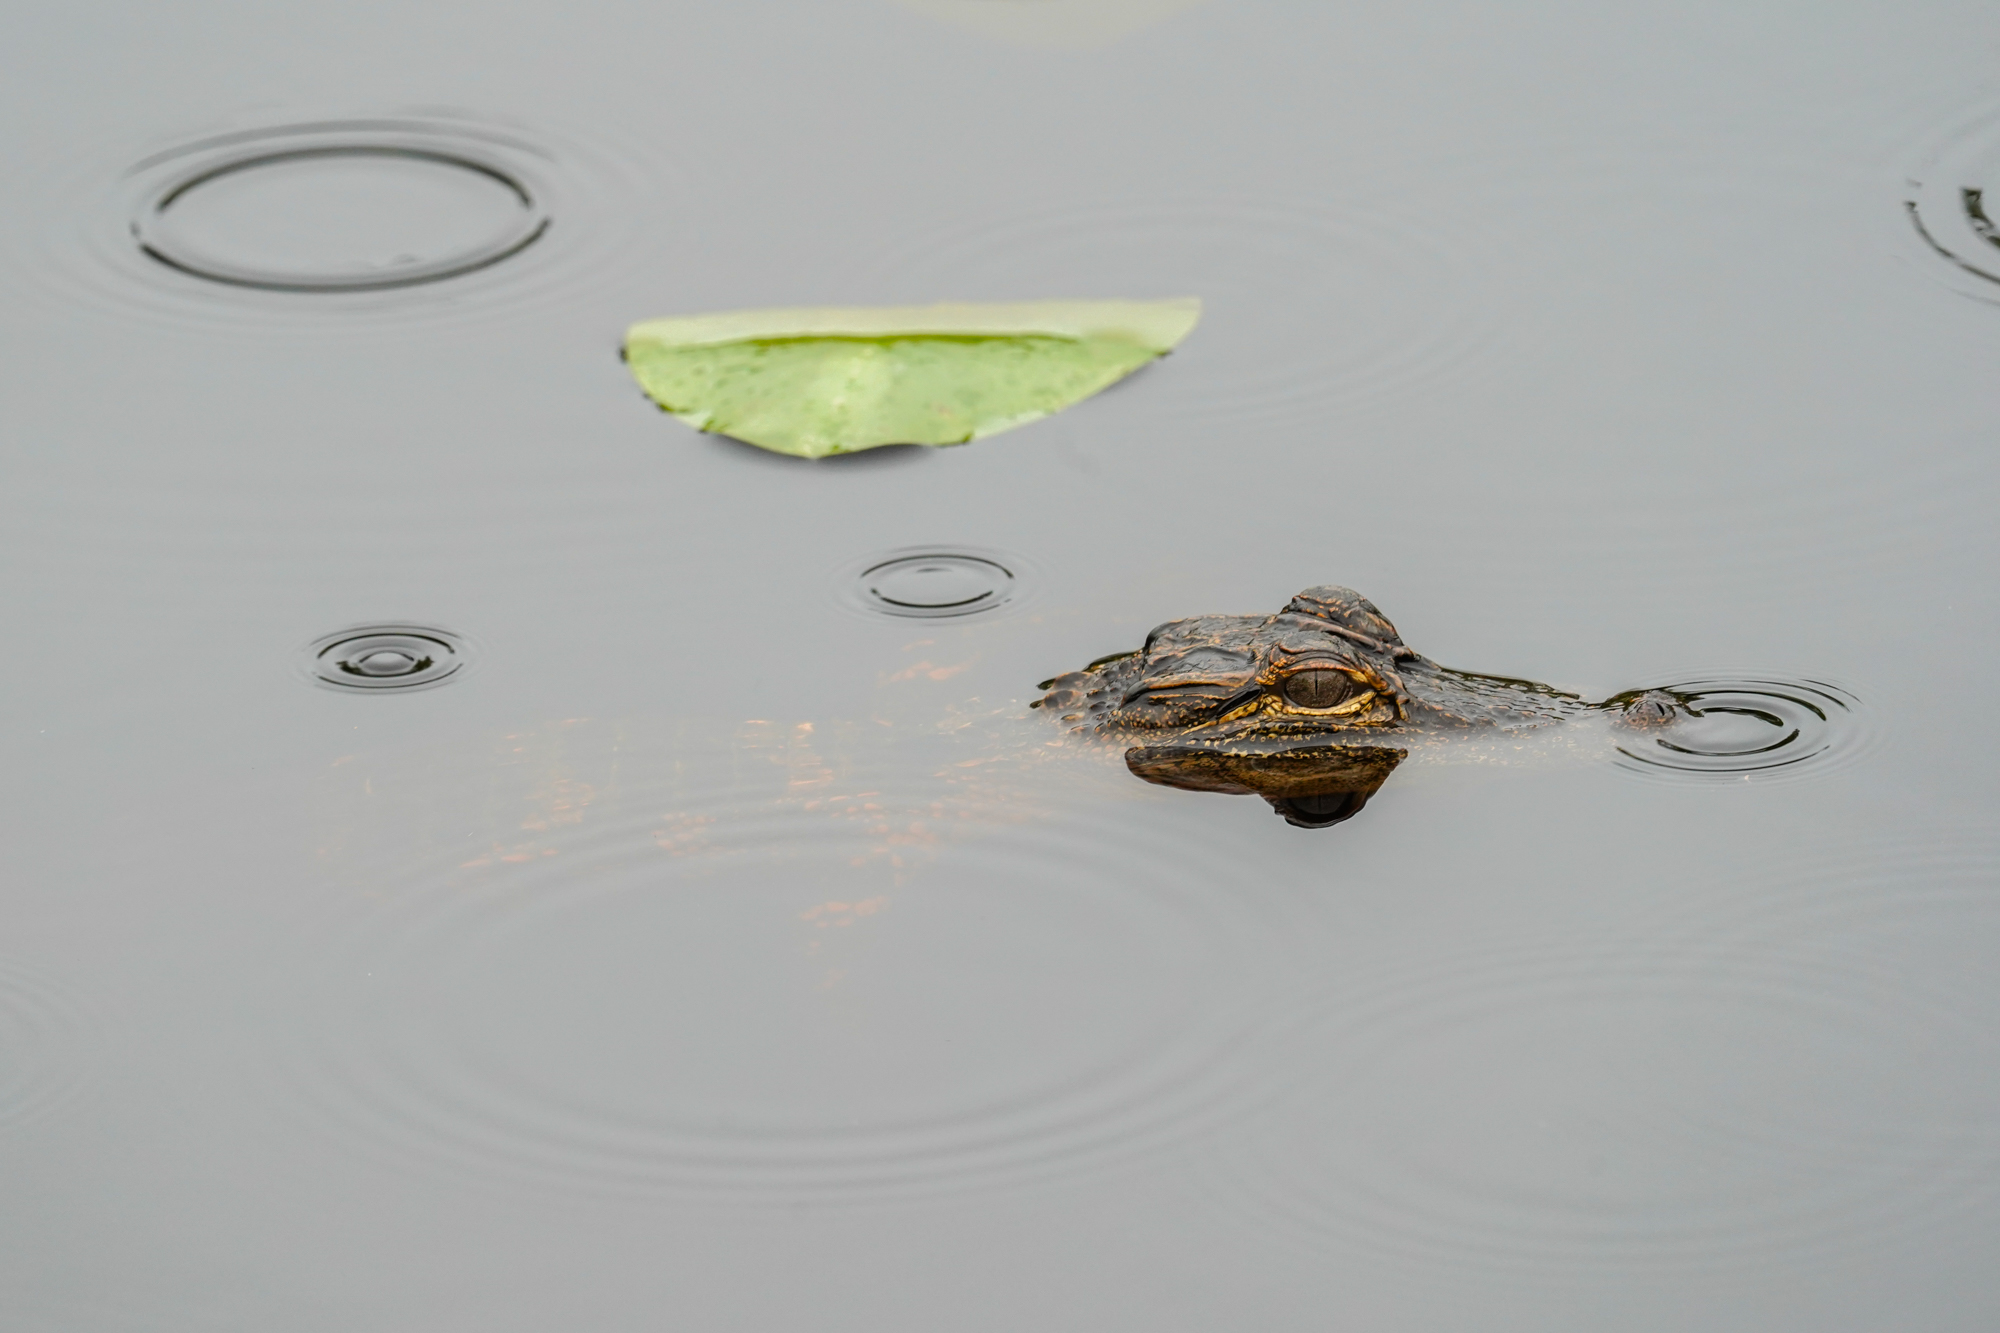
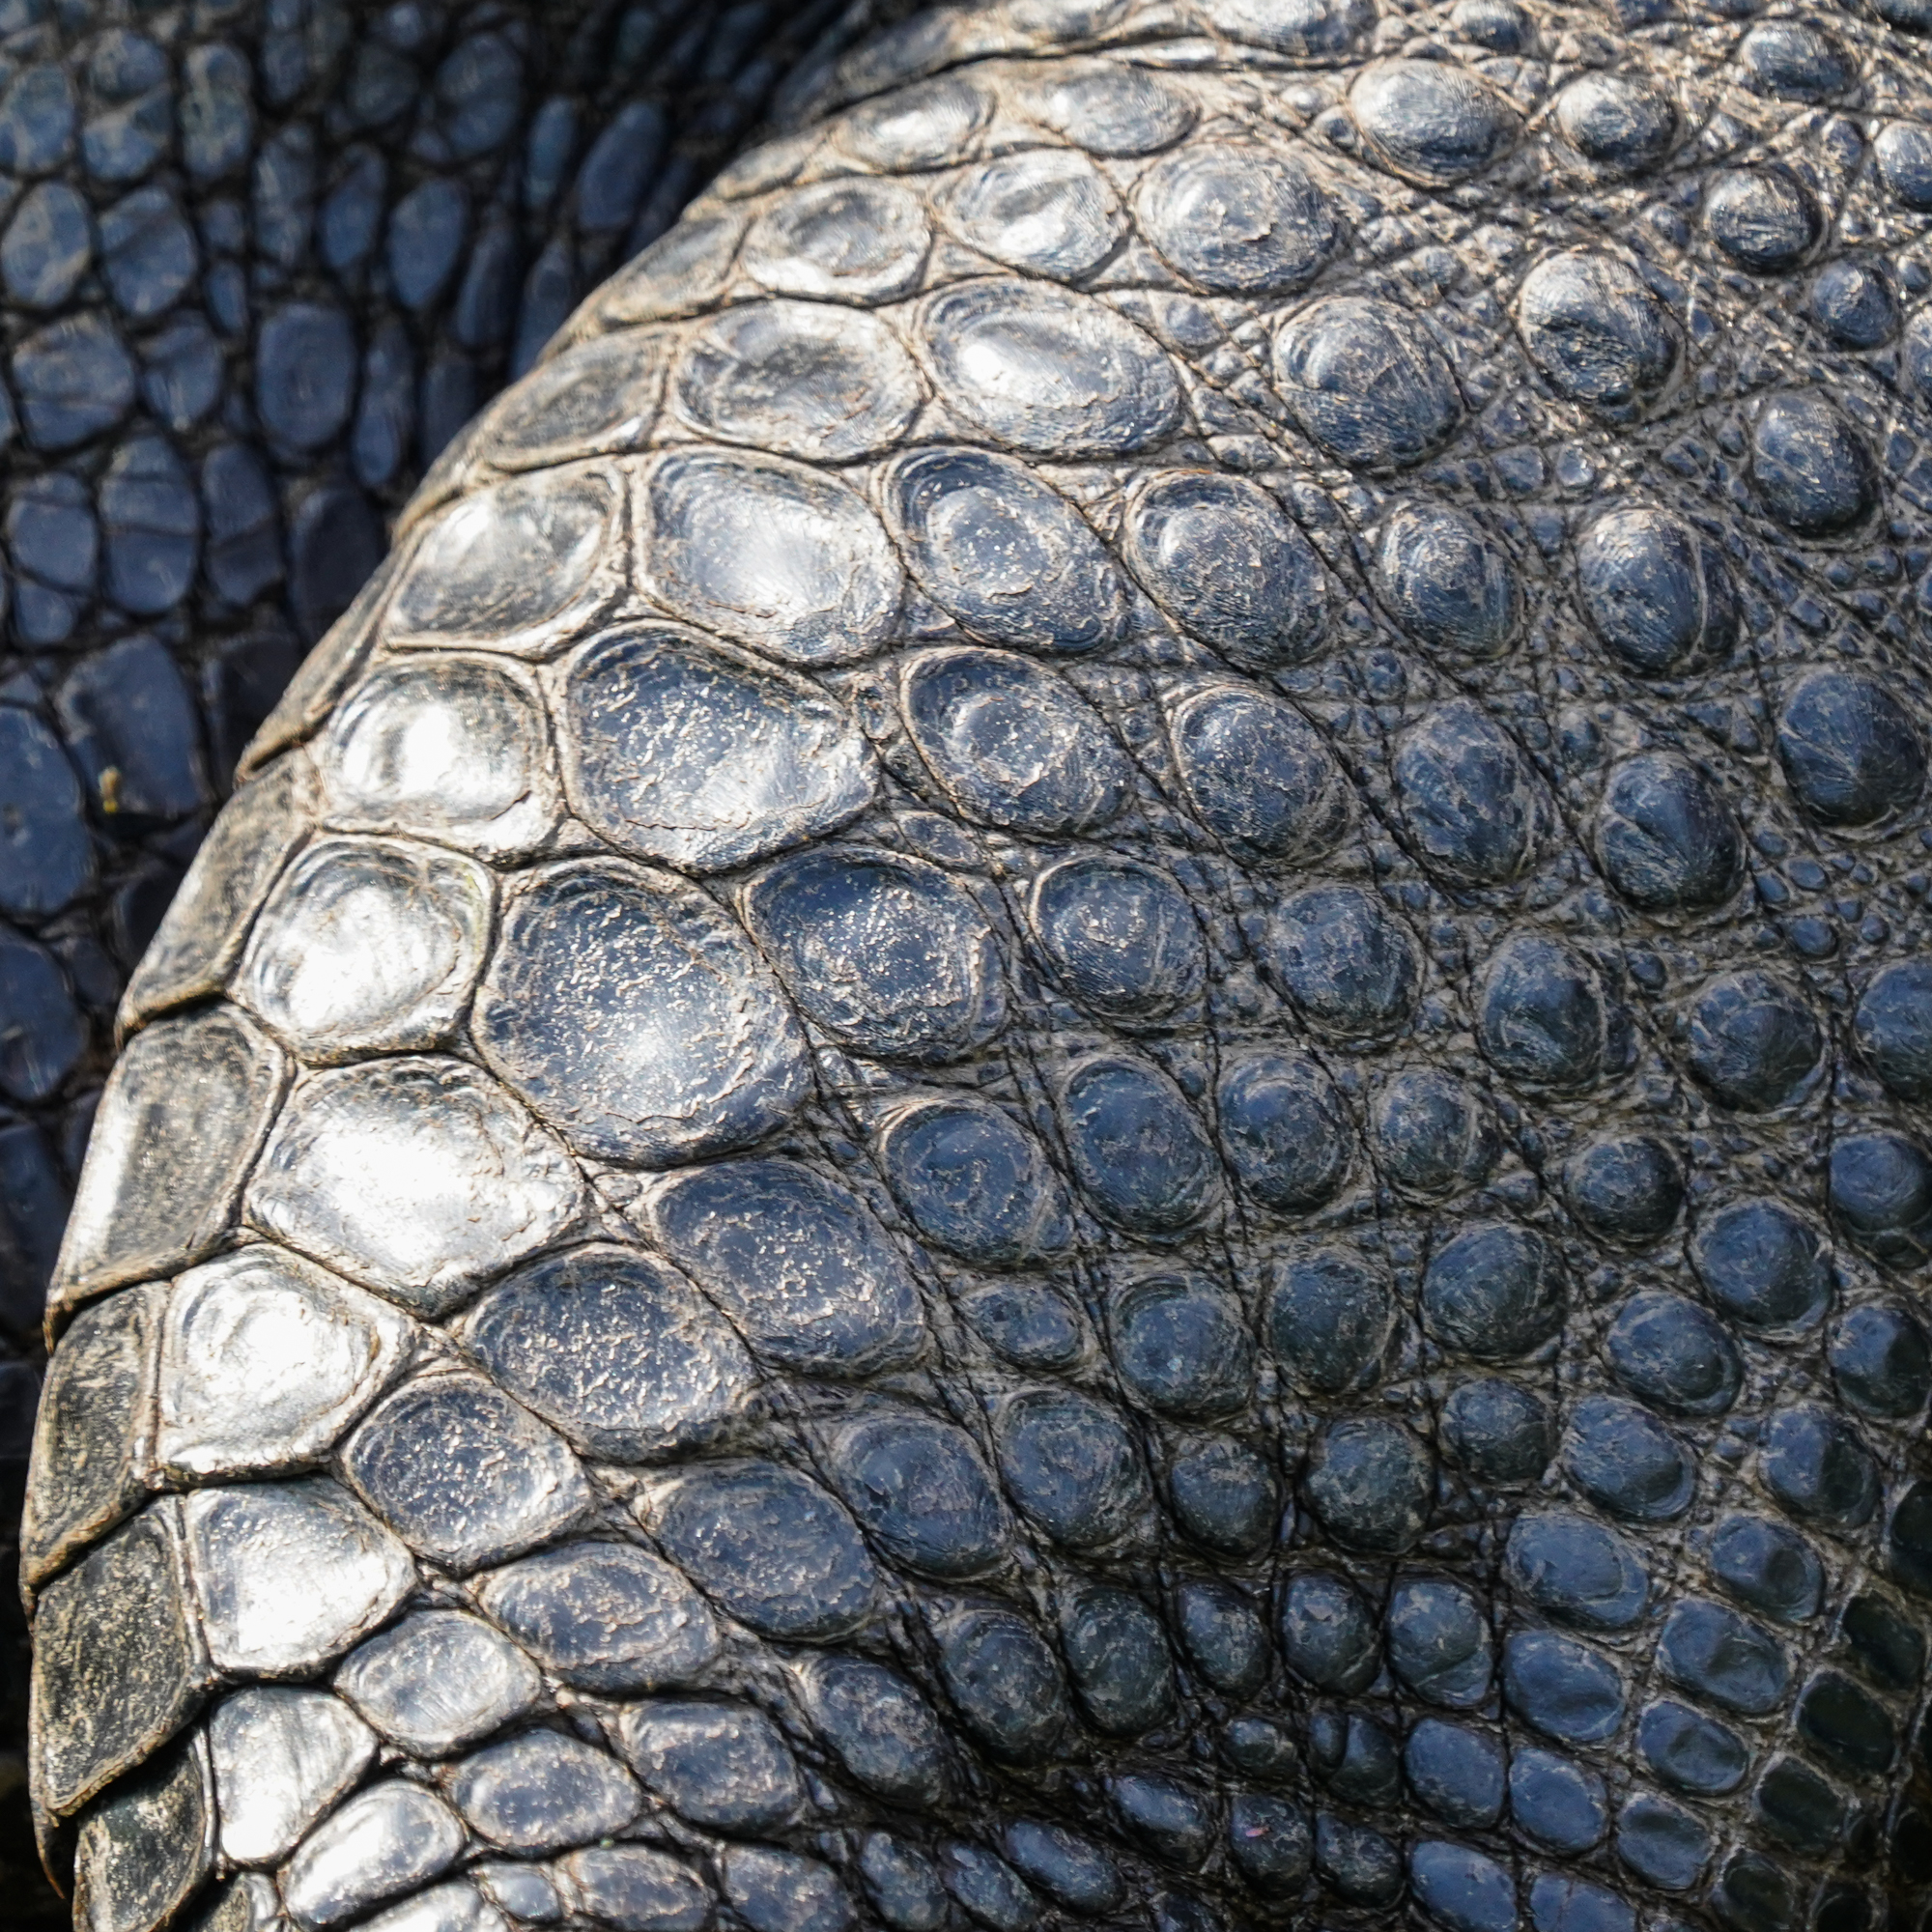
Although we love the kayaking, the real reason we keep coming back is the photography. The birds are abundant, and sometimes really noisy. There are turtles everywhere, and while nowhere near as numerous as the Okefenokee Swamp, we’ve also seen alligators. But it is the landscape, or should I say waterscape, that makes this an amazing location for photographers. It doesn’t matter the time of day or season, there is always something different to see. Shadows play across the water and the sun beams through the moss-covered trees creating some amazing moody scenes.
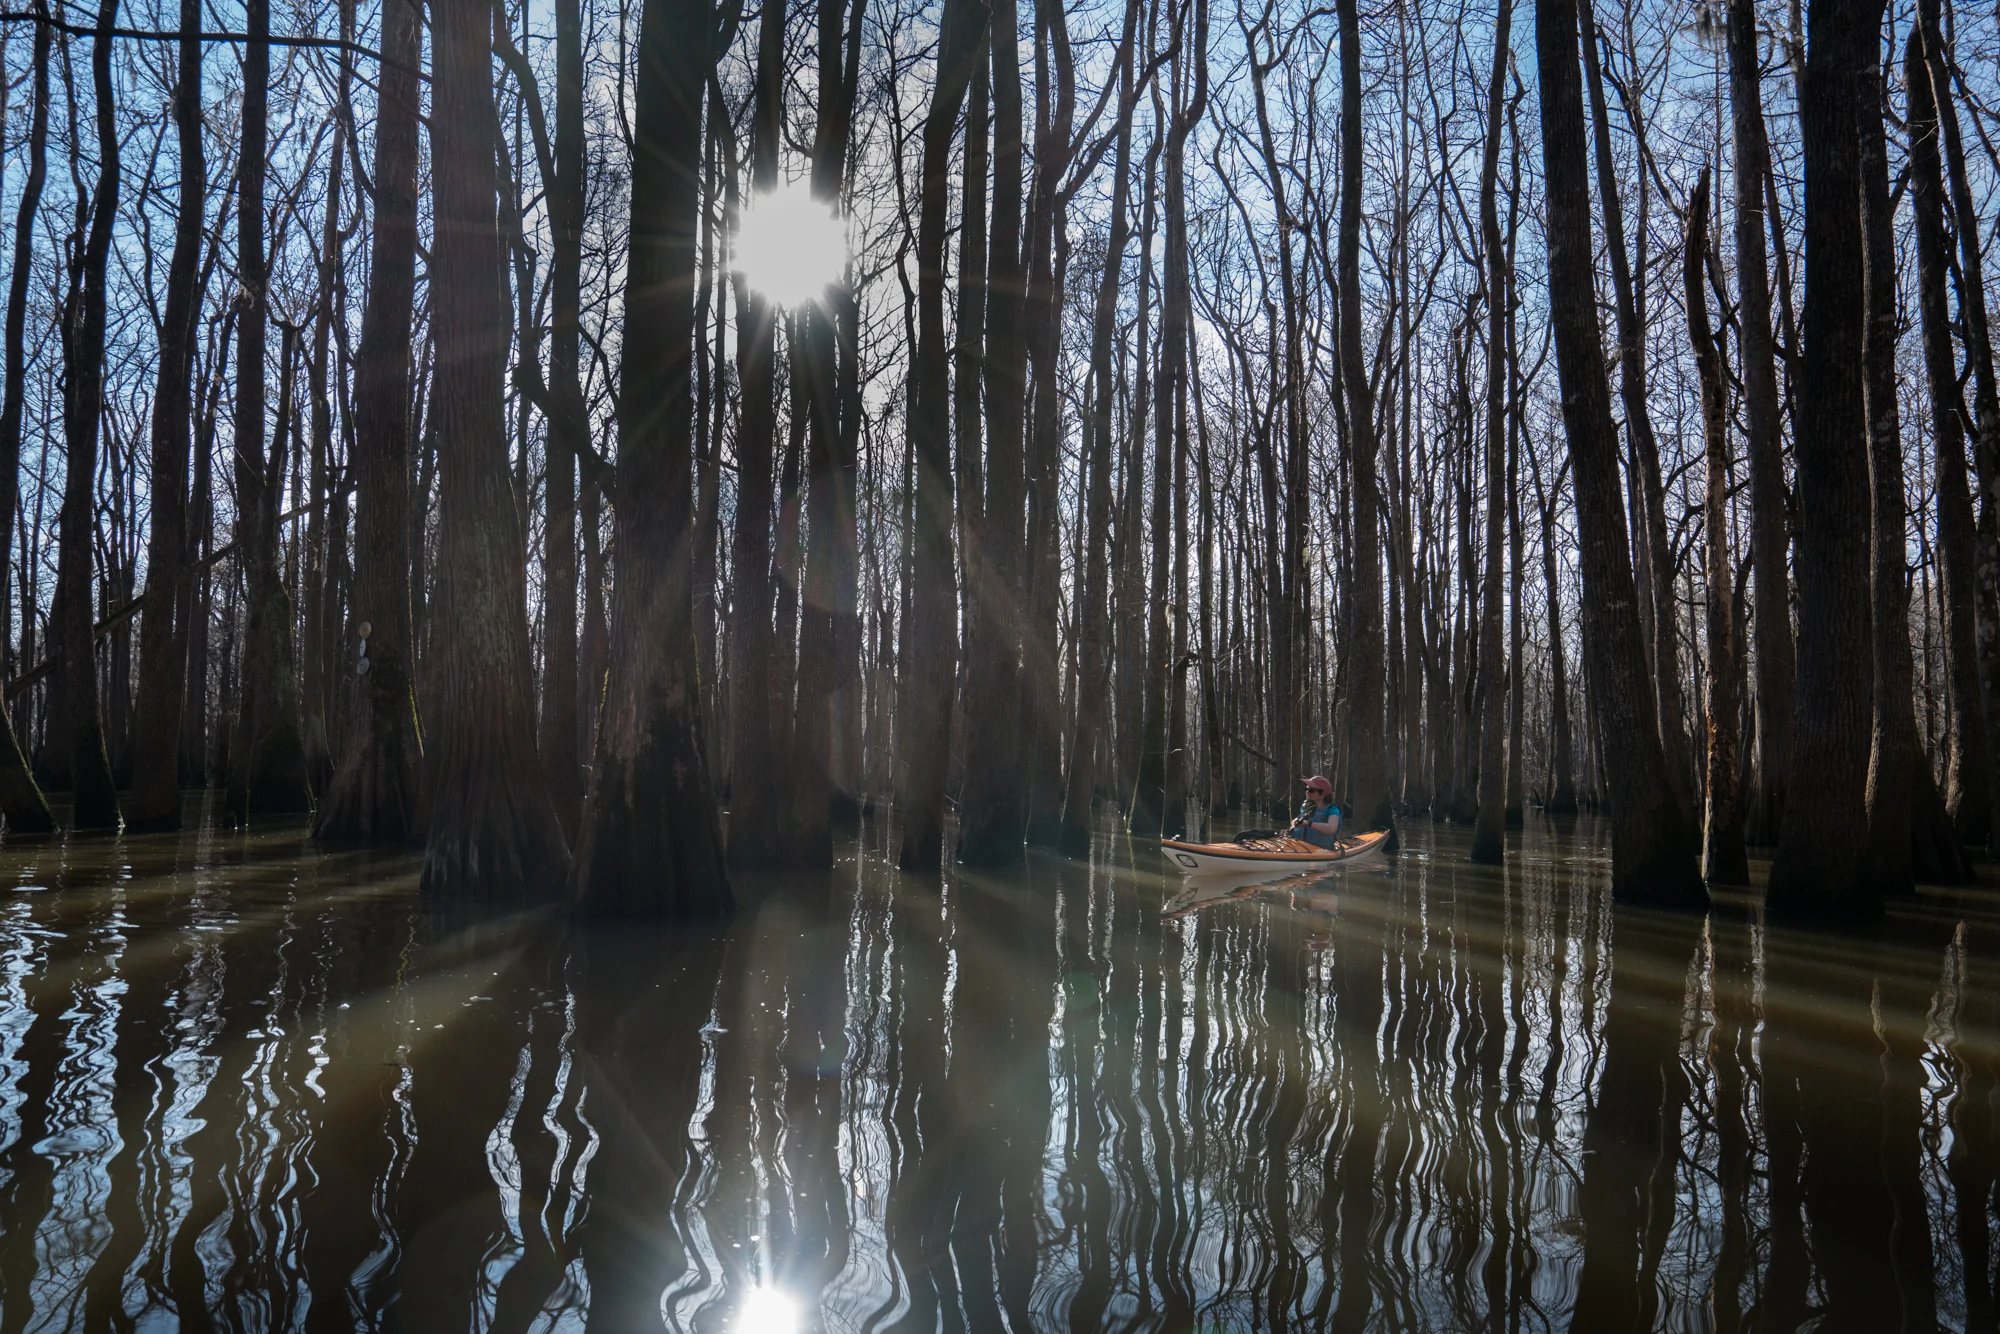
Getting near the end of the day and the shadows were getting longer as we paddled through the cypress trees in Sparkleberry swamp on the north-west end of Lake Marion, SC.
Sparkleberry Swamp is a jewel and for photographers and nature lovers, is definitely worth a wander and a paddle or two.
What To bring:
This is a location that you can quickly lose sight of time and lose yourself in the trees. It’s definitely better to be prepared with plenty of water, snacks, bug spray, sun block, and then more water. It can get surprisingly hot, even in February as we discovered on our most recent trek. Definitely bring a hat, and if you don’t want a goofy burn on the exposed parts of your legs, don’t wear shorts.
I typically bring two cameras, one with a 16-35 and the other with 100-400 and 1.4 teleconverter. A GoPro or similar video camera is a great thing to have attached to the kayaks if you have one (or a couple). I bring a towel that sits between my legs that I keep the telephoto ready to shoot and the wide angle sits in a deck bag just in front of me. One thing I would love to figure out is a tripod-like device that could sit on the rim and fold easily back down for paddling. If there is anything like that out there, please let me know, I would love to test it out.

What you might see:
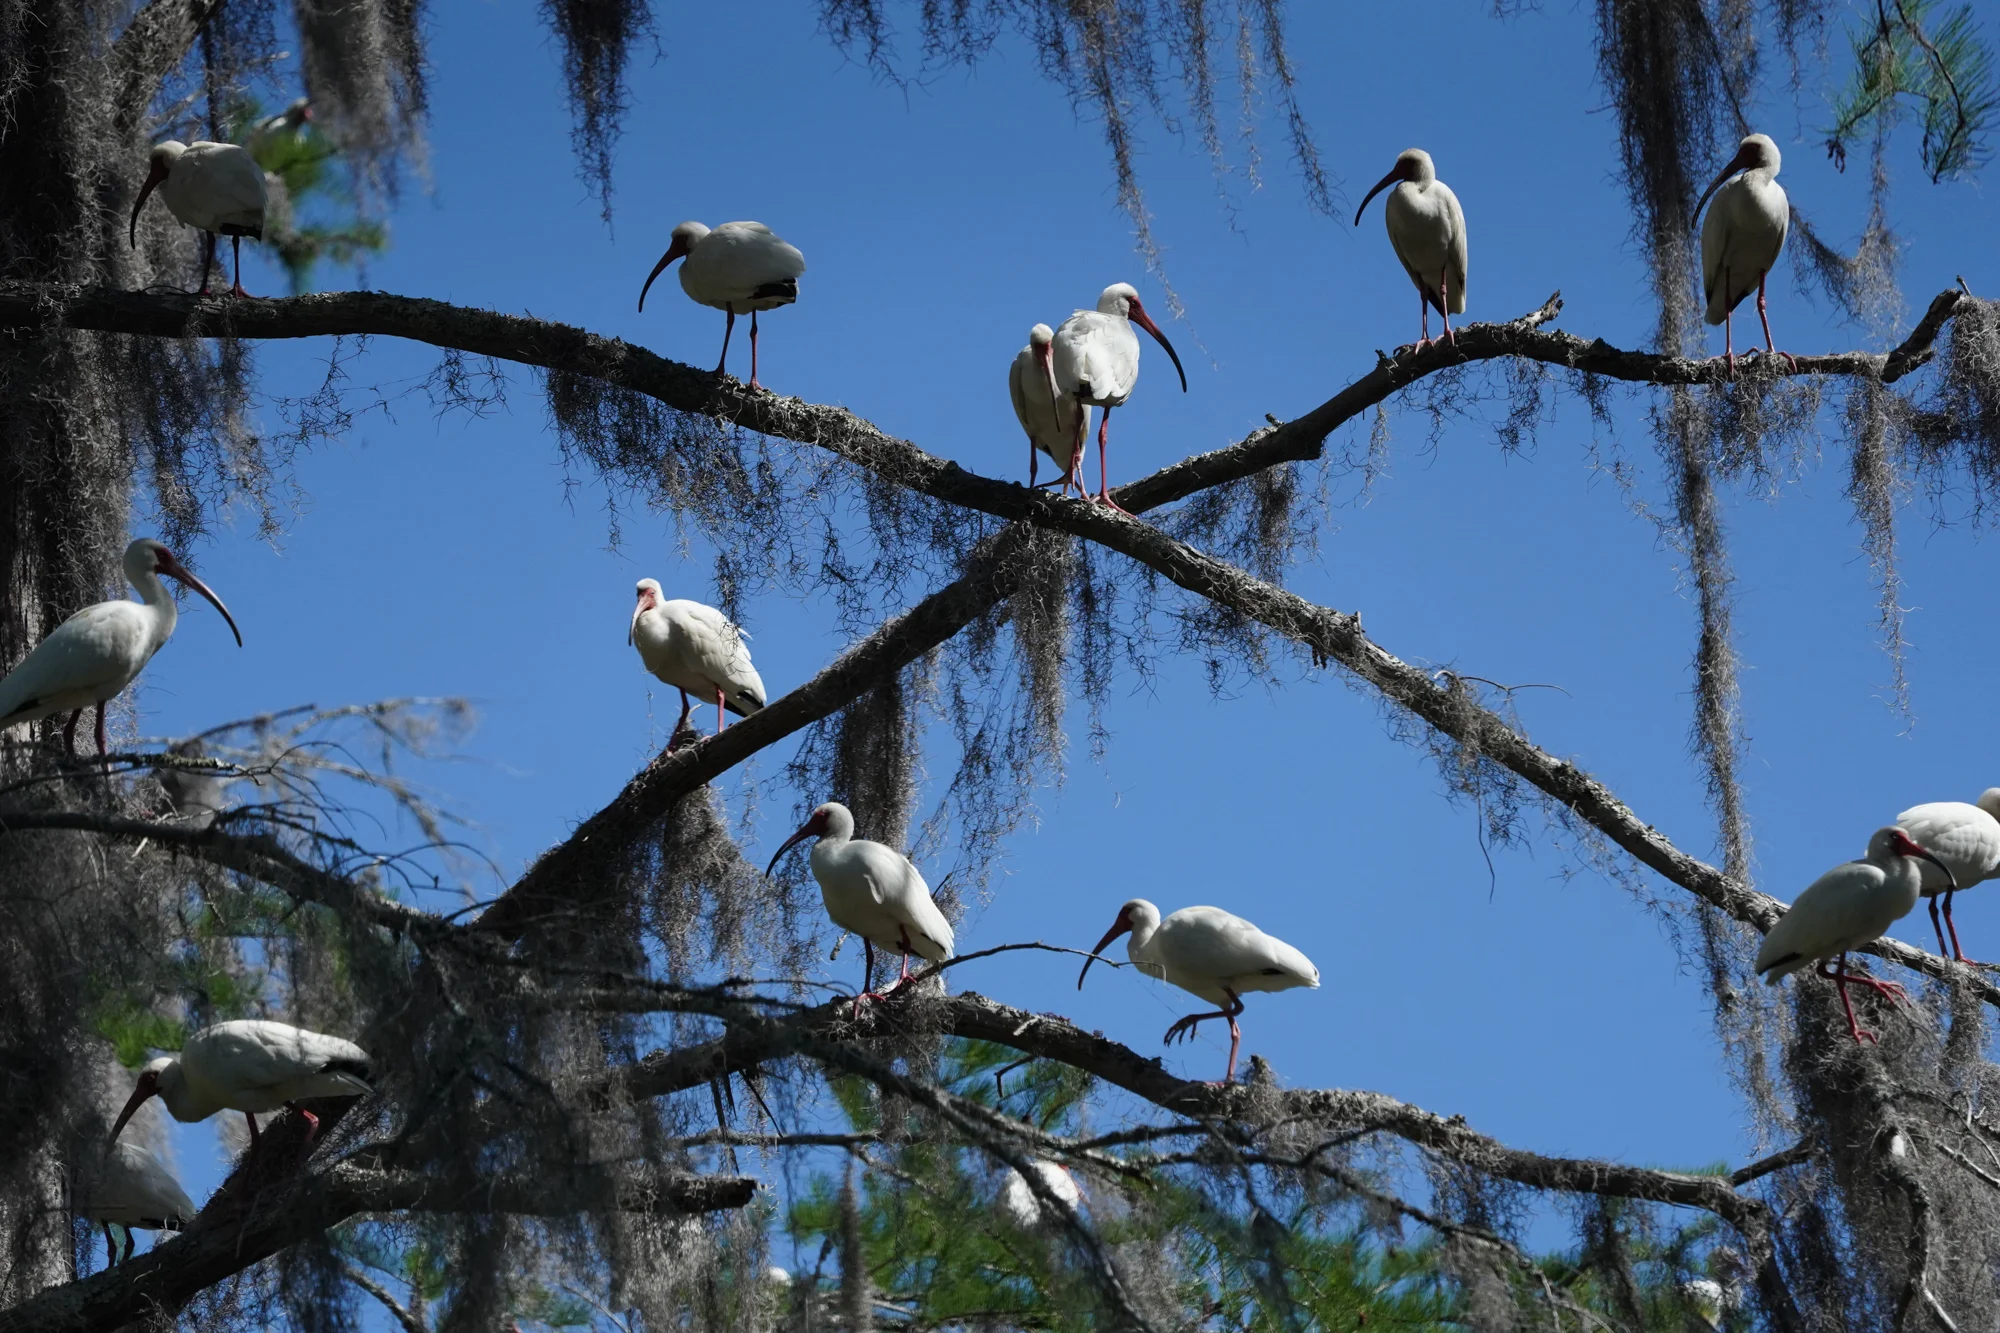
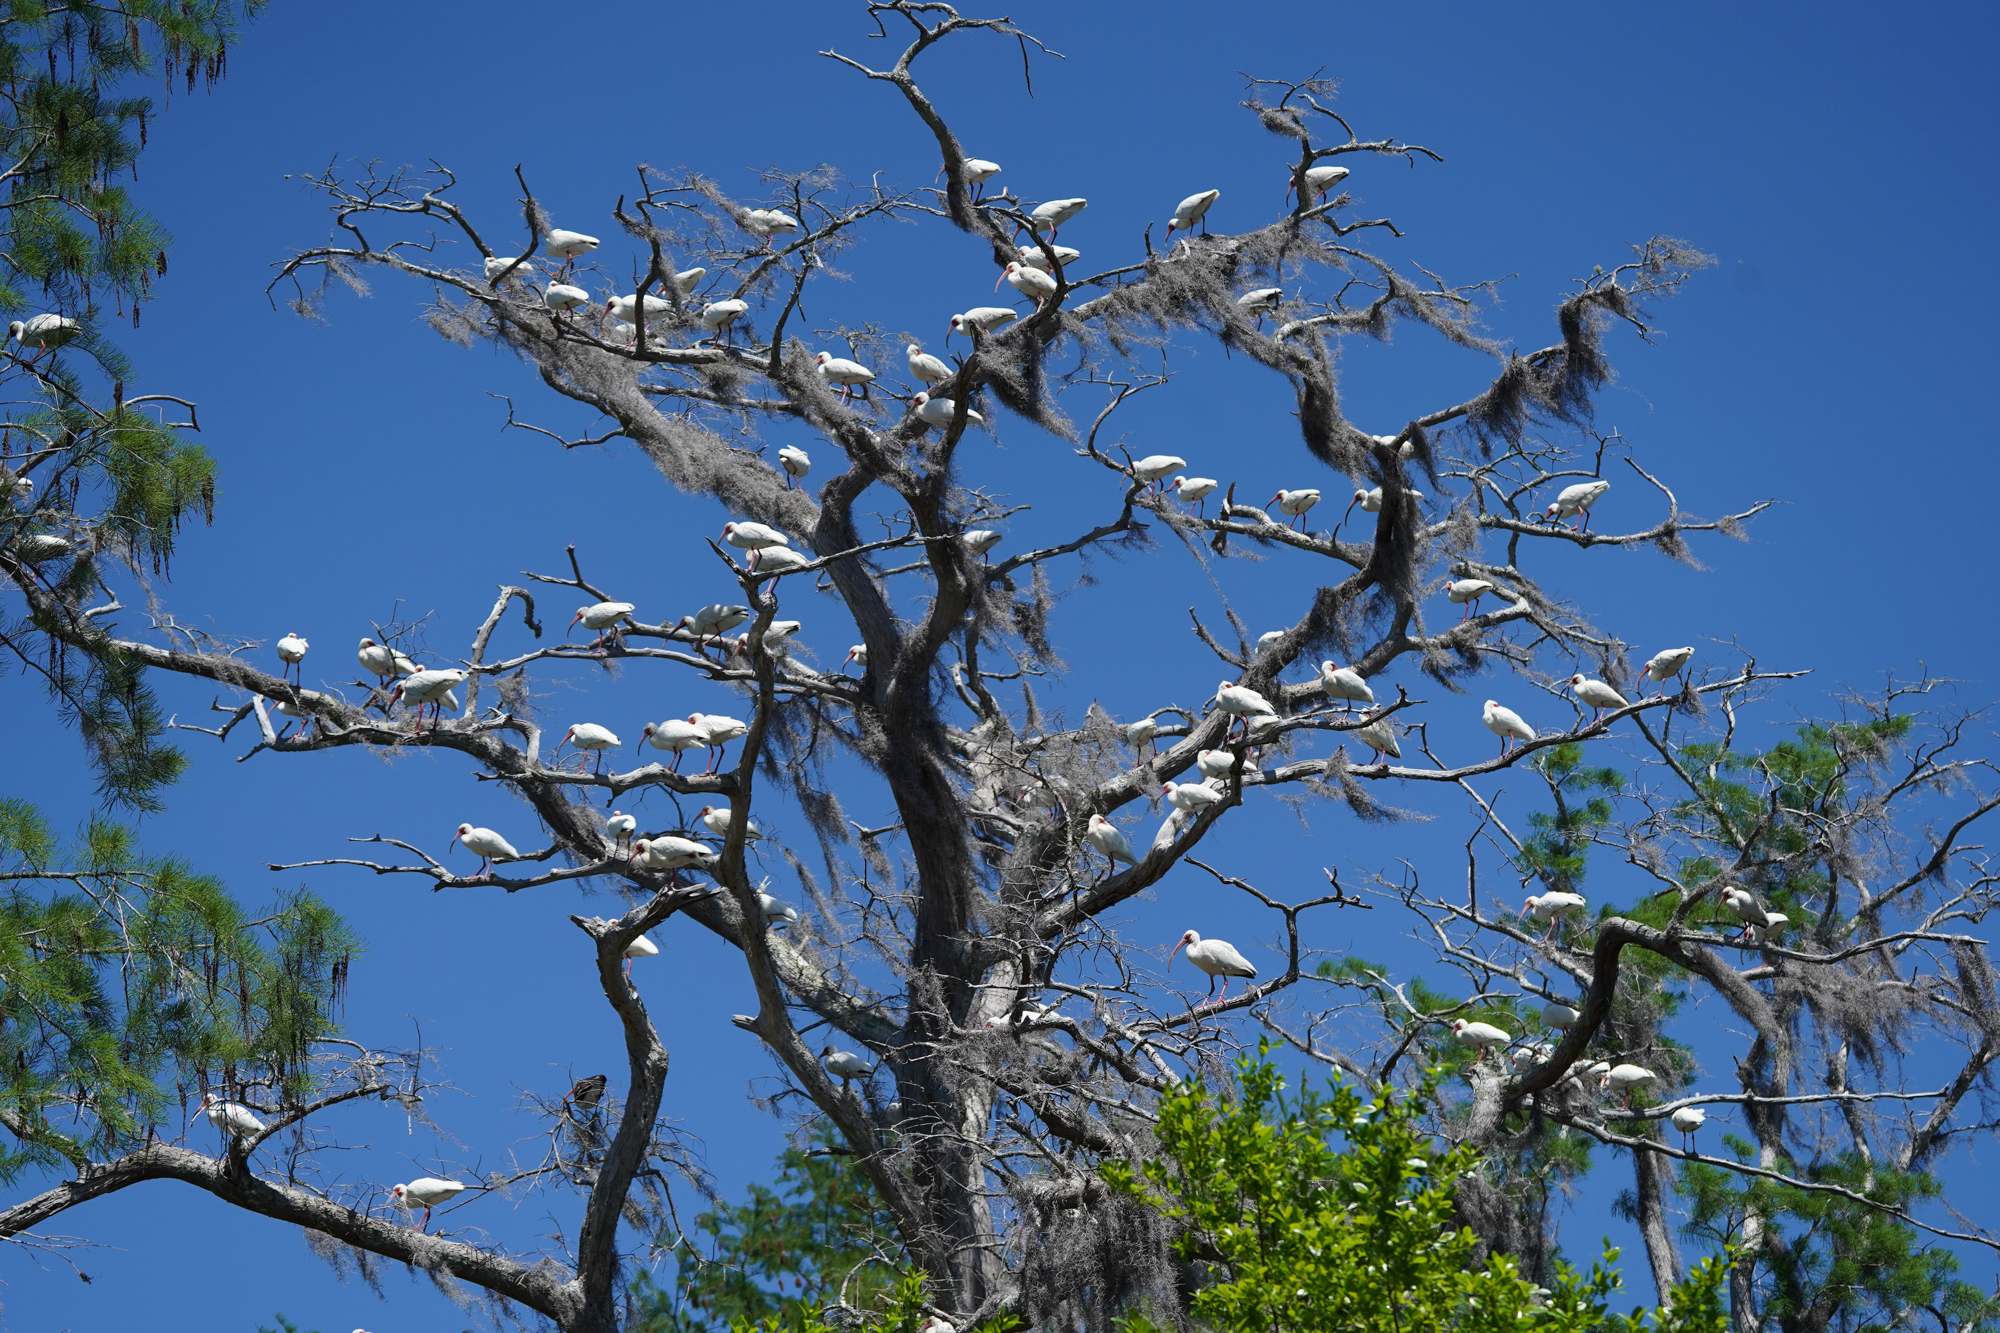
You are very likely to see most of the usual water birds: ibis, egret, herons, and anhinga. Last year we were lucky enough to see two Limpkin in the trees, a pretty rare sighting in this part of South Carolina.

Limpkin - rather rare to find in this area but hard to miss as its call was definitely unique.
When you pull in to the parking lot you are likely to hear red-shouldered hawks, barred owls, and osprey before you even get on the water. The Osprey nest in the trees and are pretty easy to locate, and they always announce their presence when you get near them.

Pair of Osprey doing what they do in their nest
The beauty of the marsh itself is one of the main things to shoot. Cypress trees, reflections, mist, sun, Spanish moss….there is so much and so many combinations from sunrise to sunset we could go back a dozen times and not scratch the surface of all the potential shots.

Where to stay, what else is nearby:
Sparkleberry landing is approximately 1 hour from Columbia or 1.5 hours from Charleston. Both great places to stay as a base. Congaree National Park is a half hour back towards Columbia and a little closer is Poinsett State Park. The launch itself isn’t much and there are no facilities near by. Of course there are great opportunities for coastal nature photography all down the coast from Myrtle beach down to the Georgia border with Edisto Beach and Hunting Island as two other great locations that I will be writing about soon.
Quick tips:
Being in a kayak gives you a great low angle for shooting a new perspective, take advantage of this and get your camera down low.
Bring filters as the light changes greatly as you move through the different parts of the swamp. A circular polarizer can help reduce glare and help keep the sky blue.
Remember that you are on a moving platform, keep your shutter speeds high enough as you may not notice the boat moving. A gimbal (dji ronin-s is the one I use) can really help with video as you won’t notice the boat rocking until you get back and start editing.
Keep a towel and some micro fiber cloths since it’s inevitable that you will get water on the camera and lenses at some point.
Pay attention to small details as well as the larger scenes, there is so much to see sometimes you can totally miss the proverbial forest for the trees.
Bring a good GPS. It is easy to get turned around in the miles of cypress trees, sometimes even the marked trails the fisher people use can be confusing with ribbons marking favorite spots as opposed to a return route.
Sunset back at Sparkleberry landing, time to pack up the kayaks and head back upstate.
A7III and 100-400 GM - how did it come to this?
Depending on what you do and if you get paid for it there are a number of camera combinations that people think of as apropos for that genre. For amateur/enthusiast nature photographers it is often the medium resolution but reasonably fast midrange camera and a 100-400 lens.
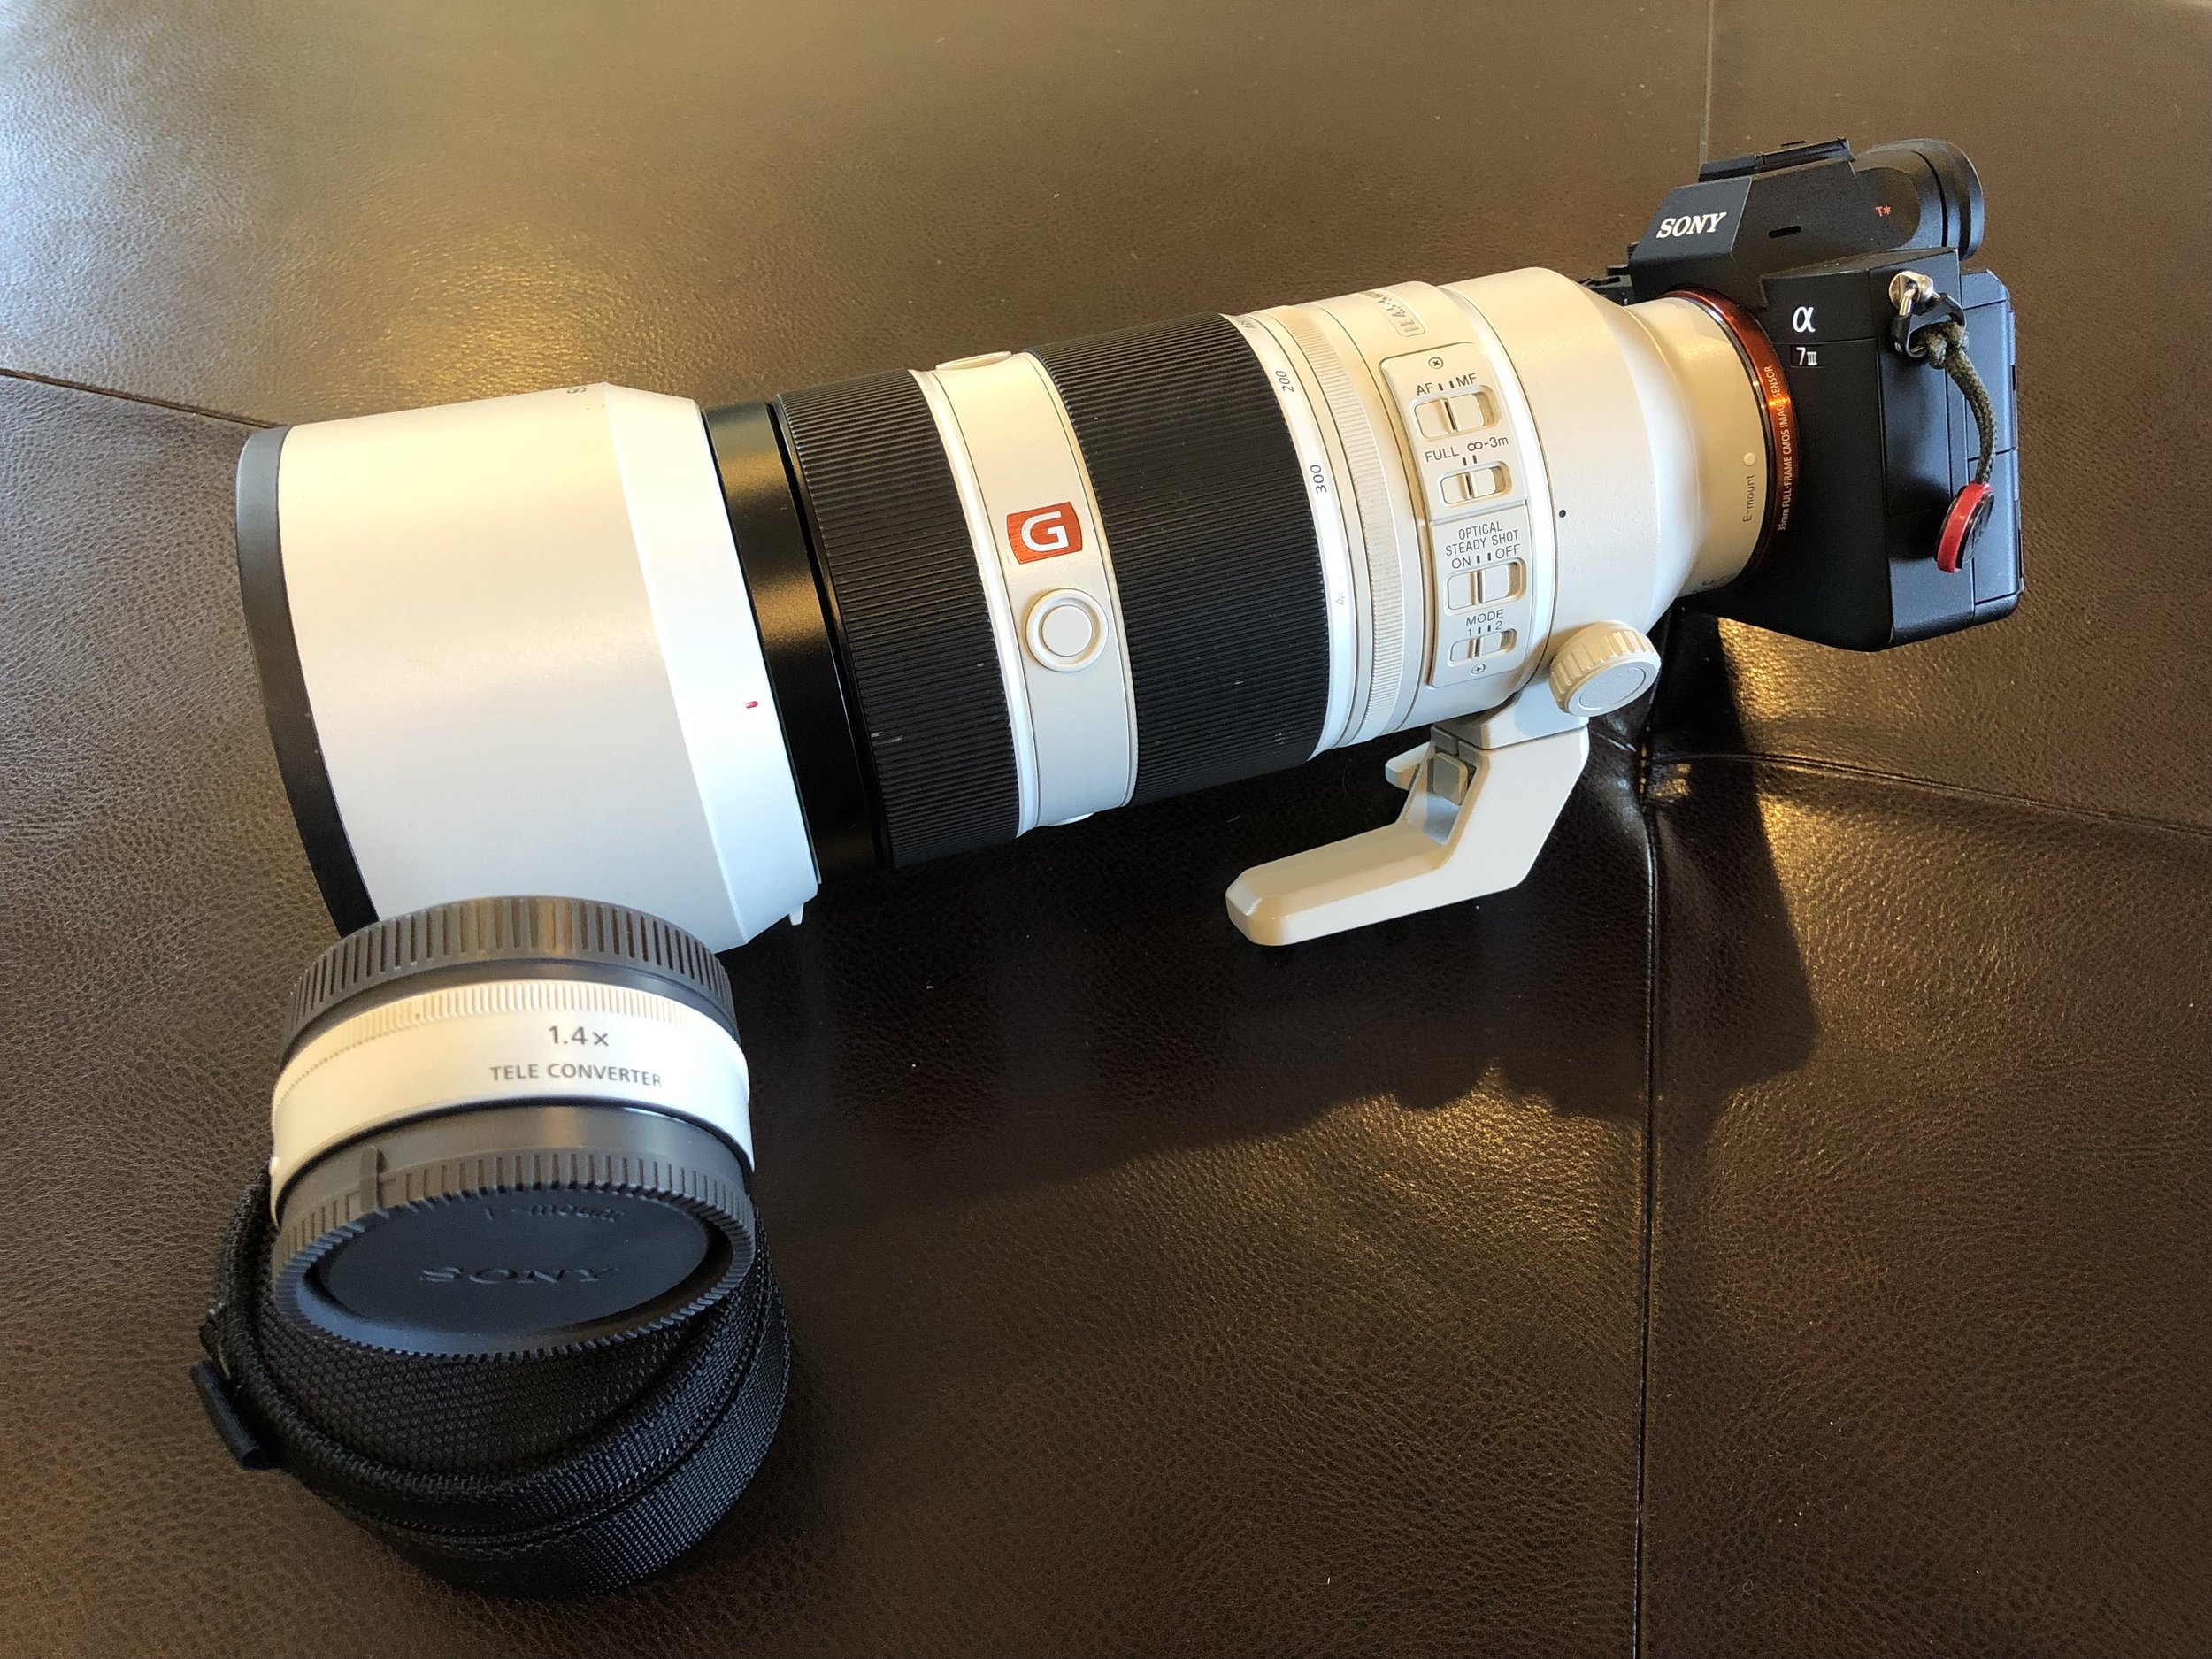
Sony A7III, 100-400 GM lens and 1.4X teleconverter
There are a few standard combinations of cameras and lenses that are indicative of the type of photography that you do. Canon 5DSR or Nikon D850 and 50 or 85 f1.2(4) for high res 35mm portraits, and Canon 1DXII or Nikon D5 and 400 f2.8 for professional sports photography can be considered typical (I know there are plenty of others). Depending on what you do and if you get paid for it there are a number of camera combinations that people think of as apropos for that genre. For amateur/enthusiast nature photographers it is often the medium resolution but reasonably fast midrange camera and a 100-400 lens. This combination tends to be the most versatile setup that doesn’t fully break the bank (without going to third party lenses) and Sony took their sweet time providing something that meets the bill.
I started playing with Sony cameras with the A7R and a wide angle lens for landscape work, I had a 70-200 for longer reach but the combination was not yet a good replacement of my canon setup for nature photography. Sony finally announce a 100-400 lens and by that time I was using the A7RII which had good (but not great) tracking autofocus. In single point tracking in good light this system worked well enough, but as you let the system do tracking with larger focus areas it tended to latch onto the background at just the wrong time....especially in backlight situations. The 5fps was adequate but not great and the buffer was rather sucky. Still this was a good combination to take out for higher resolution shots as I had my Canon 1DIV workhorse still at that time for the fast action.

Osprey shot from a kayak in Sparkleberry swamp on Lake Marion. 560mm at f/8, 1/2500s, and ISO 800 wide area continuous focus.
I got a good deal on a Canon 5DS and decided to retire my 1DIV but that left me with a bit of a hole for getting any burst shots and now I had no cameras with a buffer that didn’t leave me waiting in certain conditions.
At that time I didn’t want to spend the money on a 1D upgrade as 20 MPixels felt limiting for the amount of cropping I often have to do and I didn’t want that big of a camera anymore. The Canon 5DIV was compelling but still expensive and the buffer was as lacking as the 5DIII. Sony came out with the A9 that sounded great in terms of features but the price tag was pretty massive for a camera that I wasn’t yet sure if it would be all it was saying it was (turns out it was but I didn’t end up needing to spend the money). This is when the A7III came out with 10 frames per second, a reasonable 24 MPixel sensor with excellent autofocus and a buffer that can hold for the types of burst that I tend to do...quick small bursts but often many of those as things move by. Oh, and the price was way better than expected for all that came in that package.

Wood ducks shot in crappy light against what used to be a challenging background. 560mm at f/8, 1/640s and ISO 6400, wide continuous focus.
I do a lot of bird photography as well as animals from bear and elk to alligators. I don’t tend to have the issues that sport photographers have with picking out a single subject with a ball and tracking them through a sea of other similar subjects. Usually I’m looking at a single subject or if a group I’m trying to get the closest one or expanding to get as many in focus as I can. From that perspective the A7III wide focus group is amazing picking out and holding onto moving subjects quickly and effectively. I can change to one of the other modes quickly and the joystick is excellent for quickly moving the points around ( I have tried the touch screen but so far I have found that I accidentally change the point with my face or finger without knowing it and often have to move it again as I bring the camera back to my eye.

Black bear in the cherry trees. Cades Cove, Smoky Mountains National Park. 560mm at f/8, 1/320s, and ISO 3200.
What do I like:
New battery - this was definitely one of the biggest issues with the previous versions of Sony mirrorless cameras and the fix was not just noticeable, it was pretty fantastic for a battery that is still fairly small. This is really the only major thing that annoys me about the A7RII and the four batteries that I have to carry around with it.
Joystick - accessing focusing points was painful in previous cameras, this is still the easiest way to do so especially when you have gloves on in the cold.
Touch screen - pretty useful for tripod work but so far I have found I accidentally touch it when I don’t want to when my eye is up to the eyepiece….I have found this with all touchscreens from all companies so far.
Weight - definitely lighter than the canon setup that I have and every pound counts when you are backpacking into a site.
Autofocus - This is likely the best feature of any of the latest Sony cameras, not only is the autofocus fast and the tracking excellent the feedback in the viewfinder makes it so easy to really tell that you are in focus and that the tracking is keeping up. I can’t wait to see the updates that are supposed to improve on what is already pretty great.
Teleconverter - very sharp, all focus modes work even at f/8, I wish others would provide theirs with a nice little hard case like this.
Tripod mount - easily removable foot but once on it is not going to accidentally fall off.
Programmable buttons - on both camera and lens. Between this and the function menu I rarely need to go into the menus when shooting.
On the Lens - Copied canon’s new 100-400 on the smooth/tight lock and the polarizer window on the lens shade. Also copied them on the image quality….excellent on both.
Low light capabilities - I have been able to shoot in light conditions with this setup that I have never been able to before.
Dual cards - redundancy for both stills and video

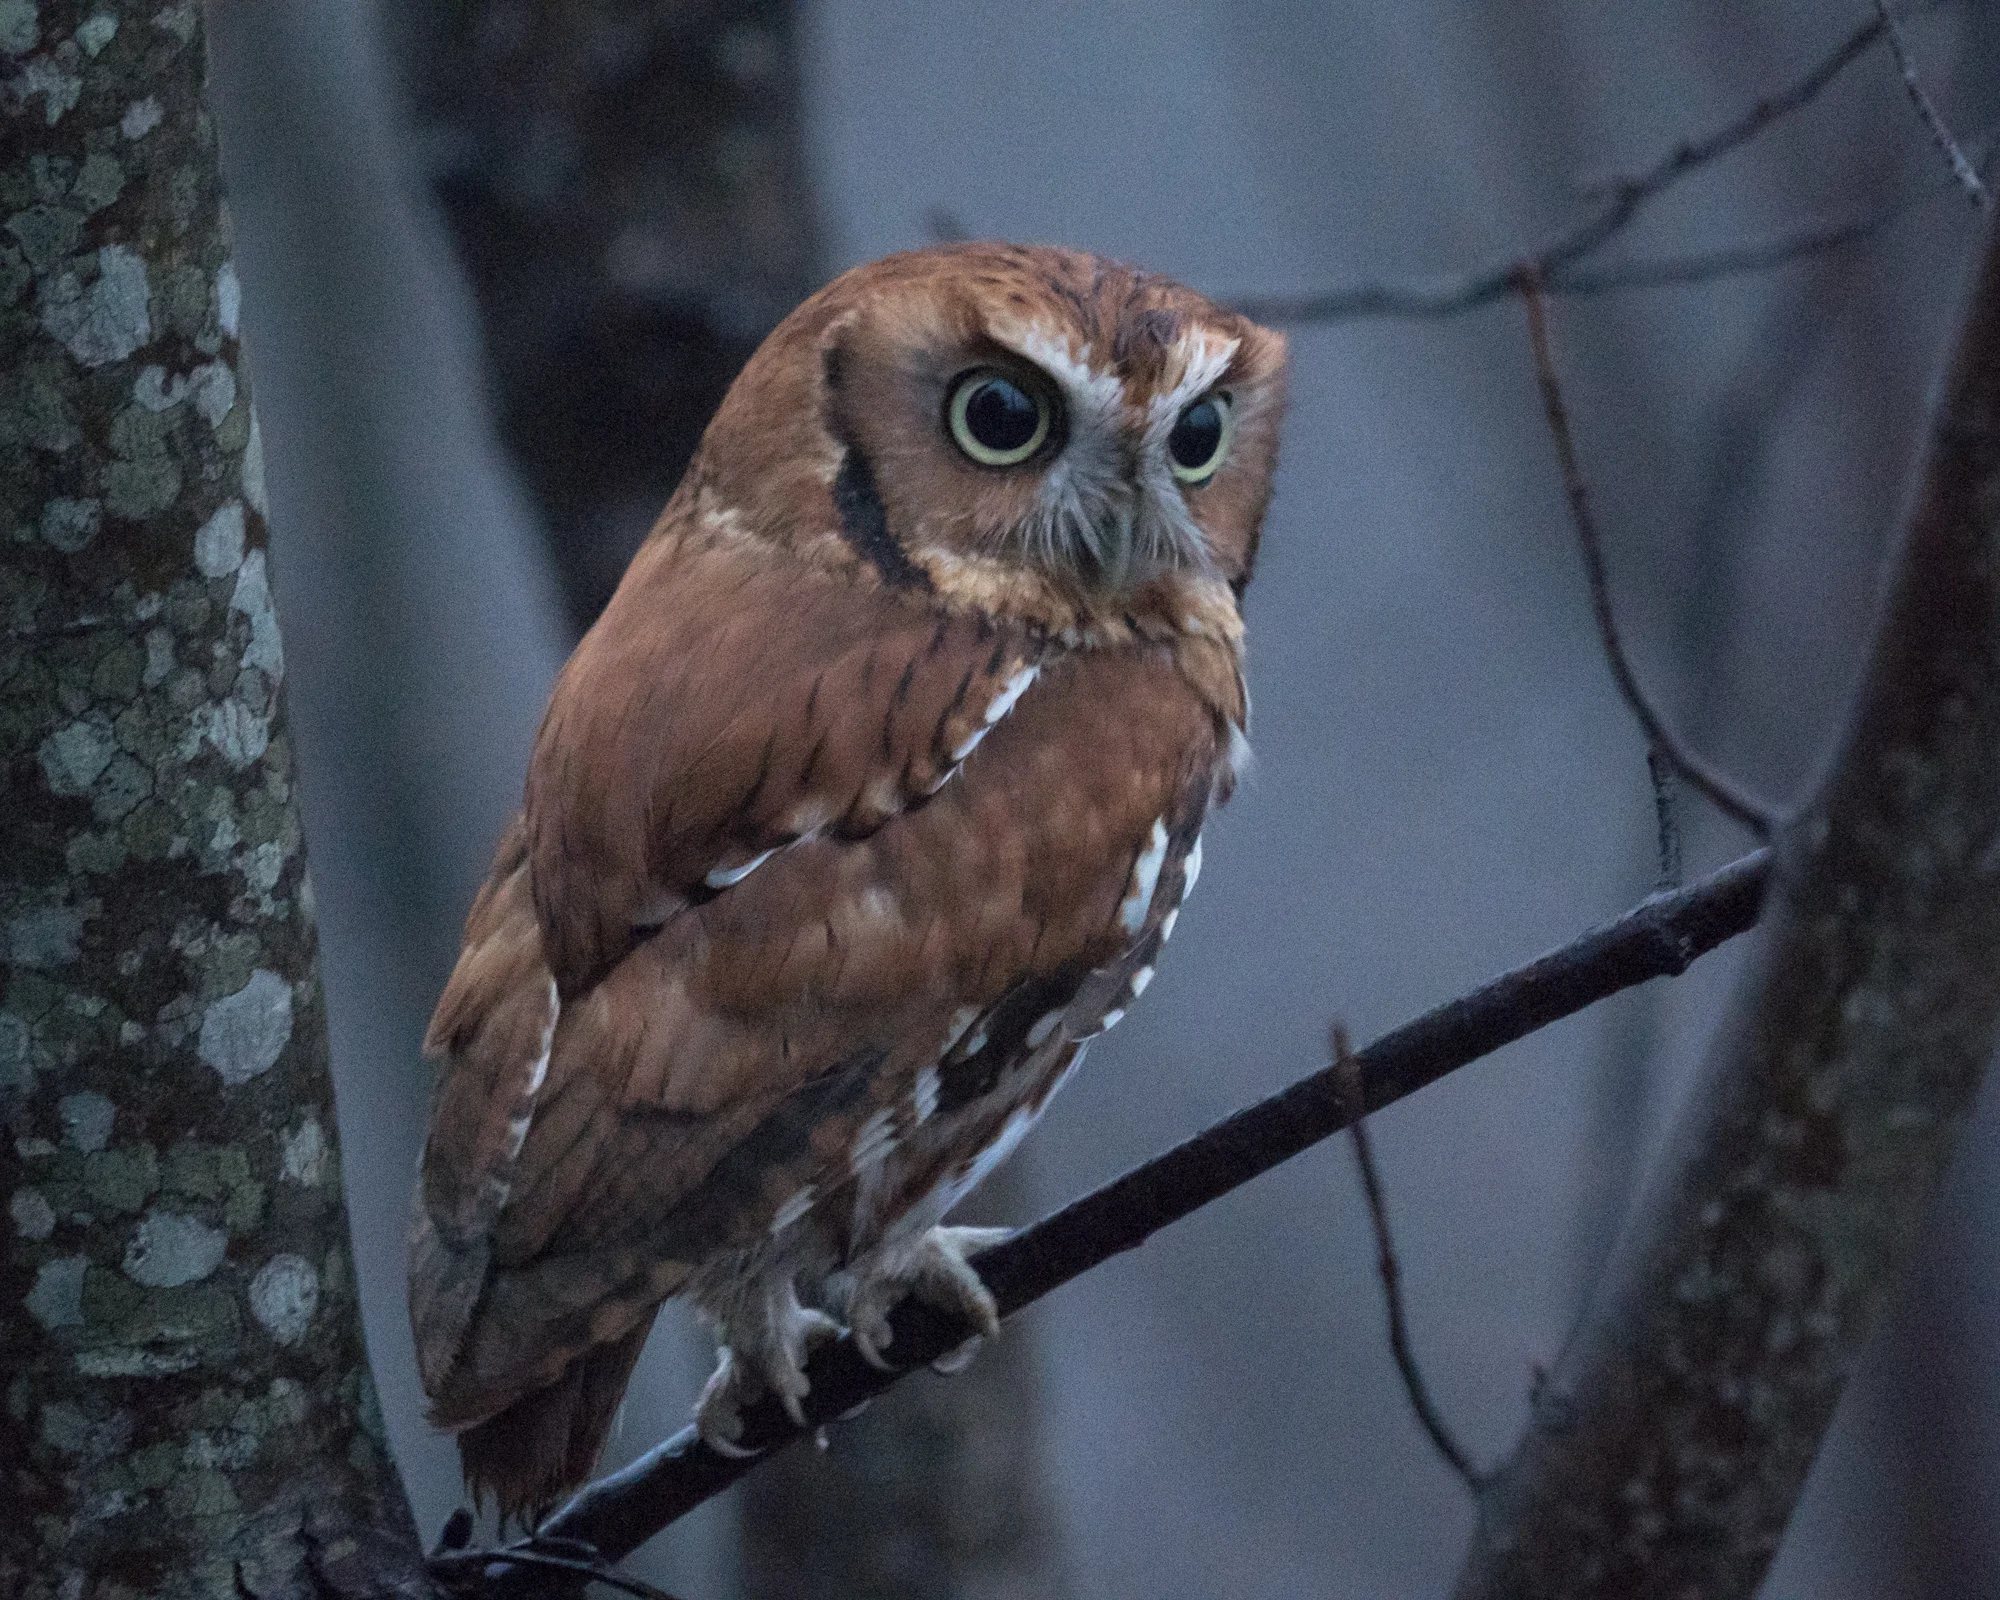
Red Morph Screech Owl after dark. 400mm at f/6.3, 1/13s, and ISO 6400. Kudos to the image stabilzer and ability to focus in almost no light.
What would I change:
Viewfinder - works well but I would love to have had higher resolution....I do realize that this was something that they did to reduce cost and differentiate this entry level camera from the more expensive ones.
Silent shooting - this is a great feature to have and works well for birds at rest or animals moving slowly but I would love to see them improve the electronic shutter for action shooting. This will likely come to us in the future as the technology from the A9 makes its way down the line over the next few years.
Touch screen - is ok, works well enough from a tripod for touch focus but Sony really needs to make these cameras so that you can do everything either by screen or by buttons/wheels....having multiple ways to accomplish things is very useful for tools that are used in so many different ways.
Vertical grip - I have the vertical grip and extra battery for this setup but have found that I don’t really use it that often. I am very used to the feel of the Sony bodies now and they fit my hand. From a power point of view, I just carry one extra battery in my pocket and that is usually enough for a couple days of shooting for me.
Great Egret in flight. 400mm at f/5.6, 1/2500s, ISO 400
Final Thoughts
I’m really looking forward to the updates to the firmware coming this spring to improve ‘real time’ tracking and especially to see how the animal eye focus tracking works. I’ll very likely write something on that as soon as it is available.
Although I would still love to have the A9 in place of this camera I am very happy with the extra money for a couple more trips as the A7III has almost everything I need. Same goes for the A7RIII, if I didn’t have version 2 already I would likely have gone for it but it is really nice to have both a high resolution and a fast camera, both available at the same time. I’ll always be wishing for a little faster and a little more detail but really there is little to complain about with this setup. If you are looking for a mid range nature setup this is a good step up from the typical apsc camera and 70-300 or even the 150-600 that many people start to get into nature photography. It definitely is competitive with anything Canon and Nikon have in the price range ( approximately $2000 or so for the camera and $2400 USD for the lens)
Tech News - New release from Olympus
Olympus has been teasing a new camera for weeks now that could very well be a fantastic nature photography tool, but I don’t think that was the most important announcement for nature photographers.
Olympus has been teasing a new camera for weeks now that could very well be a fantastic nature photography tool, but I don’t think that was the most important announcement for nature photographers.
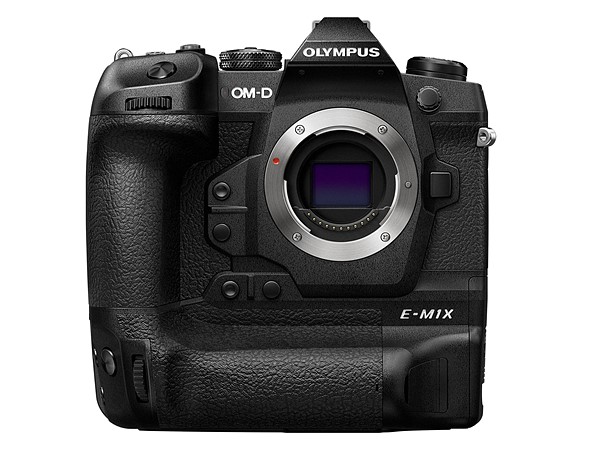
First, the camera. The new E-M1X is a 20MP micro four thirds camera that can shoot 18 fps with full tracking autofocus using 121 on sensor cross type phase detection focus points that work with contrast detect focusing and what they are referring to as deep learning (AI) algorithms for object detection. It can also do 60 fps with the focus locked at the first shot. The with mechanical shutter it can do 18 fps single focus and 10 fps continuous. There are many other features including handheld high res, and other multi-shot modes (exposure bracketing that they are calling live ND). DPReview has already put up some great articles on the specs, sample shots and hands on reviews.
This is all great, but the real interesting thing that came out of this release was a notice that they are building a new 150-400 f4.5 lens with built in 1.25 teleconverter and they also announced a separate 2X teleconverter. From a nature photographers point of view this could be amazing. Equivalent reach of a 300-800 lens in a package that looks at least slightly smaller than Canons 200-400. With the 1.25 teleconverter you have a 1000mm that you can handhold. Depending on the minimum focus distance this could be a fantastic lens for birding (especially small birds) that I would really like to get a chance to use.

The 2X teleconverter will be very interesting as well, but I’ll wait to see on this one since I have yet to be really impressed with any 2X teleconverters from any company.

Who knows, this set of announcements could lead me right back to where I started with mirrorless cameras on the micro 4/3 platform. I do have one request for Olympus…please come out with animal/bird eye detect in your AI algorithms and you will have something for birders that won’t break their backs.
Shooting the lunar eclipse
After getting a great chance to shoot the solar eclipse a couple years ago, I’ve been itching to point the cameras back up in the sky. I did a good bit of research into the shoot and thought I was pretty well prepared….

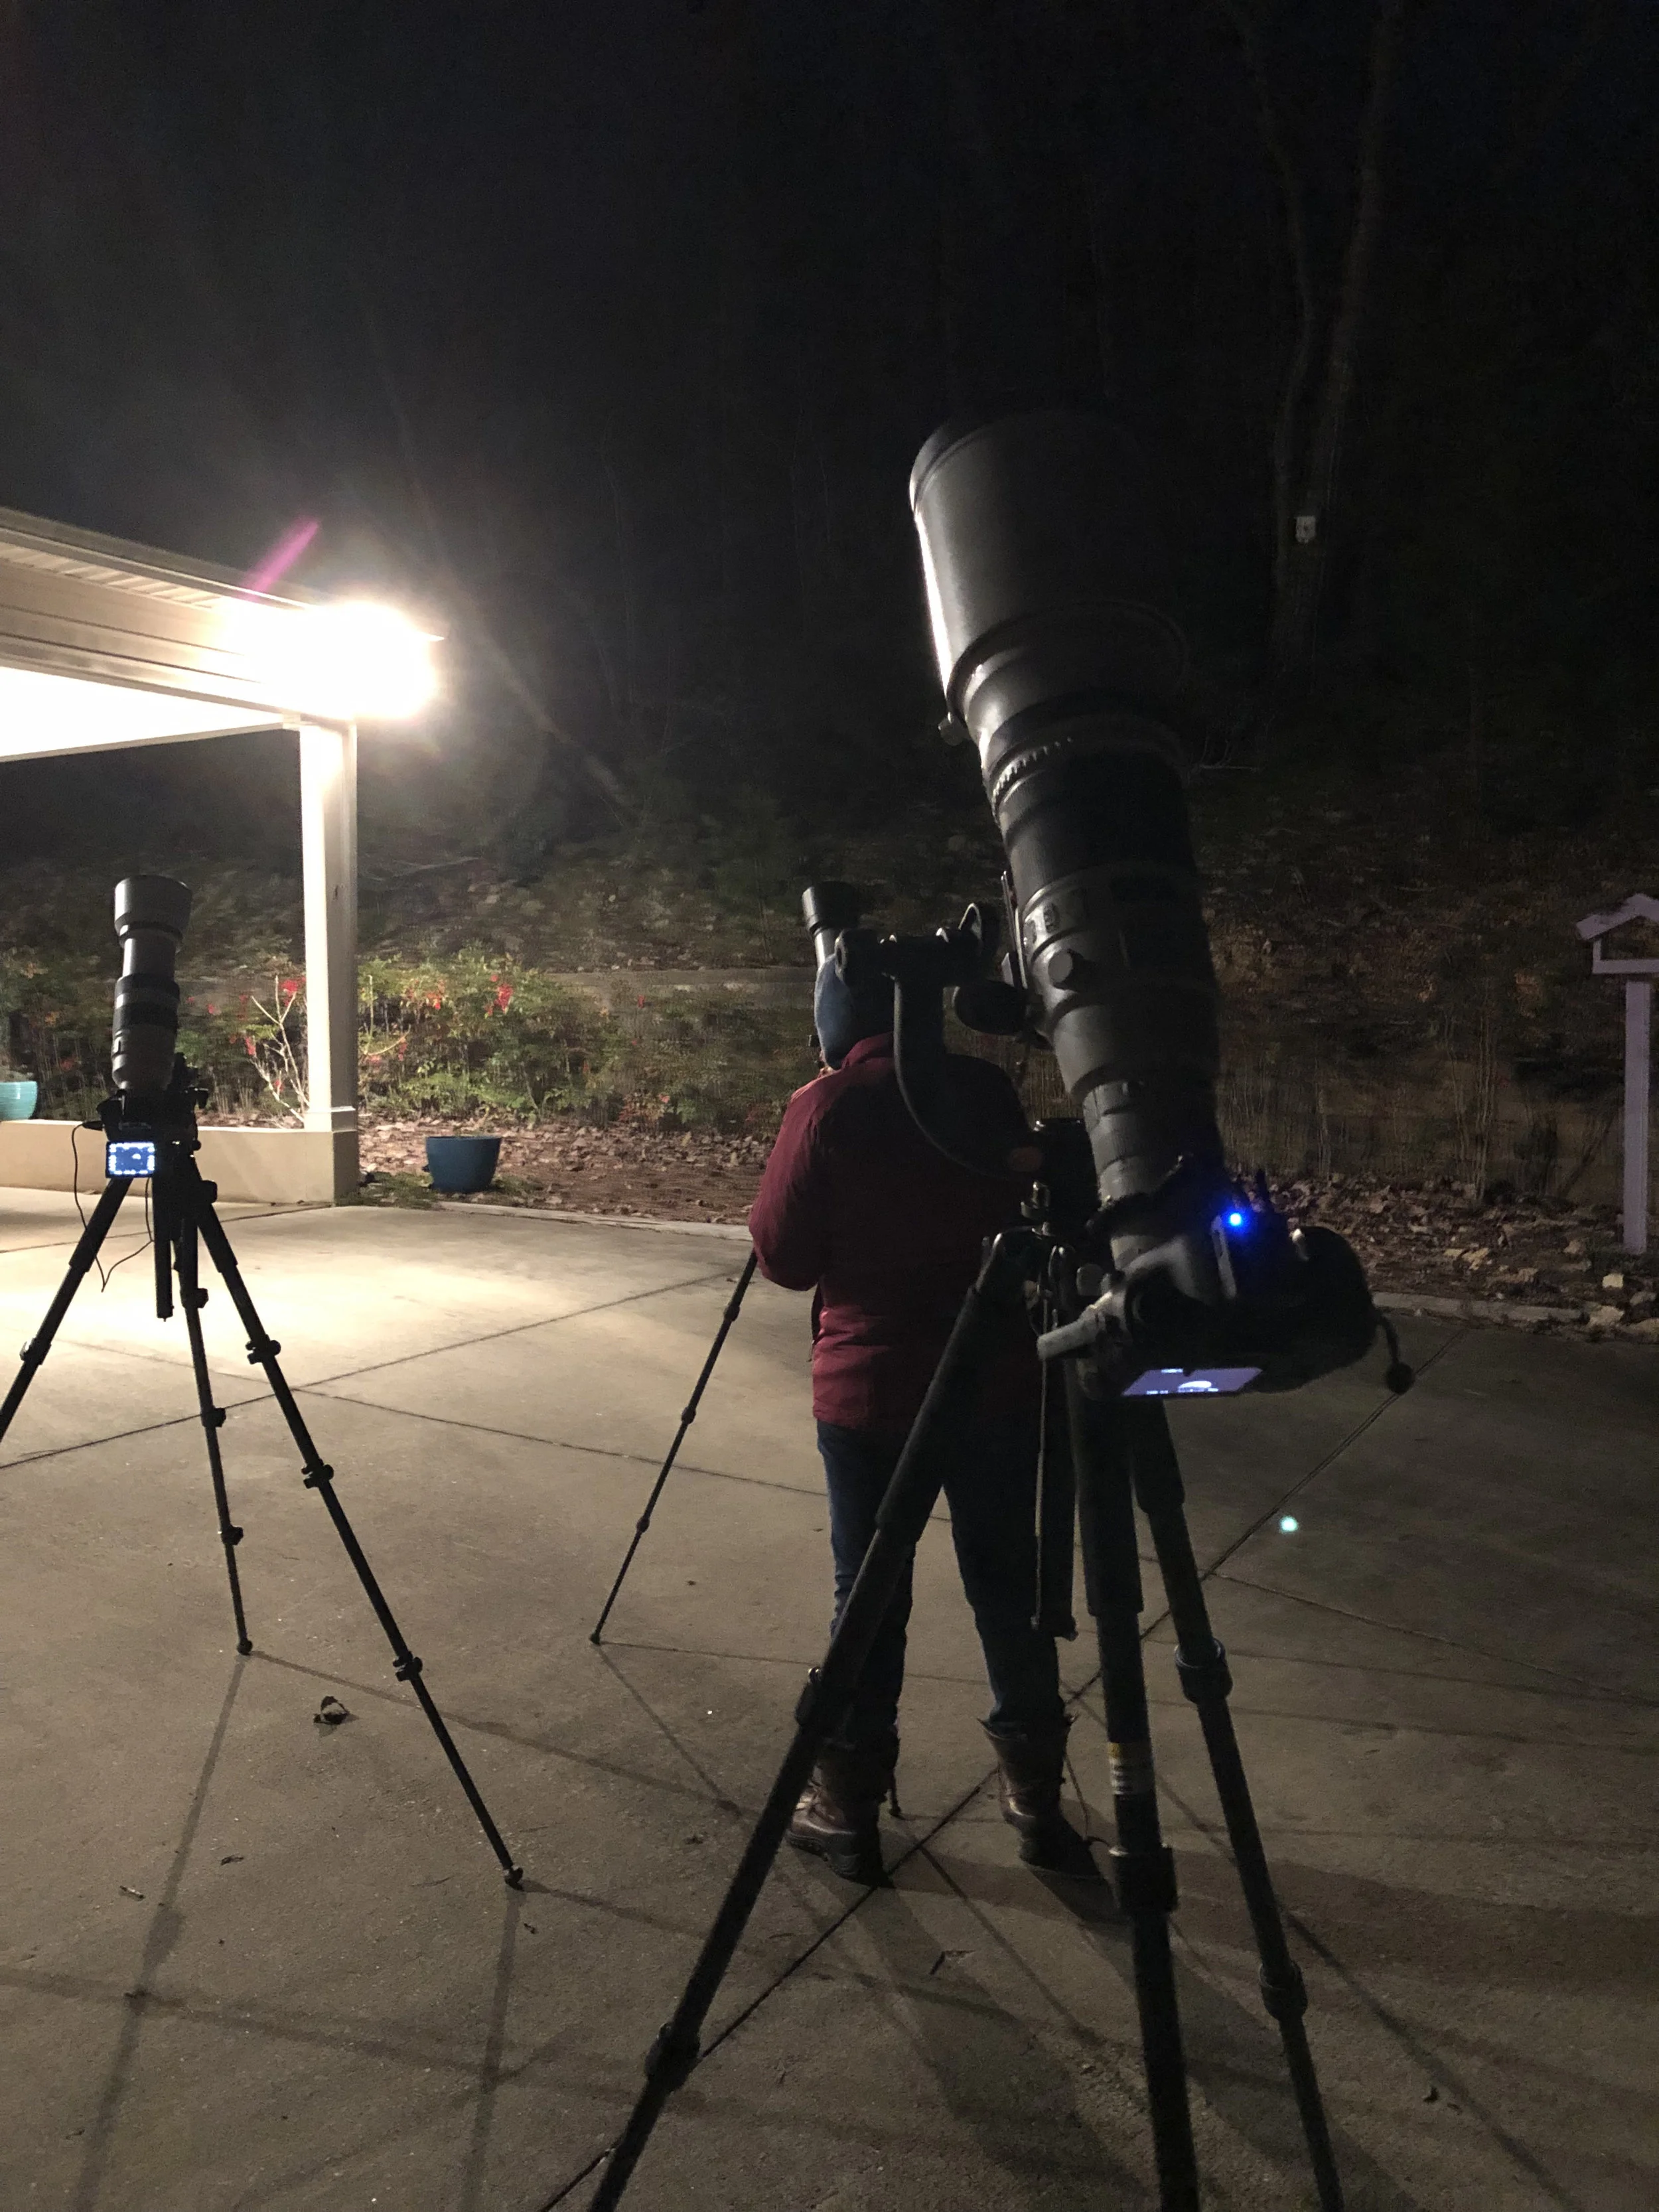
Setting up cameras for the January Lunar Eclipse
After getting a great chance to shoot the solar eclipse a couple years ago, I’ve been itching to point the cameras back up in the sky. I did a good bit of research into the shoot and thought I was pretty well prepared, I had the Canon 5DS with the 500mm and 2X teleconverter on one tripod with the jobu jr. gimbal head and a wireless shutter release. On a second tripod (that has a simple manfrotto video head) I put the Sony A7RII with the 100-400GM and 1.4X teleconverter.
Salwa was using the Canon 5D III with the 100-400 L II and 1.4X teleconverter on her travel tripod. As the Moon came over the little mountain ridge behind our house we took a few practice shots to get our settings right. I had watched where the moon was traveling the night before and thought I had a pretty good idea of where and how to get the sequences. Interestingly, this was where we had significant issues getting the shots…especially since the weather hit us with the coldest temperatures of the year so far.

Start of the partial eclipse
The eclipse was going to be 4 or so hours of shooting so that we could get everything from the full moon, through partial to the full red moon and back again.

Partial eclipse moving quickly towards full lunar eclipse.
This shoot turned into a major learning exercise:
didn’t realize how vertical the angle of shooting would be and that some of the setups were going to be problematic.
Video head couldn’t go vertical enough and I couldn’t use it during the full eclipse but it was the easiest one to keep centered on the moon since the handle made for easy small movements and the Sony camera was easy to use with the tilting screen.
The jobu gimbal definitely had better range of motion but with the wind was a major negative factor with the 1000mm.
The Canon 5DS is a great camera but the lack of a tilty-flippy screen made things really difficult in combination with trying to shoot nearly vertical on a freezing cold night. I do have a black magic monitor and I think that I will have that ready for a shoot like this next time although I would need external power supply for a 4 hour shoot.
I have also learned that I will likely need some sort of windscreen for that big lens as well as some weights on the tripod.
cameras pointing nearly vertical during the eclipse. That flippy screen on the Sony made things so much easier than trying to look at the Canon….too bad the tripod head that I used on the Sony wouldn’t go much more vertical than what you see here.
I also think that the 2X teleconverter was probably the wrong choice as it does reduce image quality and with the length every little movement is exaggerated.
I actually replaced the 5DS for the last half of the shoot with my Canon m50 (and removed the 2x teleconverter).
I’ve been considering a Goto astrophotography mount for the last few months (along with an actual telescope) and am now ready to put money down on one as longer exposure shots of stars, planets and things like these eclipses you can stop worrying about keeping your subject in the frame and think more about getting the shots you want. Looking seriously at the sky-watcher Skymax 102 AZ-GTi 102mm f/13 GoTo Maksutov-Cassegrain Telescope.

Full eclipse, subtle red colours and nice shadows….would have liked a bit more detail in the shot but this was as good as it got.
With all those issues we were still reasonably happy with the shots we got. As it turned out, the atmosphere was not the best for shooting even though it looked clear so we were not going to get amazing detail but I think I captured the moments and the sequence in a way that I’m happy to look back at the shots. Of course, now comes the hard part. I have a few shots that stand alone but I think that I need to produce a composite that shows the entire sequence in a way that looks interesting but also isn’t necessarily just going to be like all the others I’m expecting to see on the net in the next day or two. Stay tuned….

Partial eclipse

more partial eclipse

getting close to full eclipse, nearly time to change shutter speed significantly for total eclipse

near the end of the full eclipse, light is starting to come strong on the upper left of the moon.
Okefenokee Swamp - Shooting from a Kayak
Growing up there were stories and TV shows on Saturday mornings of people living in the southern swamps. Amazing waterways with Cypress trees and grassy areas that you could travel by airboat. I had heard of the Okefenokee Swamp long ago but…

Gator heading towards my kayak….not as close as it looks as this is a crop from a shot taken at 560mm
Growing up there were stories and TV shows on Saturday mornings of people living in the southern swamps. Amazing waterways with Cypress trees and grassy areas that you could travel by airboat. I had heard of the Okefenokee Swamp long ago but never thought much more about it until we were looking for a new road trip location and I saw this huge green area on the map. Up to this point we had hiked through Congaree National Park, kayaked on some rivers close to the coast but I don’t think we had a real appreciation for how big a swamp could be….or how much wildlife was living in one of these areas.

Salwa taking the lead down a side channel heading towards Minnie Lake
We have now made three trips to the swamp over our 4 years living in Upstate, South Carolina. The first time we stayed on the coast and made a side trip to Cumberland Island to see the wild horses. We really didn’t know what to expect on our trip into the swamp. We ended up there on a very hot day at the beginning of May in 2016.
We put in at the boat launch off Suwannee Canal Road on the east side of the Wildlife Refuge. Packing in our cameras, water, snacks but did not at this time realize how the sun down south can suck up your energy and burn your skin. Although we both had good hats, our arms and a couple patches on our legs were exposed and by the end of the day, were rather lobster-like. We both bought light long sleeve shirts almost immediately after that trip since the sun block really was not enough for 5 or 6 hours out in that sun.

Shooting little blue herons in Okefenokee Swamp - photo credit Salwa Farah (wanderingphocus.com)
Gear
We have gotten pretty good at packing camera gear for the kayaks, I usually carry 2 cameras so that I don’t ever have to change lenses in the boat. On the Sony A7RII I had a wide angle lens and the Canon 1D IV had the 100-400 (version II) telephoto. I usually put the wide angle in a waterproof deck bag and the telephoto starts off in a regular dry bag but I keep it between my knees on top of a little towel for getting those quick bird shots.
Circular polarizers are a necessity on these types of trips, they really cut the glare down and help keep the sky from getting blown out.

Little blue herons, everywhere you turned there were more of them.
I think we barely touched the surface of the swamp on the east side, even though we paddled for almost 6 hours. We went off on a side channel very soon into the paddle and that took us through some amazing areas of narrow streams opening into ponds or small lakes. Around every corner there was something to shoot. Gators swimming next to you or sunning on the shoreline, herons and egrets everywhere. We found one spot where there was two trees with nearly a hundred little blue herons. They didn’t seem to be interested in us but we did manage to get some interesting perched and inflight shots (at the time I didn’t think about getting a good shot of all together).

Getting ready to launch at Stephen C. Foster State Park. photo credit Salwa Farah (wanderingphocus.com)
Second time around
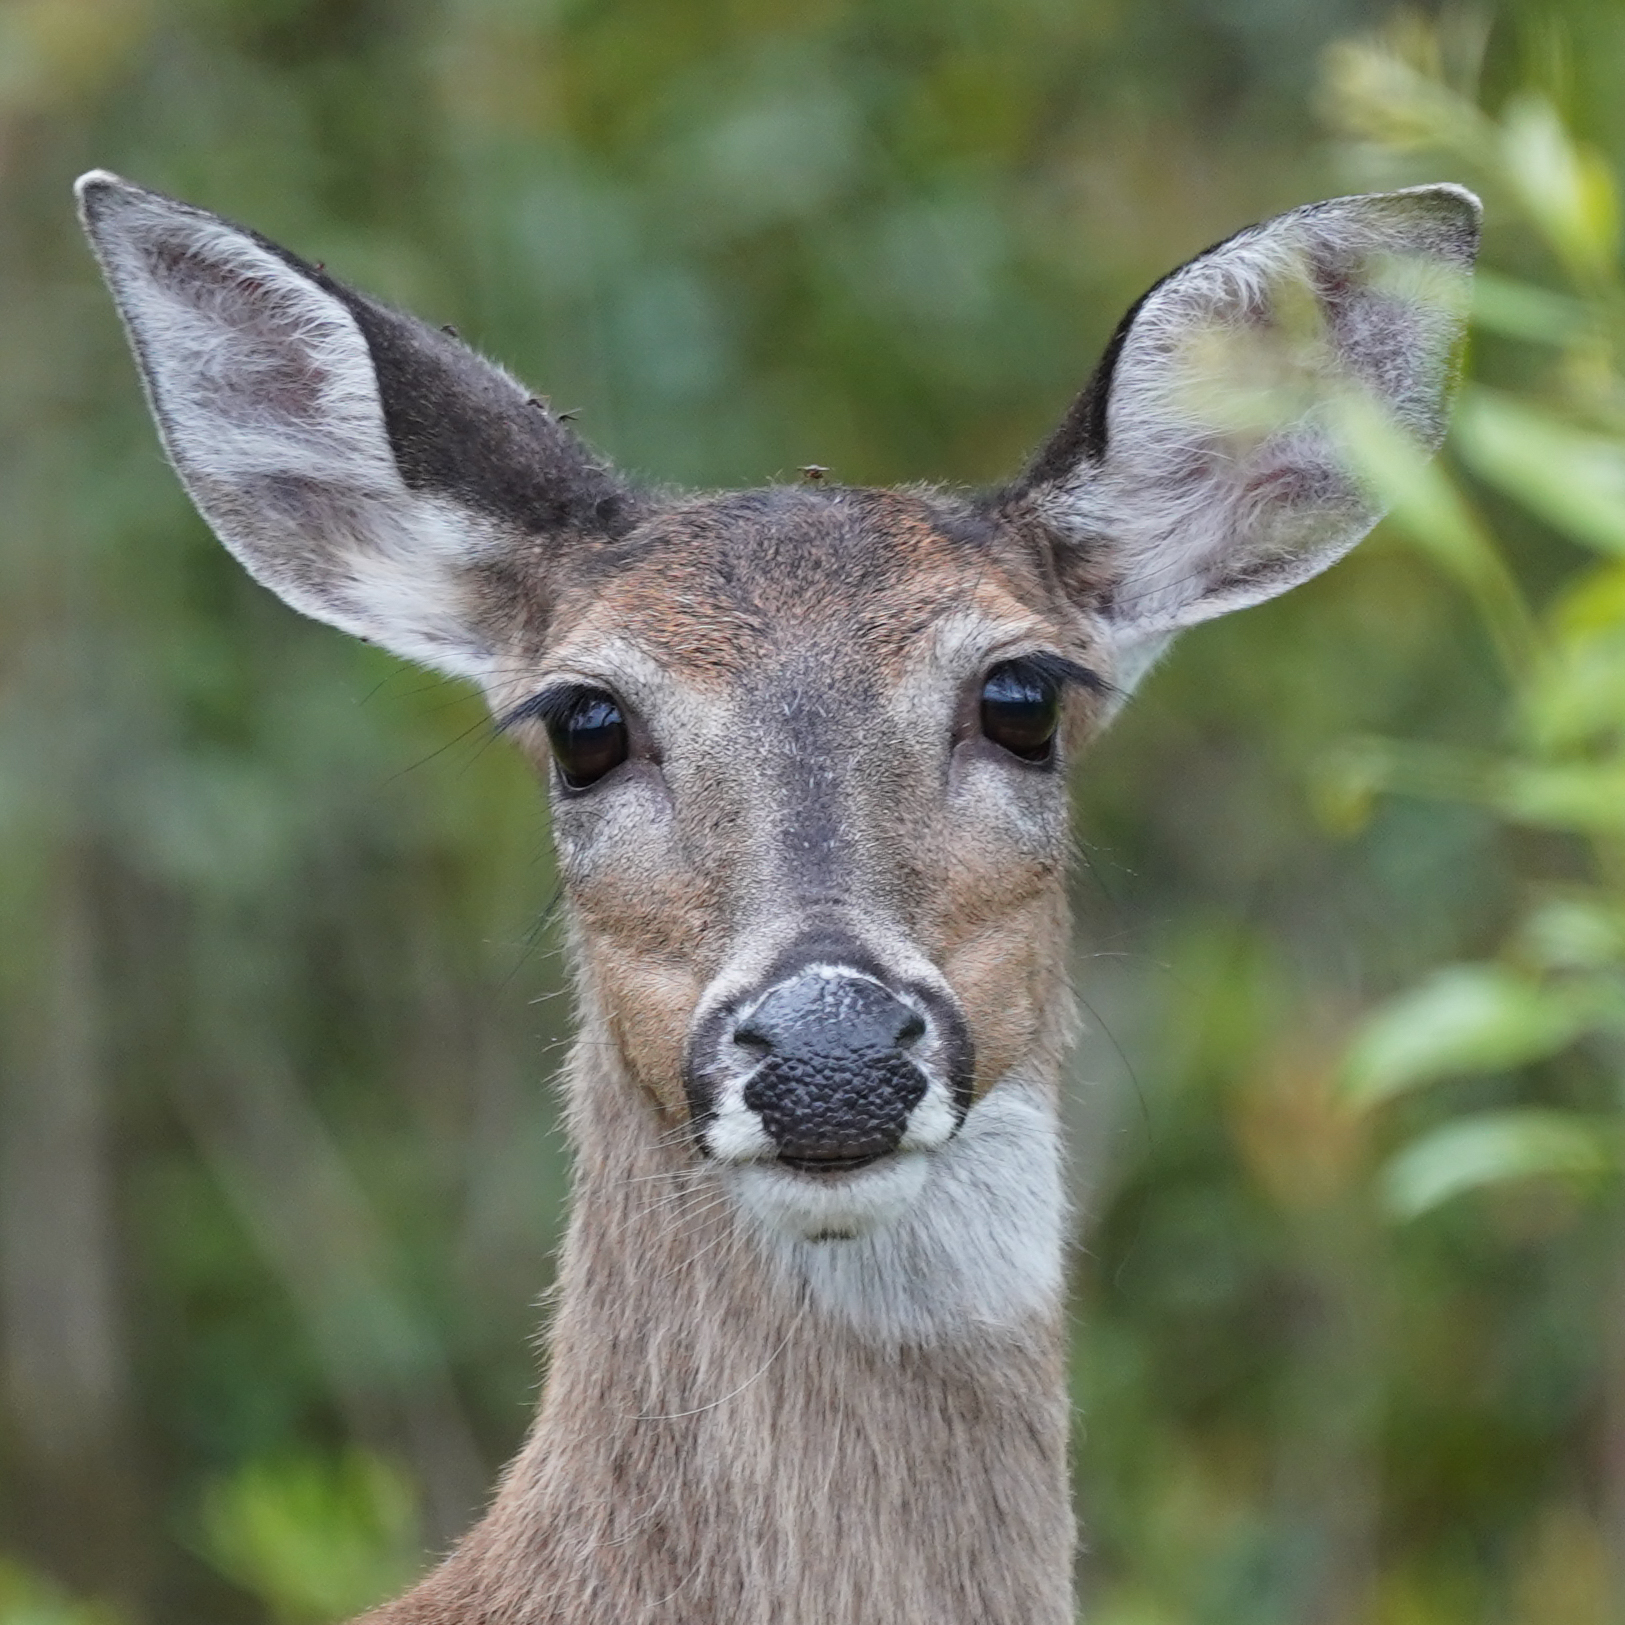
Next trip we decided to camp in the park and found a spot on the west side in Stephen C. Foster State Park. This is a beautiful park with really nice tenting spots as well as places for large campers and a few cabins for those who don’t like to sleep on the ground. Hiking around the campground you will likely see red-shouldered hawks as well as barred owls. On a clear day you can see Swallow-tailed Kites circling above you and Osprey fishing. Deer also wander around everywhere on park property.
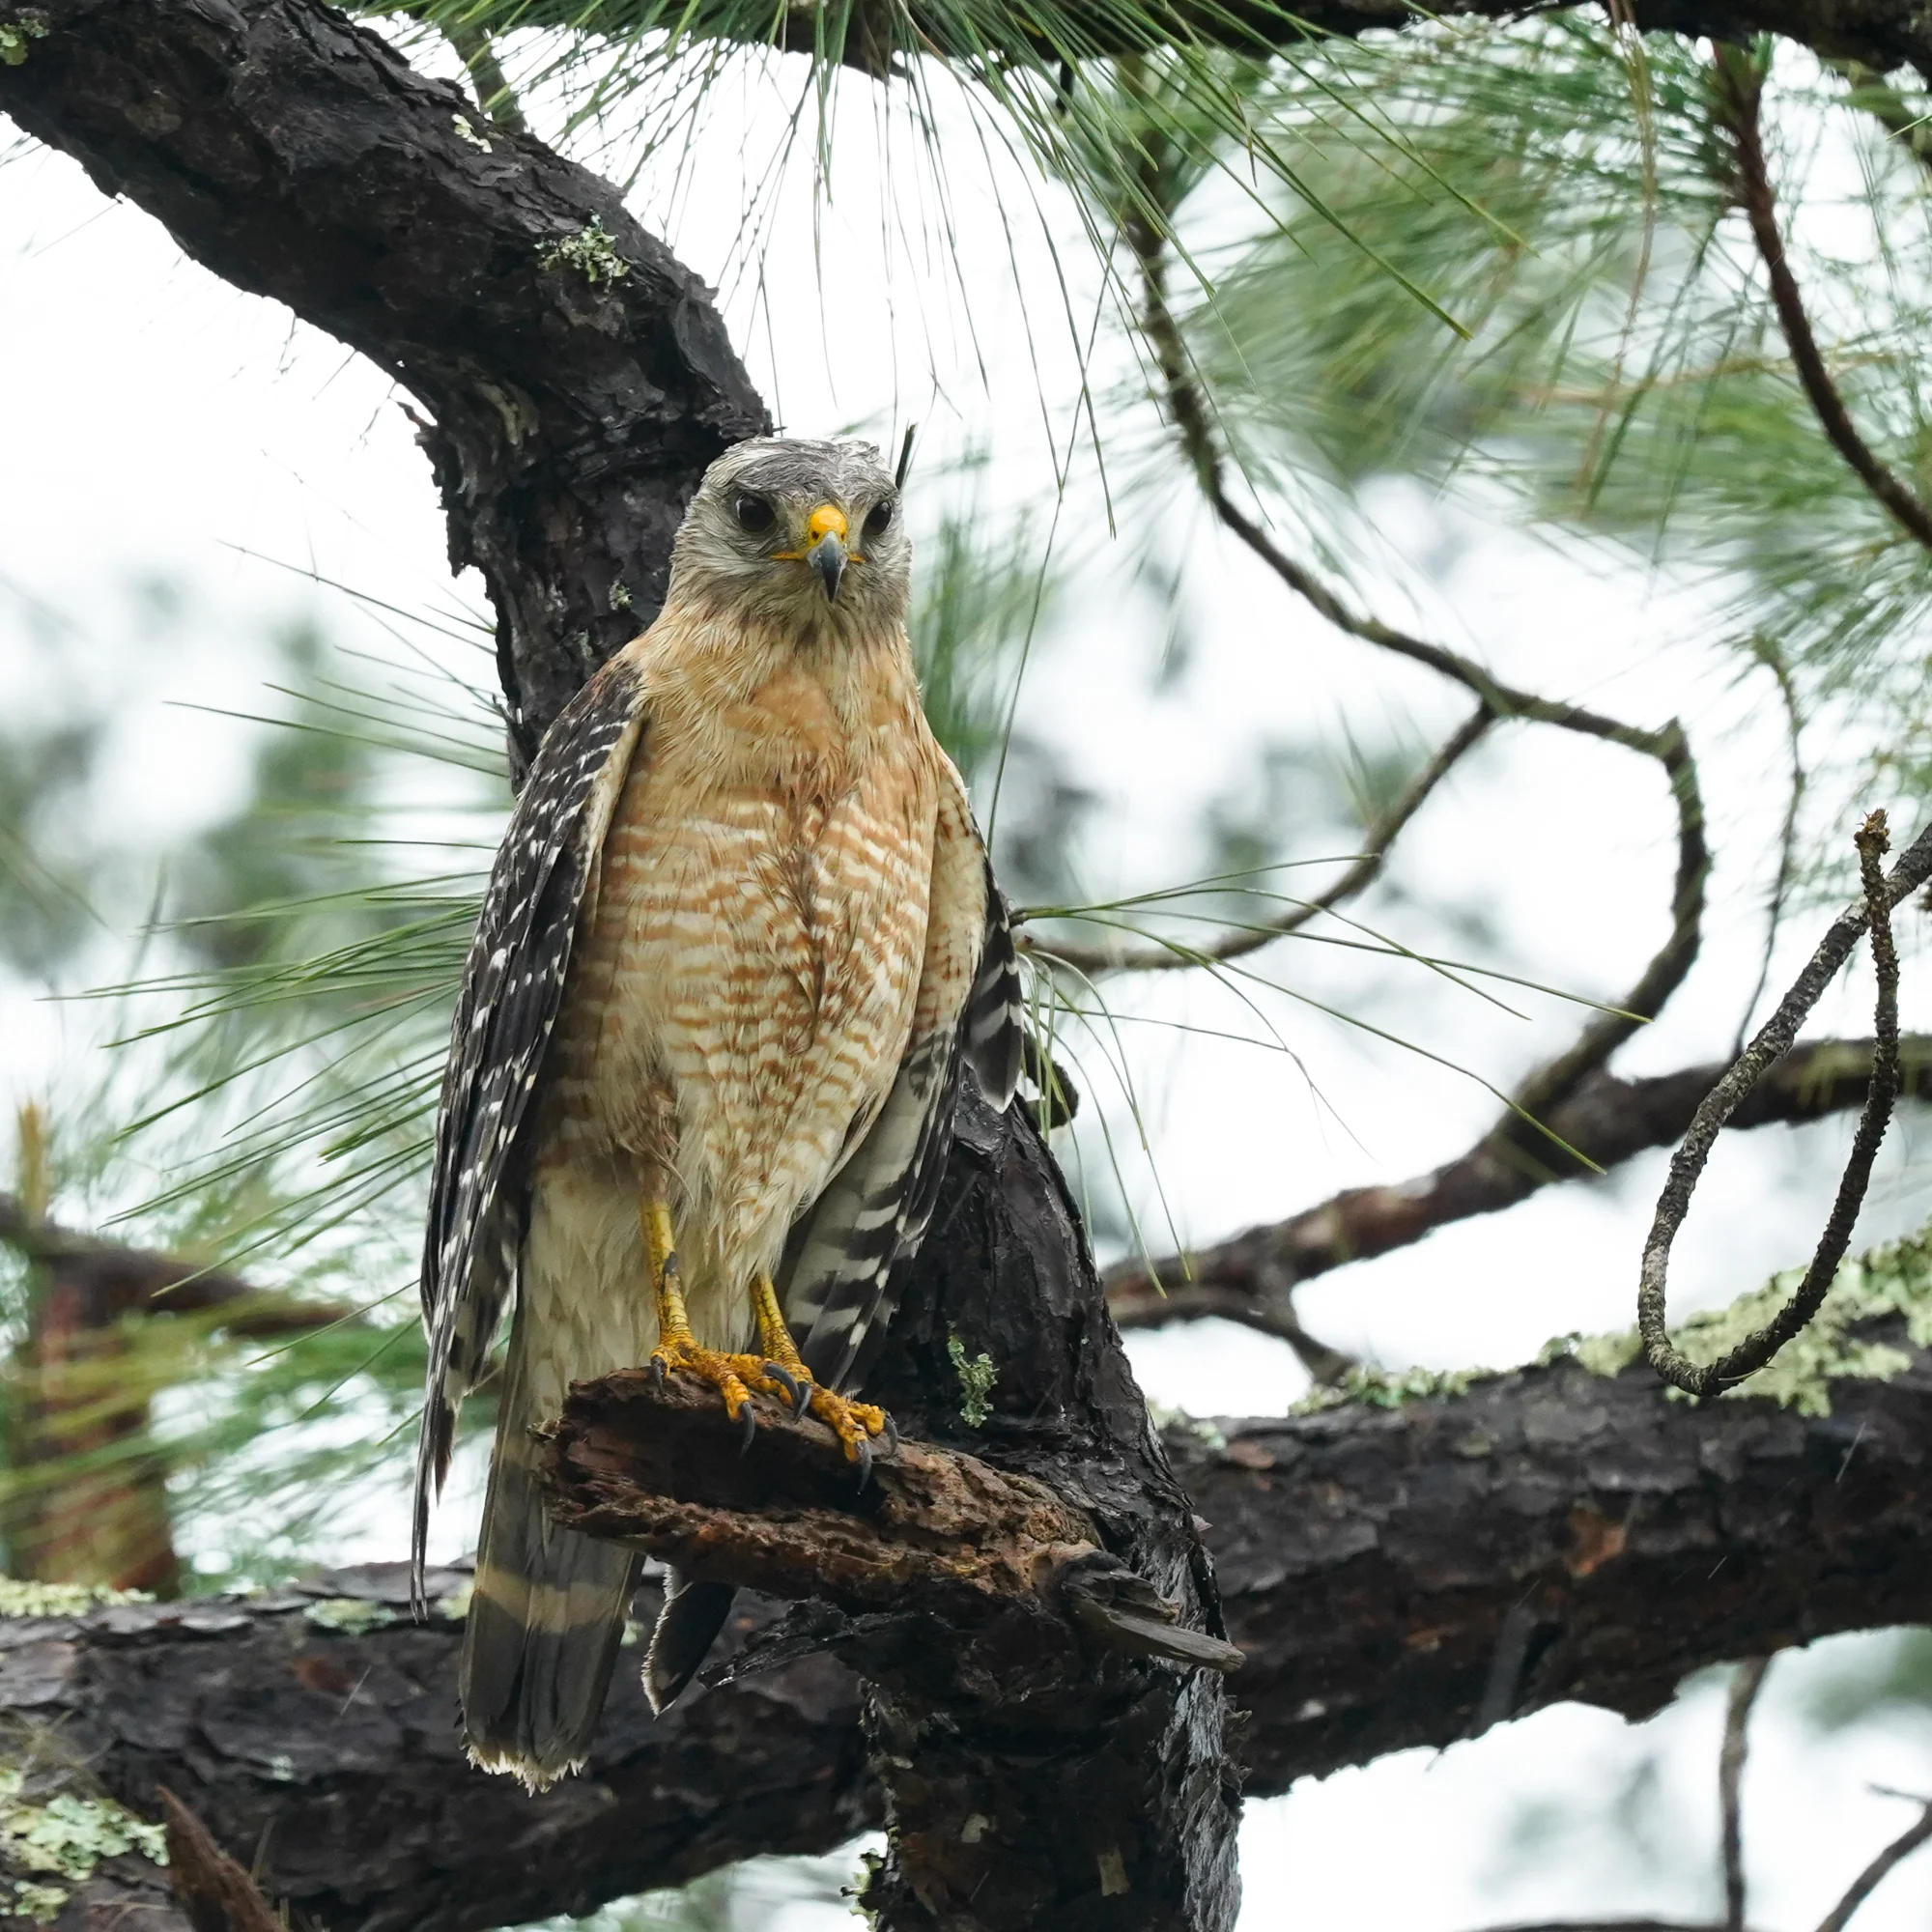
red-shouldered hawk looking a little ragged after a massive rain storm
Kayaking here is amazing. Once you get out of the initial channel you move into a much larger channel that leads to multiple, smaller channels within less than an hours paddle.
I would highly suggest getting out before the sun comes up, especially on a calm days, as the reflections and the mist over the water can lead to some spectacular shots. From a nature perspective, on the morning we were out, the alligators were swimming near our kayaks and we got some amazing shots with reflections that are still some of my favourites of all time. There was a noise that we heard that morning that really chilled us to the bone. Male gators were doing a mating call in which they seem to vibrate their entire bodies to make a noise that sounds like something out of Jurassic Park. If we go back again I would love to get some video of the water bouncing off the scales of the gator as it vibrated like a speaker membrane.

calm water in the morning allows for some fantastic reflections.
Our most memorable paddle came from taking the first channel off the main route heading towards Big Water Lake (trail map link https://www.fws.gov/uploadedFiles/OkeWildMapSide.pdf ). On this route we passed through cypress tree forests, long narrow passageways with alligators only a few feet from us, openings with ibis and herons roosting in the trees and a great picnic stop to get out of the kayaks and stretch….just watch for the water moccasins resting by the shore. Kingfisher were abundant and always just out of picture range, teasing us by perching until we just got the cameras out and then moving up stream for another go.

blocking the way as my kayak turns while I’m trying to get a shot of baby alligators
There is a camping spot further up in Big Water that I think would be on our list for a future trip but this time we just headed back for some relaxing at the state park. Even though the sunsets were pretty beautiful, we were so tired by the time the sun went down we did not get a chance to be on the water for sunset shots….another reason to go back again.

boat launch on a clear night. Had to use a post to steady the shot…remember to bring tripod next time.
I haven’t had a lot of experience so far with astro photography but it was a nice surprise that we found out Okefenokee has been designated a dark sky area. I did take a couple of quick wide angle shots that turned out ok and it would be a lot of fun to do some more serious stacking and deep sky shots. It is very likely that if we go back I will be taking a telescope and tracking mount to get some long exposure shots.

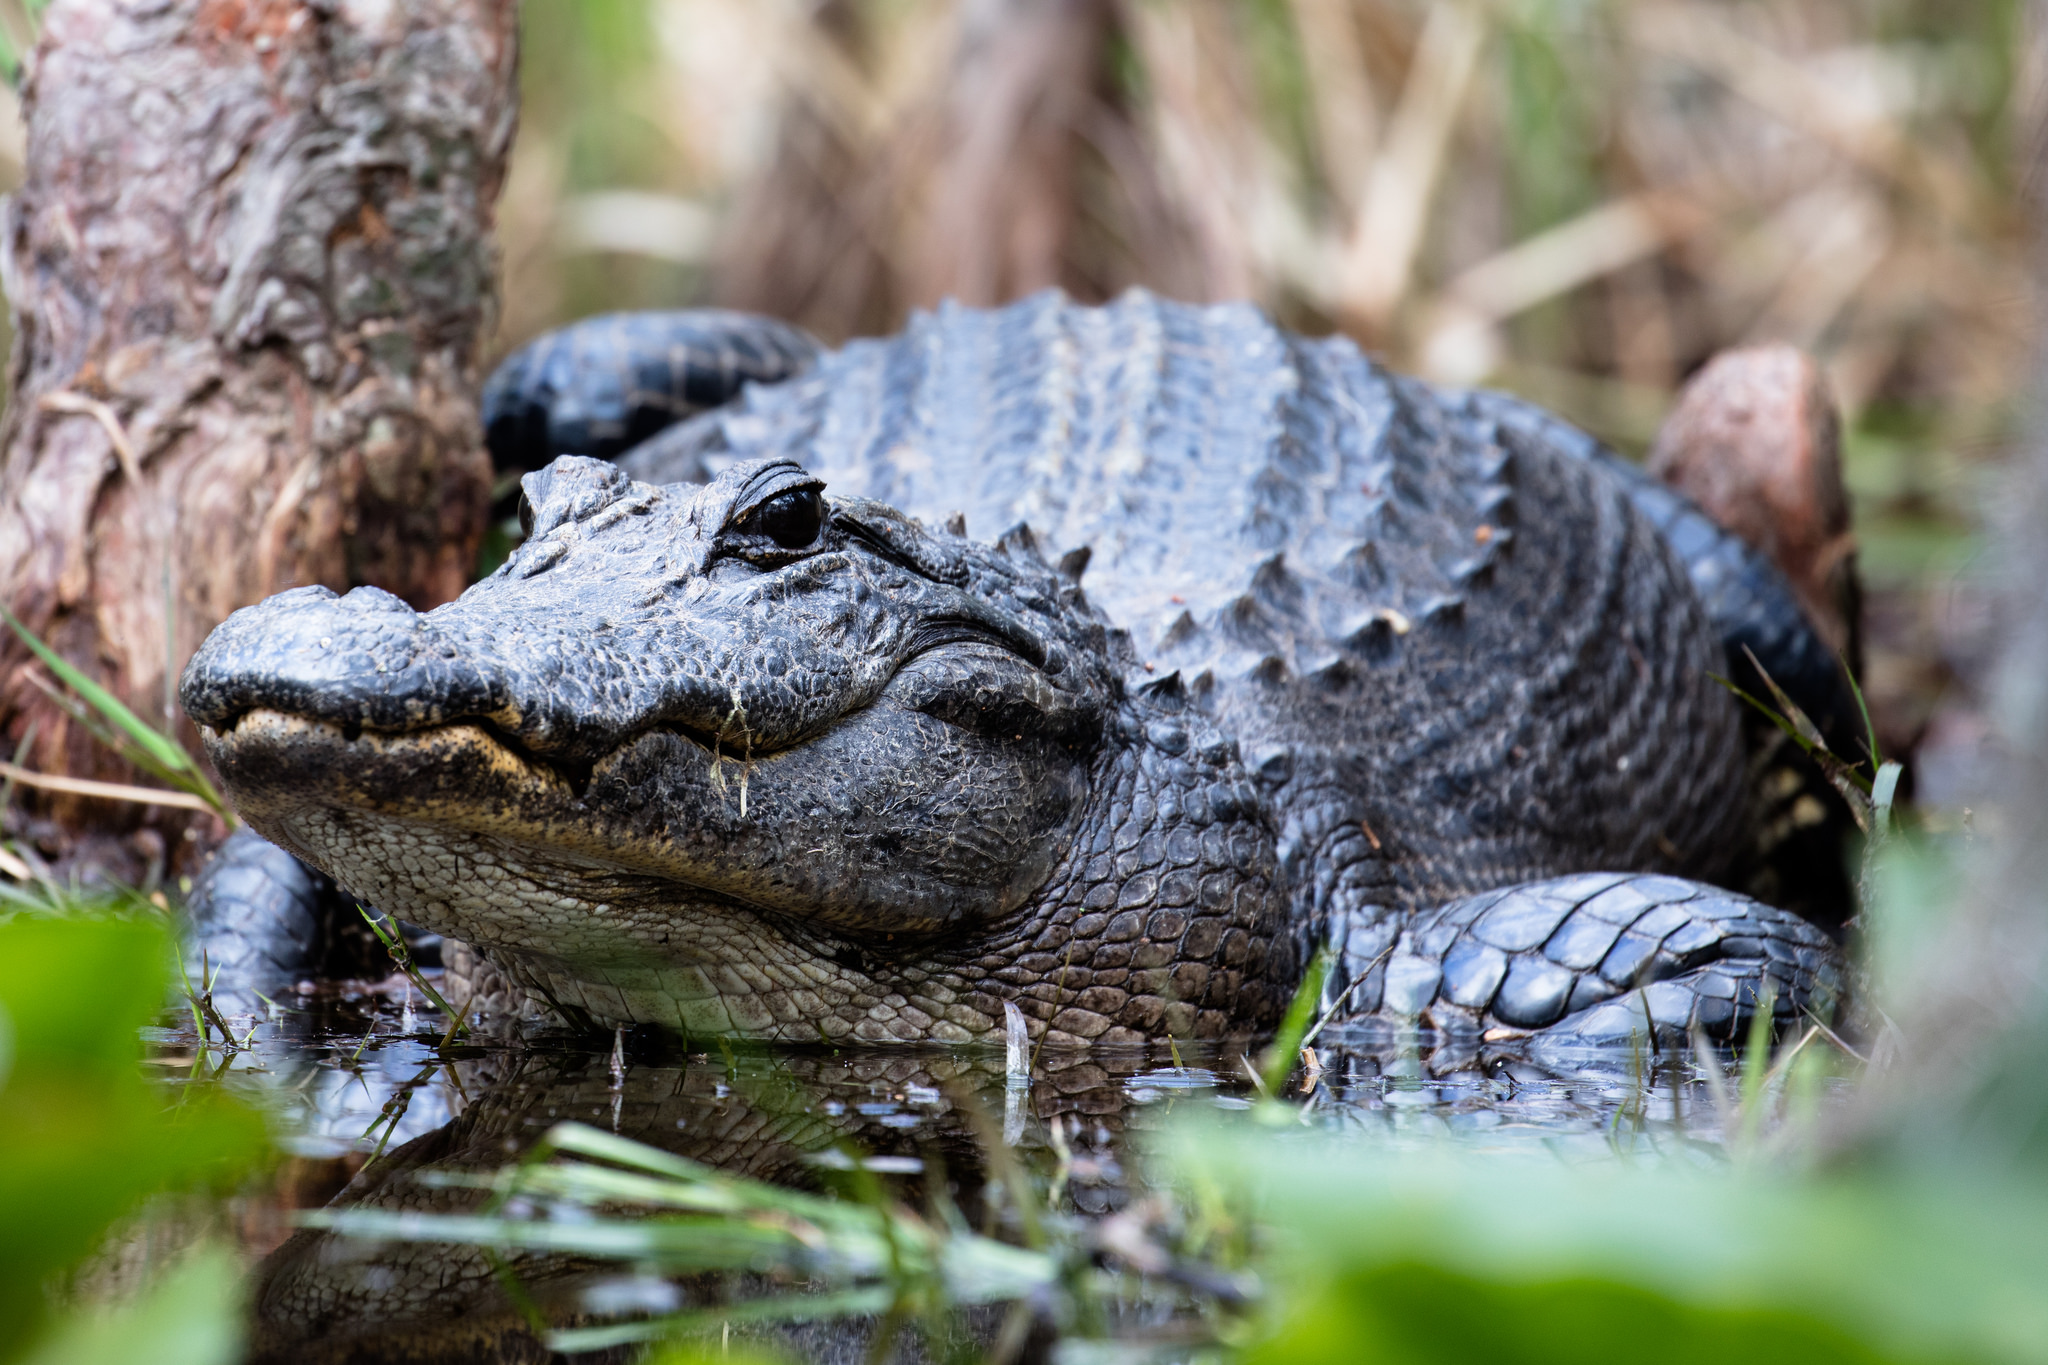
warming up in the morning sun. This young alligator was not worried about us as we paddled by.
Things to remember for shooting in Okefenokee:
Camera perspective - There is so much to shoot but also so many ways to get the shot. In a Kayak you have a great opportunity to get a very low perspective both for landscapes and to get eye level shots of the alligators and birds.
Video - this is a great opportunity to get video using an action camera or your main SLR/mirrorless.
Tripod - Don’t forget a tripod for any night shots, focus stacking and panoramas.
Filters - Polarizers, ND filters, graduated filters are all useful for reducing glare, adding a sense of movement and dealing with the fact that you are going to have bright skies with dark shadows in many shots.
Lenses - get out your wide angle and your telephoto lenses, different perspectives can really change how you look for that shot….I guess by definition :)
Leading lines - with so many tree lines and creeks try to use them to your advantage in leading the eye to the subject or through your the photo.
Be aware - not just for shooting, you are in an area with animals that can seem to be safe to be near but they are wild and you can also unwittingly disturb them or damage their environment.
Even after 3 trips to the Okefenokee swamp we feel like we have barely scratched the surface of what there is to see. There are at least two other boat launches that we haven’t been to and camping in the refuge would allow us to see much more.

This gator was one of the bigger ones we saw, we were happy that it just wanted to sit in the sun.


Sony A6400 and firmware updates for A7(R)III and A9
Sony had a press event yesterday to announce their new APS-C mirrorless camera that seems to be an update to the A6300 called A6400.

Sony had a press event yesterday to announce their new APS-C mirrorless camera that seems to be an update to the A6300 called A6400. Updates seem to be mostly software (and likely processor) based as the camera itself has not changed much physically except for the LCD screen which is now able to rise up fully over the top of the camera. With a starting price of $899 USD, a bit lower than the entry price of the A6300 this seems to be a compelling mid level camera with it would seem some amazing autofocus abilities but it leaves out in body image stabilization that likely will come in the A6500 replacement soon.
More interesting for me is the announcement of firmware updates in the near future for the A7(R)III and A9 cameras. These updates are improving on the focusing algorithms and will include something that I’m very excited about….animal eye tracking. Can’t wait to try this on my A7III when it comes out.
Software updates are due in April for A7 series. The A9 will have a first update with considerable improvements in March and a second one in July for the animal eye focus.
For some details on the firmware and the camera there are good articles on www.sonyalpharumors.com and petapixel.com that cover most of the details.
Getting the shot - Screech owl after dusk
I thought at first it was a small hawk buy the way it took off, but the shape was wrong…a little too small and round looking.

First shot taken - definitely not the right settings, even though I’m already at iso6400.
Driving up our driveway just at dusk after a day of downpours of rain in upstate South Carolina, turning to go into our carport and I see a little lump on the ground that is hopping. Once it noticed the headlights it flew up to our cherry tree, I thought at first it was a small hawk buy the way it took off, but the shape was wrong…a little too small and round looking. I got out…left the car running and went to grab the camera out of the hatchback. Luckily, the Sony A7III was sitting ready with the 100-400 on it. I quickly adjusted the ISO to 6400 and as soon as I brought the camera to my eye I could tell it was a screech owl. I was excited to get a shot but it immediately dropped back down to the ground about 10 feet in front of me. I guess it missed what it was after and it again flew over to another tree in the yard landing about 6 feet up on a branch.
This was my chance and I took a couple of shots quickly, and realized that my settings were wrong.
I adjusted the exposure compensation to -2 stops to match the level of light outside (knowing that I could recover shadows pretty easily with this camera), increased my shutter speed and took a couple more shots….this time I got a couple of good ones off but the light was disappearing very quickly.

Best shot that I got at ISO 6400, had to drop the exposure -2 stops while taking the shot but with the Sony A7III I was able to bring it back up without loosing too much detail in the noise.
I increased the ISO to 25600 and aimed again. At this point the autofocus was struggling, but was still managing to grab the subject and I took another dozen or so shots before the owl took off again.

Sample of shot taken at iso25600, dropped 2 stops in exposure. This is how most of the shots looked before processing.
It went into our back yard and started a whinny and a few trills. I then noticed an answer about 30 feet off behind our house. At this point it was too dark for pictures so I just listened to them chatting for a few minutes before they both took off into the woods behind the house to continue the nights hunt.

Like the last image but after some post processing, brought the exposure back up and applied some noise reduction as well as adding a bit of clarity. Not a horrible shot for the web, but I won’t be printing it anytime soon.
It wasn’t until I reviewed the shots that I realized that this wasn’t the same screech owl that comes to stay in a tree in our front yard regularly. That one is a pretty little grey morph, but this one was a beautifully coloured red morph…the first of that type I have seen and photographed. Sometimes the most interesting nature interactions have only luck as a basis for getting a shot…but I’ll take it anyway it comes.
Using mirrorless cameras for nature photography (My progress over time)
I started with a little point and shoot canon and quickly got hooked on taking shots and on how to improve the shots that didn’t look as good as I wanted. I started, and continue today, to use Canon cameras….point and shoot, then Rebel, moving up with my skills and as my budget allowed.

Size comparison of my Canon and Sony systems with equivalent 100-400 lenses.
I consider myself a nature and landscape photographer, but I have to admit I really enjoy the technology around taking pictures and video nearly as much as I enjoy being in nature. I started with a little point and shoot canon and quickly got hooked on taking shots and on how to improve the shots that didn’t look as good as I wanted. I started, and continue today, to use Canon cameras….point and shoot, then Rebel, moving up with my skills and as my budget allowed. As with computers, I have never felt like I could only use one brand and have looked at different tools when they did the job easier. I currently use both Canon and Sony cameras often one of each on a shoot but have recently been asked quite a few questions as people see me carrying Sony gear while shooting some challenging nature work.
I’ll start with a bit of my progression since Sony was not a great choice for many reasons in the beginning but has become not only much better, but in some cases, the best choice for me in certain situations now.
First generation mirrorless Sony cameras had contrast detect autofocus only and were really only good for static shots of perched birds or maybe slow moving animals.
I first went mirrorless with Panasonic GF1 and later GX1. The micro 4/3 system seemed to have a lot going for them with significantly smaller lenses for the reach you could get and the picture quality in good light was good enough for moderate sized prints. It was nice at the time to be able to get 600mm equivalent with the 100-300mm in a system I could carry in a small sling bag.

Panasonic GX1 with 100-300mm (600 equivalent field of view). A compelling system but autofocus tracking was my major limiting factor with this system. Maybe Olympus will change this with the new EM1 successor that is to come out.
There were two issues with these cameras for the types of photography that I was doing at the time. Since I shoot owls regularly and they tend to start being active at dusk and sometimes stay active just at dawn, low light noise is a major factor in the types of cameras I want to use. As you increase the sensor size (in general) for cameras of the same or similar technology you get better low light capabilities. The second is that due to the fact that I would like to capture in-flight shots and interactions which means both a higher shutter speed (again low noise at higher ISO to achieve those shutter speeds) and good autofocus tracking.
The first Sony camera I got helped in low light even though the A7R had a fairly high number of pixels, when you reduced shots taken in low light to @20 MPixel you were able to have excellent low light shots. This camera was also a great landscape camera and I used it mostly for those types of shots over it’s lifetime. The problem was that the autofocus not only wasn’t better than the Panasonic it was actually considerably slower, even for single shot. Then along came the A6000.

Sony A6000 and A7R, a really good start but Sony was going to quickly improve on these cameras
The A6000 was the first mirrorless camera that changed my way of thinking about autofocus. I would rarely use anything more than 9 points on my Canon camera for continuous focus and more often than not, would only use center point and have to always crop my shot for the composition I wanted later. With this camera I could use either all points or a slightly smaller (but still bigger than the full focus on my canon) box and I could watch the little green dots follow my subject in real time. Along with 10 frames per second I was able to frame my shot in real time and (most of the time) keep focus on the subject. The software was not perfect at this time, it would lose the subject where the background was complex and contrasty. The ability to keep focus would drop off considerably as the light diminished. As an APS-C camera, the low light capabilities were good but not great. The best thing was that I was sure this was a good sign of things to come for the next generation of full frame cameras.
That lead to the A7RII for me. This camera at the time was nearly everything I was looking for. The autofocus was similar to the A6000, it had more resolution than my A7R and it seemed to have better low light capabilities as well, even with the higher resolution. With more and more lenses coming out I was finally able to get a 100-400 and a 1.4 teleconverter (whereas before the longest native lens I had was a 70-200). This combination finally became as usable as my Canon setup….but not necessary better. There were things that Canon still did better and things now that the Sony combo was better at.

Pretty much a full set of lenses for me, 16-35, 24-105, 100-400 with or without the 1.4 teleconverter (and a 70-200 for video). Pretty much matches my Canon setup except for the 500 f4.
The A7RIII came out and I wasn’t sure that it was worth upgrading even though the autofocus was considerably better, 10 frames per second was pretty compelling, and that new battery was a big improvement. The A9 also came out and I thought that might be the perfect nature camera, especially with the silent shutter that is actually good enough to capture moving subjects without any distortion. However, the cost of that camera had me sitting on my money as I could have picked up a used Canon 1DX for that kind of money and I wasn’t convinced, at that time, that it was in the same league.
This is when Sony did something very unexpected. They came out with the A7III with the same resolution as the A9, 10 frames per second, excellent autofocus, the new battery, 2 cards slots, and a price that had up until that time been relegated to “budget” full frame like the 6D or D610. I almost forgot, it also had some pretty good video specs as well which was something I was starting to get more interest in at that time. So instead of replacing my A7RII with the A7RIII or blowing my budget on the A9, I kept the A7RII and picked up the A7III as well. Now I had a combination that I felt matched most of my Nature shooting and I found I was leaving my Canon equipment at home more often (unless I needed the 500mm). I could hike with 2 cameras and 3 lenses (16-35 f4, 24-105 f4, 100-400 f4.5-5.6) that were all interchangeable and I had high resolution as well as speed and excellent high ISO capabilities.
This is the current state for me. I’m sure with the new mirrorless cameras that have come out from Canon and Nikon (and Fuji for that matter) we are in for even better cameras in the next couple of years.

I really love the A7RII for landscape photography.
What do I expect? In the next generation of cameras, I’m expecting some fantastic things for nature photography. We are very likely to see fast silent shutters make it down to more affordable cameras, likely with Sony taking the lead on this. Autofocus is improving very quickly as processors get faster at looking at the live image and actually using that data in near real time. I’m also expecting to see usable eye autofocus for birds and animals in the next generation of cameras. Tracking objects is improving steadily, and algorithms are getting more robust. I expect Canon and Nikon to put out something before the next Olympics that will be interesting, and possibly catch up to Sony on some of these fronts. The next couple of years are likely to be exciting as these companies jockey to gain/keep their hold on the market and I expect that there is going to be some fallout, just not sure who is going to make a mistake or decide they can’t compete.
Video is going to be more and more important in these systems, and Canon and Sony have a bit of an edge to start but Nikon and Fuji have now put out some surprisingly good products. Panasonic and Olympus seem to be the bigger question and we shall see as one sticks their foot in the full frame game and the other looks to try to compete in the sport/nature game but stick with the micro 4/3 platform with the EM1 successor.

For nature shoots I commonly carry the canon 5DS with a 500mm and have a sony (either a7III for faster subjects, or A7RII for environmental shots) hanging from my shoulder.
Next I’ll cover some questions that I get asked about using Sony out in the field.
Autofocus - many questions here
Sony started with autofocus that was accurate but so slow it was only good for static subjects (on the mirrorless front, the SLT cameras are a different story). Each generation improved both the technology (on sensor phase detection, increasing the number of points, speed of detection) and the software (ability to detect objects, tracking algorithms, eye AF) with the current version 3 having mostly caught up to Canon and Nikon and in some areas actually surpassing them. The challenge with any autofocus system is learning it. It took me years to get the most out of the Canon system and to know when to use what methods. Likewise it took time to learn the Sony system. I have found that I don’t use the same methods for the same subjects. I will use all focus points and let the camera do the work of tracking with the A7III for most bird in-flight shots, whereas with the Canon I will most often use 9 point in the center for those same conditions. Using all points on the Canon I would often lose focus to the background, and using small cluster of points on the Sony seems to limit my composition unnecessarily. I have not used all of the track and follow methods of the Sony yet, my first trials were not as successful as I had wanted. Single point in lower light is still not as good on the Sony as on the Canon. The state of focus tracking on all systems is so good compared to what I started with 15 years ago, most of the time missing the target is more often human error than the camera.
This will likely be the subject of another post on its own and hopefully I will put out a video showing some techniques as I get better at documenting things while they are happening.
Weather sealing - I personally have used (and am comfortable with) all the Sony cameras in the same places that I use the Canons. I would never, on purpose, shoot any camera in the rain and will use rain covers like Lens Coat when I’m in bad weather. My main experience with challenging weather is in very hot and humid conditions or very cold conditions. In humid conditions I have only ever had 2 issues with a photography equipment, a canon xti in which the SD card failed in Costa Rica, and a Tamron lens that fogged on the inside in the rainforest in Northern Australia…that lens is still working fine today and only needed to be in a dry area for a few days. I regularly use all cameras in the swamps of South Carolina and Georgia, in very salty conditions on the coast (we do product shoots for a sailing catamaran company). I also regularly shoot in very cold conditions ( < -30 °C) searching for hours for owls. I guess the point is that the weather sealing is good enough for me for these conditions and the way I ensure my equipment stays safe. I will leave actual tests of the failure points of each one to people who can afford to break their equipment.
Build quality - After saying what I did above, I have dropped my Canon 1D IV on volcanic rock in Maui, fallen with it down a scree field, bounced the camera of the side of a rock face while shooting bouldering and still managed to sell that camera last year with only a few scratches. I do not believe any of the Sony cameras I have would fair as well. The build quality is solid on these machines but they are not in the same class as a 1D, I would put them equivalent to the 6D or 80D which are still very good.
Battery Life - After using a 1D for 5 years pretty much any other camera that I have falls significantly short. 2 batteries would last me an entire week in the woods. On the other side of the spectrum is the A7RII. I have 4 batteries and will use 2 a day easily when shooting it as primary. I definitely need to be within reach of power every 2 days with that camera. This changed significantly with the A7III. This camera last about the same amount of time as my Canon 5DS and both of these cameras can usually go 2 days per battery. This is the one major reason I will upgrade the A7RII at some point.
Lenses - I have been using Sony mirrorless since the beginning so have had to deal with the early lack of lenses. Since I was doing mostly landscape with these cameras at first the 24-70 f4 and 16-35 f4 were good (well the later was good the former just good enough). I was also able to use all my Canon lenses for landscape easily with the metabones adapter since autofocus was not a huge issue. In the last year I was able to pick up the 100-400 and the 1.4 teleconverter to which was also my go to combo for the canon system for years before I was able to get a 500 f4. There are some fun lenses I would like to pick up but now that I have the 24-105 f4 in place of the older sony/zeiss 24-70, I have all I regularly use on any given shoot. Quality wise, I have the same lenses on Canon and am equally happy with both systems.
Ergonomics - This one is very personal to almost everyone. Personally I find both Canon and Sony cameras very easy to use. They both take time to learn well enough (and to customize to the level I’m happy with) that I can do most of what I need without thinking and rarely in the field need to go to the menus. Unlike many complaints I have seen, since I use long lenses a lot the size of the camera is not really relevant because most of the weight is on my left hand and my right hand guides the camera. Now that the Sony has a joy stick, I don’t have anything to complain about for Canon or Sony. I do like how small and light I can go with the Sony A7RII and 16-35 for long hikes to landscape locations…it may only save me a pound off the equivalent in Canon land but it is nice.
Support - I do not have CPS but anytime I have had an issue with canon equipment it has been fixed quickly and when not my own fault, Canon has done the work without charge. I have had excellent experience with Sigma when my 120-300 image stabilizer died. This is one area that I have not had good experience so far with Sony. I scratched the 100-400 lens a few months back (my own fault, did not expect Sony to fix it for free). I sent it in for an estimate and it came back at $1800 to replace the outer element. Nearly the price of the lens itself. I decided not to get it fixed since it really doesn’t affect the image much (but I’ll never be able to sell the lens). When it came back, my camera guy (yes I have a camera guy that has been taking care of both of us for 14 years now) asked the Sony rep who was in the store to see if they might be able to do something a bit more reasonable. In the end, all I got was a bit of a sneer and was told to use a filter next time. I guess I was more annoyed by the attitude than whether or not they might try to do more, but it has left a bad taste in my mouth.
Video - I’m just learning to do more video so the capabilities of all of my cameras are not the going to be the limiting factor for quite some time. The A7III does make things very easy compared to any of the other cameras I have used before. I have very little experience with any of the Canon cameras with DPAF so can’t compare them yet, just bought a m50 for use with the DJI ronin-s so will likely do some comparisons between that and the A7III soon.
Stabilization - I love the in body image stabilization. I can handhold shots I would never consider before with any lens I have. There are many times I would like to have a tripod but the weight is just too much for the hike. In these cases the Sony cameras mean I can use any lens now in those conditions.
Colour - not an issue with me as I adjust white balance for each shot depending on how I feel the scene should look. Out of camera, Canon seems “warmer”, Sony seems “colder”, both can be adjusted to what I think I actually saw.
Noise - With Canon I tend to shoot to the right since shadows can be a challenge to recover an the noise is a bit ugly in those areas. With Sony I don’t need to worry as much, I can expose for the scene and recover shadows more easily. I rarely feel limited by either system.
So for now, I have some excellent equipment and I use all of it together depending on what I am shooting. I’m looking forward to all the tech that is likely to come in the next few years, from improvements to the smaller sensors, to the ways that autofocus is going to seem almost simplistic and just to the competition in the market place with so many good products looking to get our attention. If anyone actually reads this far and would like me to go deeper into any of the subjects above leave a comment. We will be working on some videos soon and may cover these areas as we learn what to do (and likely show you what we found doesn’t work).
Last Chance….at least for now
We came back to Ontario after 4 years of playing with nature in the sunny South of the Eastern US. This was always going to be a short stay, get our paperwork in order and start looking for the next place…

Snowy on the side of the road, finally one close enough to get a shot….too bad the sky is still almost the same shade as the bird.
We came back to Ontario after 4 years of playing with nature in the sunny South of the Eastern US. This was always going to be a short stay, get our paperwork in order and start looking for the next place we want to live/work/photograph. During this time we were lucky in some ways and unlucky in others. On the less than fun side, we came back to one of the coldest, dreariest autumns that I can remember. I think we saw the sun 3 times in 60 days….and only for a few minutes. Cold and snow came early this year, but with that came some good news.
There have been a significant number of owls to be seen in Southern Ontario this fall. Along the north shore of Lake Ontario you can often find (if you are patient and know where to look) 5 types of owls. Great Horned, Barred, short eared, long eared, and Saw-whet are always on the list. Now it seems that last year was a good year up north for lemmings and that often means that a bumper crop of Snowy owls fledge and the next winter many come south to forage. Even this early in the season the carrot fields and shorelines are becoming great places to find one. That is a bit of an understatement as we saw 8 on one day alone. Most of those were far off in the fields but on the last day we did find one in a tree along the road.

Breakfast? Lunch? a quick snack, and it didn’t last long.
So far this has also been a good season for Barred Owls as they head a little further south for winter. We had cold but fun morning watching a successful vole hunt just a few feet away from us.

Start of the hunt, Barred Owl taking it to the voles.
I also got a chance to see some Great Horned owls way, way up in the white pines. I did a bit of searching, unsuccessfully for Saw-whet and long eared owls. Those will have to wait for our next trip.

Great Horned Owl high up in the white pines
Now December has come, and we have finished what we needed to do in Ontario and have decided to spend Christmas back down in the Carolinas where we have already found the sun again. We have left the northern owls behind for now, I’m sure some of my photo friends are getting more shots of the owls that are there and hopefully will get a chance to see some that I missed on this trip. Don’t worry about me too much, as we got back to our property down south we were greeted by our screech owl….well, at least he was sleeping in its usual tree in our front yard.

Sleepy Screech Owl keeping our front yard safe from critters
So, where to next??? Maybe out west….we shall see, I’m looking up good birding locations (and I guess a new place to live and work).

Time to go.
Snowy Far Away
This weekend there were some more sightings, and another one up near Lake Simcoe so we headed out to some farmers fields to see what might be around.

Grim morning on Lake Simcoe. Snowy owl was seen in this area the day before but no luck on this day.
It has been a pretty grim fall back in Southern Ontario for the first time in four years. October and November have been mostly raining and cold. With Winter seeming to be coming early there is one benefit….Snowy Owls are coming south already.
I looked up sightings on eBird last week and saw a sighting on Lake Simcoe. Since we were going to be up in Bradford area this was a simple side trip on a rainy day but turned out that we were unable to find it. Salwa was supportive as usual but spent most of her time trying to keep warm in the car.
This weekend there were some more sightings, and another one up near Lake Simcoe so we headed out to some farmers fields to see what might be around. I guess you could say we had better luck, found an owl and it was a beautiful male, but….it was far out in the field sitting on the ground and it was bloody cold and windy.

You probably can’t pick it out, not sure how I did but there is a tiny white spot out there near the barns. Camera is set up, time to wait and watch.
Still, this is the first very white male that I have seen and there is always the possibility that it will come closer so I set up the tripod, took out the 500mm with the 2x teleconverter on the Canon 5DS grabbed my coffee and stood in the cold and waited.

Snowy owl sitting off in the distance, even with 1000mm I’m going to have to crop like crazy to get anything.
…..and waited…..the owl was pretty active, watching gulls and crows above him and taking a look at me every once in a while.

Massive crop of the last image, not the detail level that I would like to have but nice to capture a few shots of this owl.
…..and waited, nice to see it in this sea of green but I was still hoping it would fly.

….and waited, it started preening its feathers and stretching. Usually a good sign that it might take off but not this time. I’m sure if I could have waited the rest of the afternoon I would have gotten something but the chill was setting into me and coffee was calling.

For about an hour and a half I watched in the cold, Salwa is patient but this bird was not going anywhere soon. At least I got a few shots and hopefully this owl will stay in this area for a while. Nice to have a couple of shots even if they are massively cropped, and the anticipation of the next owl will keep me going.
photographing Black Bears in Cades Cove
The Great Smoky Mountains National Park is the busiest park in the US, and Cades Cove can seem like you are in the worst of New York and Toronto commuter traffic. So why on earth would you want to spend a perfectly good weekend stuck in traffic?

Salwa (WanderingPhocus.com) looking for a good spot to capture the morning mist across the valley in Cades Cove.
The Great Smoky Mountains National Park is the busiest park in the US, and Cades Cove can seem like you are in the worst of New York and Toronto commuter traffic. So why on earth would you want to spend a perfectly good weekend stuck in traffic? Simple, once you look beyond the bumpers ahead of you, the rewards quickly become apparent.
Over the last 4 years we have done day trips, weekend getaways, and week-long camping trips into this small corner of the crowded park. We finally found the right combination to get the place mostly to ourselves to experience the exceptional sunrises, have a picnic overlooking the distant mountains, and shoot both landscape and wildlife photographs in spite of the occasional selfie-taking tourists wandering into the picture, placing themselves dangerously close to the resident black bears.

Standing cub looking to ensure mom isn’t too far away.
Bears, that’s exactly what the majority of people come in to Cades Cove for. Fortunately for everyone, the park rangers have managed to ensure that the bears don’t see people as a source of food and enforce a strict standard for food storage at the campground. While the bears are tolerant of the people, we’ve seen plenty of occasions that would irritate even the most docile animals - including encroaching on their space and blocking their escape routes, cornering them in trees, or our favourite, approaching them with cell-phones extended and a complete disregard to their or the bear’s safety.

Sow and cub looking up from eating the new grass shoots in early spring.
The best time for shooting bears is in the Spring when they venture out of the woods to eat the new shoots of grass after a winter of foraging acorns. Mother bears with new born cubs amble along the edge of the fields, keeping a close eye for potential danger (usually from the irritable males), keeping their cubs close by and close to climbing trees. Year-old cubs eat along side mom until they get bored and start sparring and testing the limits of their mom’s patience.

cubs are just as comfortable in the trees as on the ground. This is the first place to head at any sign of trouble.
Finding the bears takes some patience, knowledge of their habits and luck. Having said that, the easiest tell-tale sign of a bear spotting are the “bear” jams - a snarled and snaking line of stopped vehicles that can stretch back for miles. Trying to drive to the sighting is usually an exercise in futility and frustration since some drivers refuse to pull over. Instead, they stop their vehicles in the middle of the road, swing their doors open, and race toward the bears with complete disregard to everyone else - cue the car horns.
While the cars are backed up, I typically grab the cameras and walk past the traffic jam to get some shots. This is usually worth the effort since the bears are often only about 50 to 100 yards off in the field. With a long lens, and a bit of patience you can get some fun shots even with a line of cars and people in the background.

Pair of cubs keeping an eye on the crowd of tourists on the road.
To get the best shots, however, you need to find the bears before the crowds find them, and this means knowing some of the locations that the bears frequent, the trees they like to climb and sleep in, and where they find security and slip off to when a crowd encroaches. A good set of binoculars helps too and you can often see the bears at the edge of the tree line and anticipate if they are going to come to a good shooting location. In these cases you will most likely get some of the more interesting shots before people catch on to what you are looking at with that big lens.
Bears are not the only wildlife you’ll encounter at Cades Cove. We’ve spotted deer, coyote, river otter and a variety of birds there.

Pair of bucks doing a little sparring in early fall as the rut starts.
When the crowds get a little much and the animals have retreated from the midday heat of the sun you can get out on some of the hikes that are along the edges of the cove. One in particular has a spectacular waterfall at the end of a fantastic walk along Abrams creek. Don’t be surprised if you see a black bear wandering along the creek as you make your way up and down the trail.

Abrams falls is the reward for a long hike up and down a couple of mountain ridges. Great place to sit and relax before tackling the walk back out to the cove.
The Gear
Much like shooting Elk in Cataloochee, the gear I take consists of the Canon 5DS with the 500 f4 and both 1.4x and 2x teleconverters usually on a tripod with the Jobu gimbal head. I carry a second camera with a 100-400mm lens, in this case either the Sony A7III for faster action or the Sony A7RII for high detail shots.
In the morning, I will usually have a landscape lens on the A7RII. Often the first hour in the cove you will find spectacular light and misty views around every corner.

Misty morning across the valley in Cades Cove
Technique
From the perspective of being ready for the shot, I always try to keep a camera ready for action in fairly low light. Since the fun with bears usually happens close to the edge of the forest, light is unpredictable and animals move in and out of deep shadows quickly. I will usually keep one camera set to a minimum of ISO 1600 at the largest aperture of the lens (in aperture mode) and watch the shutter speed range from shadows to the brighter areas. I try to keep to a 1/1000s in the shadows when possible. I have found it is almost always better to have a bit more noise and get the shot without any blur.
If you have never shot black bears in low light it is good to know that single point autofocus can be fooled since there is very little deltas in contrast for the cameras to detect. I will tend to use wide area focus on the Sony and then drop down to smaller groups if the bear is behind leaves or high grass. The canon is usually good with 9 point focus as at least one of those points can find the edge of the bear’s fur.
For the most interesting shots, anticipating some actions can lead to great shots. Young bears will often wander a little ways from mom while chewing on grass in the fields. Once they realize this they will often stand and look around giving some really fun shots.
If you see another bear in sight of a mom and cubs, be ready to watch mom give a grunt signal to climb. Shots of the cubs climbing trees and sitting on the limbs are some of the best you can get.

Young cub waiting for mom to give the ok to come back down out of the tree.
Phocus Tips
Pick your season: The first couple of trips we made the mistake of visiting on a beautiful weekend in the summer. We quickly caught on that spring is the most interesting times of year and that’s when the bears typically come out of the woods to graze in the open fields. Late Fall can be fantastic as well as the deer are in rut and the bears are busy eating all they can before winter.
Pick your day: A weekday is best if you can. Sunrise is the best time to photograph in Cades Cove. Choose a day that has a chance of rain in the forecast which typically clears out the park and gives you an opportunity to take some moody landscape shots in the morning fog.
Carry binoculars and scan the edge of the woods for the tell-tale shape of black bears.
Take the longest lens you have or rent one. A Sigma or Tamron 150-600 on a crop body can give you enough reach that you won’t disturb the bears and won’t completely destroy your wallet.

If you get to Cades Cove at the right time of year you can have portions of the park all to yourself, at least for a few moments.
Once you have found the magic times to wander Cades Cove, each trip has the potential for some amazing experiences and views. Whether it is bear cubs climbing a tree, deer sparring in the fields or magical landscapes at sunrise we have yet to come home without something to add to the portfolio. Even if you get there and it is busy there is always someplace to go to get away from the crowds.

Photographing Elk in the Cataloochee Valley
It doesn’t take long before the sun casts a warm yellow light on the meadow, revealing a glimmering frost on the grasses. As the fog begins to lift, the shadowy outlines of solitary trees begin to take shape.
Lone male elk, one of the lesser males in the valley heading towards the herd around the corner. The dominant male did not let it get very close, there was no fight this morning just a lot of noise.
It doesn’t take long before the sun casts a warm yellow light on the meadow, revealing a glimmering frost on the grasses. As the fog begins to lift, the shadowy outlines of solitary trees begin to take shape.
The unmistakable trumpeting sound of a bull elk in the woods announces the herd. They scatter from out of the woods, casually rubbing their antlers on a tree branch, and with heads down, graze their way toward the meadow.
We are in the Cataloochee Valley, a corner of the Great Smoky Mountain National Park in North Carolina. To get there, you drive past a few ramshackle homes and seemingly abandoned trailer homes to where the paved road gives way to a heavily rutted single-track dirt road. The descent into the valley is not for the faint of heart, and with each corner there is a high probability of encountering a caravan of pickup trucks hauling horse trailers barreling up the valley, reluctant to break their momentum.
Frosty morning in the valley, this herd came down out of the woods as the sun was coming up and stayed active for a good 2 hours before finding warmer spots in the field to settle down. You can see the line where the sun hasn’t yet burned off the frost.
Capturing wildlife is a combination of luck, persistence, and observation. After making several trips to the valley the elk’s habits began to reveal themselves. We can anticipate which paths they will follow, predict their penchant for a mid-morning nap, and of course, expect their commanding displays of dominance and aggression during the rut. We have also found what we think is the best timings to avoid any crowds. It is pretty rare that we have seen many people at all in the early morning which we have found to be the best time for shooting. Week days are the best, however due to the 2 major religions in the South, Saturday and Sunday are not as busy as you would expect. The other religion, by the way, is college football.
Dominant male elk sounding the horn as another male approaches across the valley floor.
Best Timing
If you really want to see the elk at their most active you need to be in the valley as the sun starts to rise over the mountains. In the fall as the rut starts and the temperature starts to drop you can get some of the most interesting shots. Active males keeping close eye on their harem with younger males looking to challenge or just for a quick foray to see if they can get in for a few minutes of fun. If you can, pick a day when the temperature has gone below freezing over night. The frost in the valley is an amazing scene and seeing an elk bellowing with heated breath can make for a stunning shot.
Dominant male elk continuously testing the air, warm breath fogging up on a relatively cold and frosty morning in Cataloochee Valley.
Technically Speaking
On the technical side of things, I have found that the best setup for me is with two cameras. I carry the Canon 5DS with the 500 f4 and have available the 1.4x and 2x teleconverters on a tripod with a good (in my case Jobu) gimbal head. I also have the Sony A7RII or A7III with the 100-400 f4.5-5.6 hanging from my neck for when the action gets a little closer and less predictable. The park has limitations on how close you should be to the elk (and bear) and these rules are good guidelines from a photography perspective, allowing you to capture natural behavior as much as possible. Keep a wider angle lens available for some good environment shots as the sun comes over the mountains and into the valley. Salwa (WanderingPhocus) will usually carry the 100-400 on her Canon 5D III and have a wide angle or macro lens available.
Due to the constantly changing light conditions while shooting we tend to shoot in aperture mode, adjusting the iris for the depth of field we need to get enough of the subject in focus and then getting a good feel for what ISO will ensure that we don’t go below 1/500 second in the darkest areas. Exposure compensation becomes your friend if you are using anything other than spot metering. I tend to shoot nearly 100% of the time in Ai servo mode with the 9 point box that I move around for composition on the Canon 5DS. On the Sony cameras I usually use all points and continuous tracking since in these cases the algorithms are excellent for picking out the subject and staying with it. I will change to single point or small group if there are many subjects and I want to focus on one in particular. At the longer distances we are shooting at, you can usually shoot close to wide open and get the full subject in focus. You can get a feeling for the depth by distance using something like the photopills app.
There are no gas stations, stores or cell phone service in the valley. Preparation for us usually means bringing a cooler full of food and a little camp stove or a big thermos. Hot coffee is a necessity for us on the drive in and while watching and waiting before the sun is fully up. Come with many layers of cloths as well, you will need them early and can peel them off as the day progresses.
Once the elk have settled for the morning there are many hikes in the valley. Some of these hikes lead to old cabins and cemeteries, others follow creeks up into the mountains. Keep your camera ready as the trails are also used by elk and bear.
As the sun rises higher in the valley the elk become less energetic and tend to either lay in the grass or retreat to the edge of the woods. At which point we trade our telephoto lens for a wide angle and hit the trails. Although not as predictable, you will still often come across wildlife on the trails, and the creeks and valleys make for some beautiful images under the dappled light in the forests.
A lunch by the creek, top off more coffee and sit and watch the steam which on a prior visit, we saw a herd crossing. This is a typical day for us in the Cataloochee Valley. As with all nature photography your luck will vary on any given day in the valley, but if you follow our timings above you can up your odds and avoid crowds
Picnic lunch after a cool morning with the elk herd. This stream is a relaxing point with the bonus that the elk often cross just downstream.
Compared to other parts of the Smokies, Cataloochee Valley is a relatively little known gem and well worth a visit or two to get shots of some wildlife that you will not often see in the south east.