
Photo locations, techniques and technology. Highlights of locations we frequent as well as features on how and why we shoot the way we do, including gear reviews specific to nature photographers.

What's in my bag for Tanzania
We started planning this trip more than 8 months ago so for once I have plenty of time to consider what I need/want to bring with me from a gear perspective.
Option 1: In the left side Canon R5II with EF 100-400 lens attached, 14-35 f/4 RF lens, set of magnetic filters. On the right side we have the Sigma 500 f/5.6, Sony A7R5 with 35-150 f/2-2.8 lens, DJI Osmo Pocket 3, Canon 1.4x EF teleconverter.
We are not long term planners, usually deciding on trips a few weeks ahead and then just doing our own thing without a major schedule or others to rely on. This year we decided to finally do an African safari, basically a trip of a lifetime for us, but we are doing so with 3 other couples. This is a photography trip and we are all nature photographers so at least we will have the same priorities for the most part. We started planning this trip more than 8 months ago so for once I have plenty of time to consider what I need/want to bring with me from a gear perspective. I normally carry a long telephoto zoom and a big white telephoto prime for much of my photography closer to home but I don’t think this is going to be the best gear for this trip. Taking that gear on a number of planes would also be challenging so I have really had to think about what we are going to be shooting, the distances from the subject, how much gear and how heavy my bag will be.
I’ve watched a number of different youtube shows from other photographers on different safaris to try to get some idea of what will be most useful that can all fit in one backpack. The general consensus seems to be that unless the trip is mostly birding you will not really need a super long lens. 400mm is likely as long as will be needed most of the time and with some of the bigger animals you may be close enough to need a normal or wide lens. I always like to do some landscape work while traveling so most likely an ultrawide zoom will be good to have. To keep things light and still have a good assortment of focal lengths zooms will be most practical.
Based on all of that, I think I have determined that the types of photography I will be doing will be closer to the bear photography that I do in the fall where we have larger subjects often at medium to fairly close distances and in low light. To this end I have put together a set of kit that I think I will take on the trip and have been using that most of the time during salmon season this year.
The gear includes the following:
Canon R5II
Canon 100-400 EF f/4-5.6 L
Canon EF 1.4x teleconverter
Canon RF 14-35 f/4 L
Sony A7R5
Tamron 35-150 f/2-2.8
Sigma 500 f/5.6
I will also be bringing along the DJI Pocket 3 and the Sony ZV1 for capturing video as we are shooting. I have also now a new MacBook Air m4 plus a number of external SSD drives for backing up pictures and videos each night.
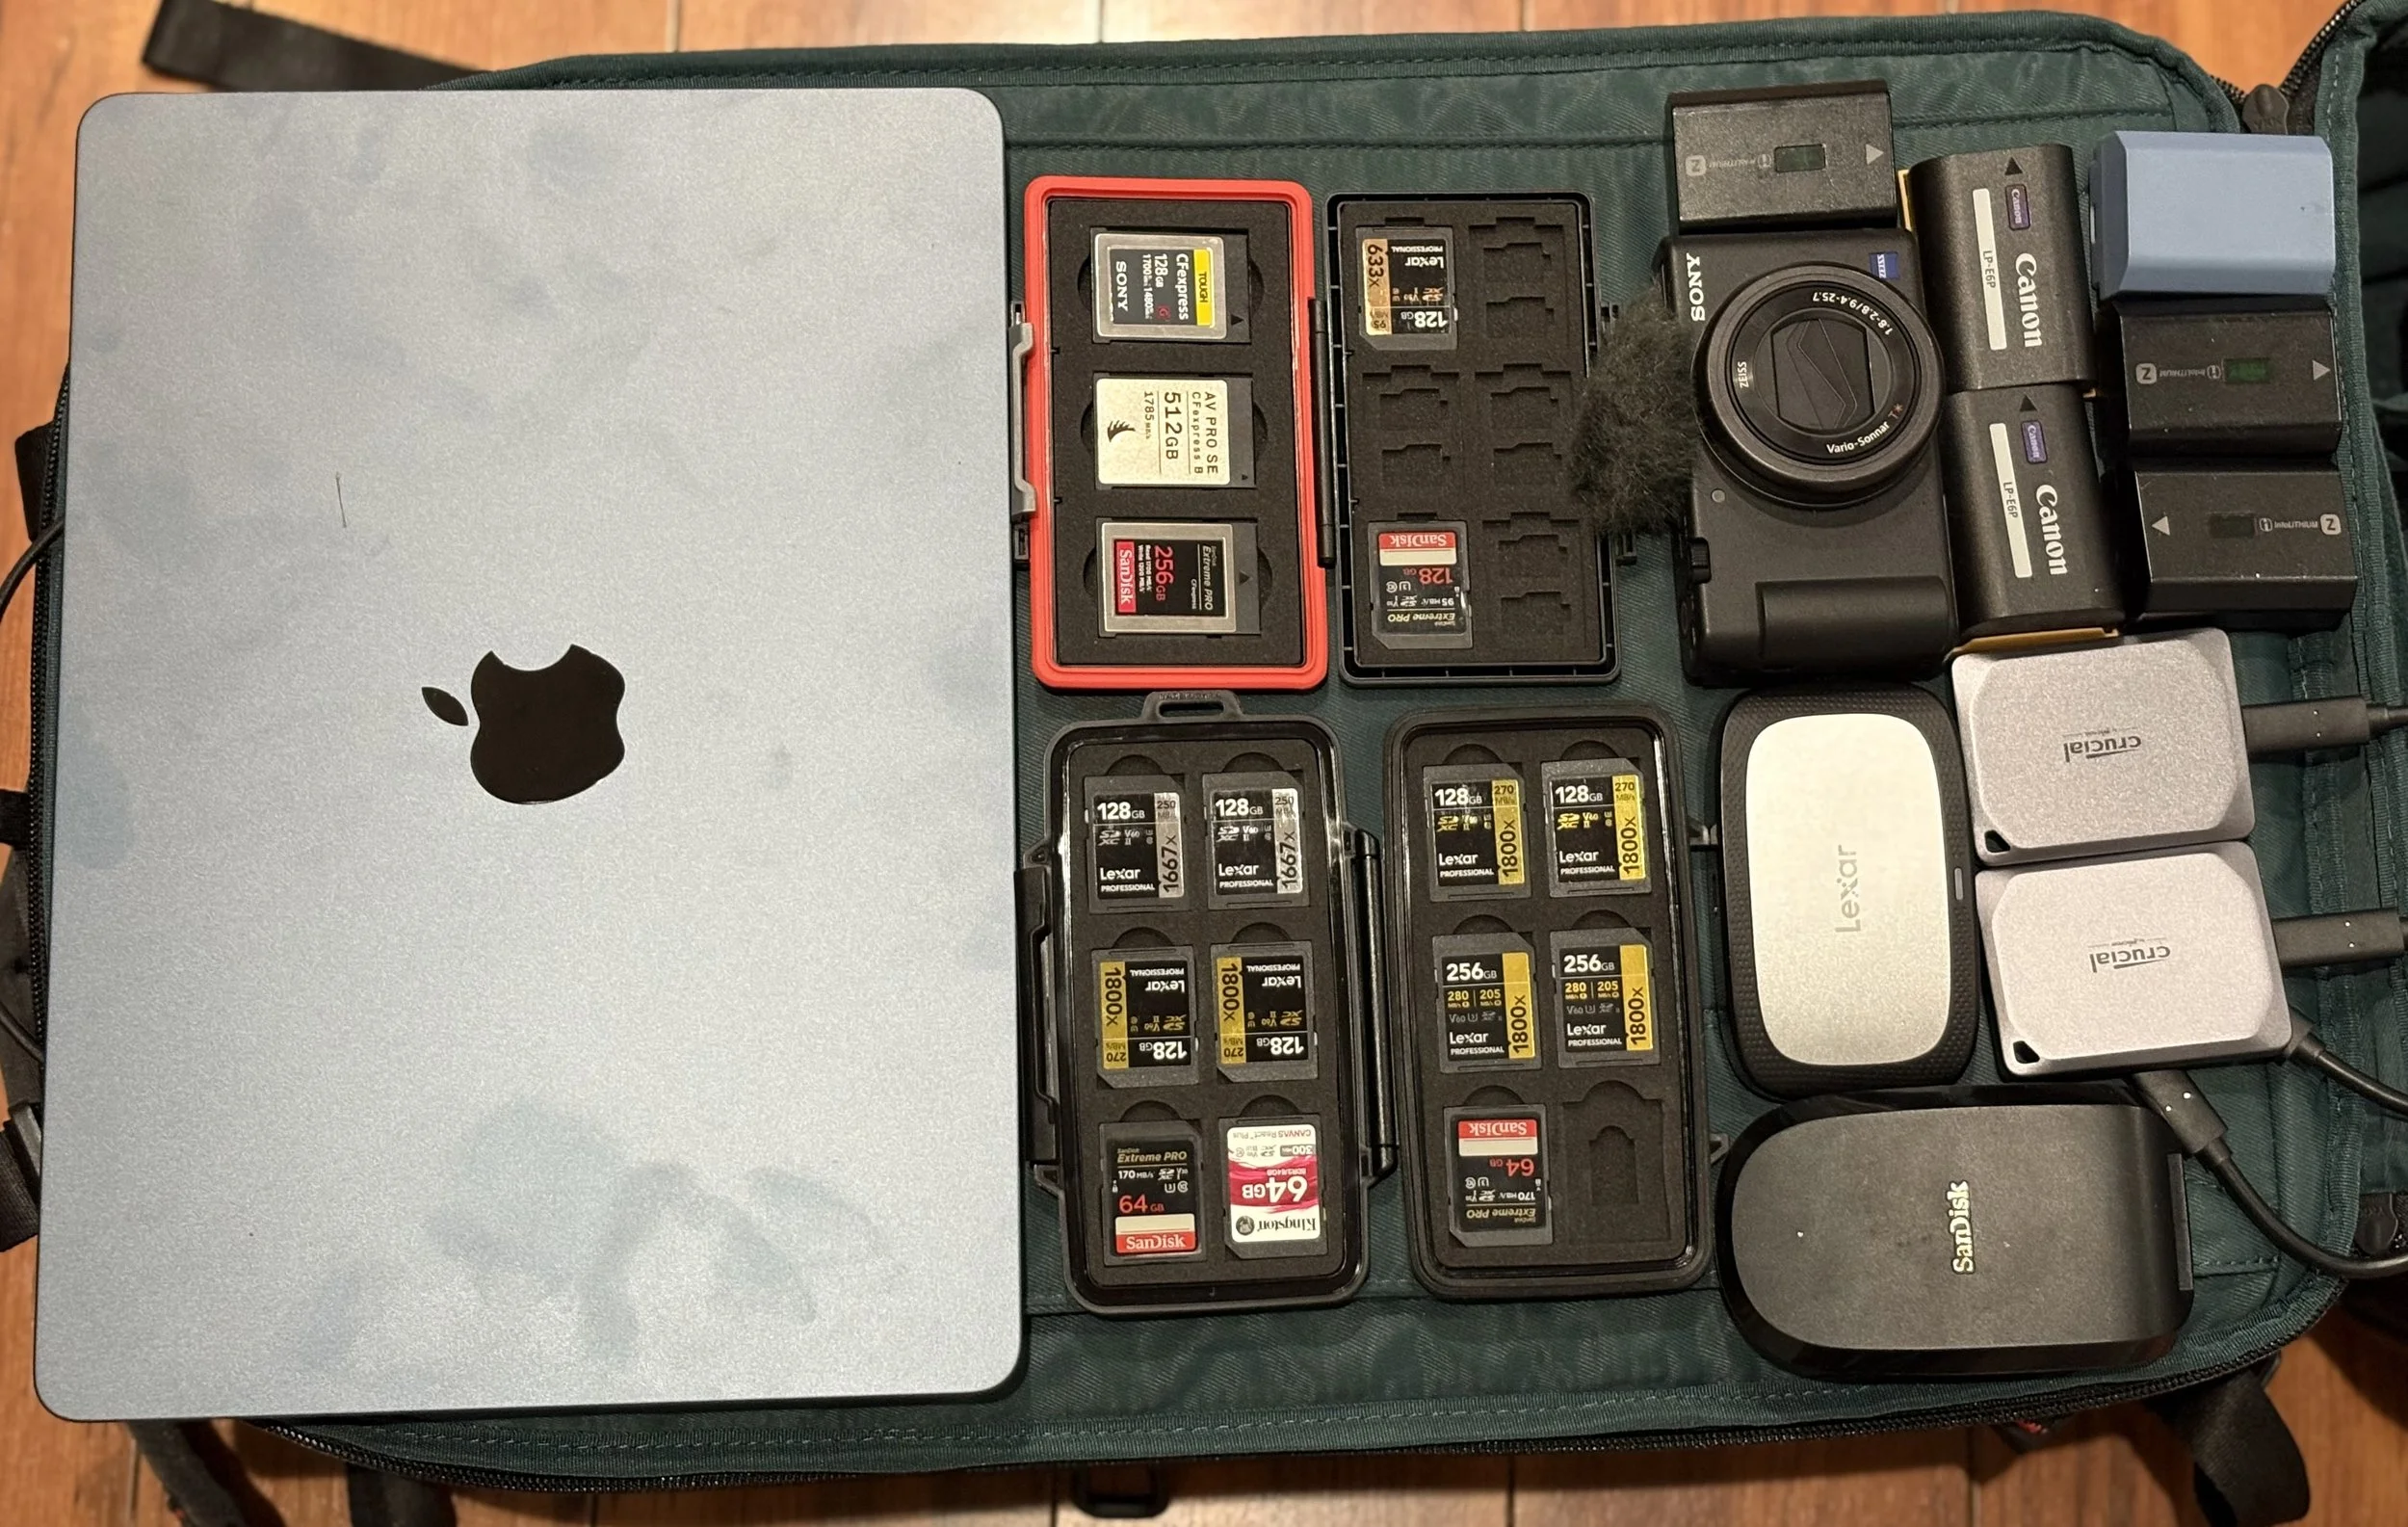
Accessories going in one of the bags are the Macbook air, 2 small cases of memory cards, extra batteries for all cameras, card readers for CF Express type A and B as well as for SD cards, external SSDs for quick backup of files each night and the trusty Sony ZV1 for quick videos.
To hold everything I have 2 options, a PGYTech Onemo 2 35L camera bag shown above or the Gura Gear Kiboko 16L below. The PGYTech fits everything above fairly easily but with the Gura Gear I would need to leave the 500 Sigma at home. That bag would not have worked at all originally since it can’t fit a large laptop but now with the macbook air I can take either easily. I haven’t made the decision yet but am leaning towards the smaller bag at the moment.
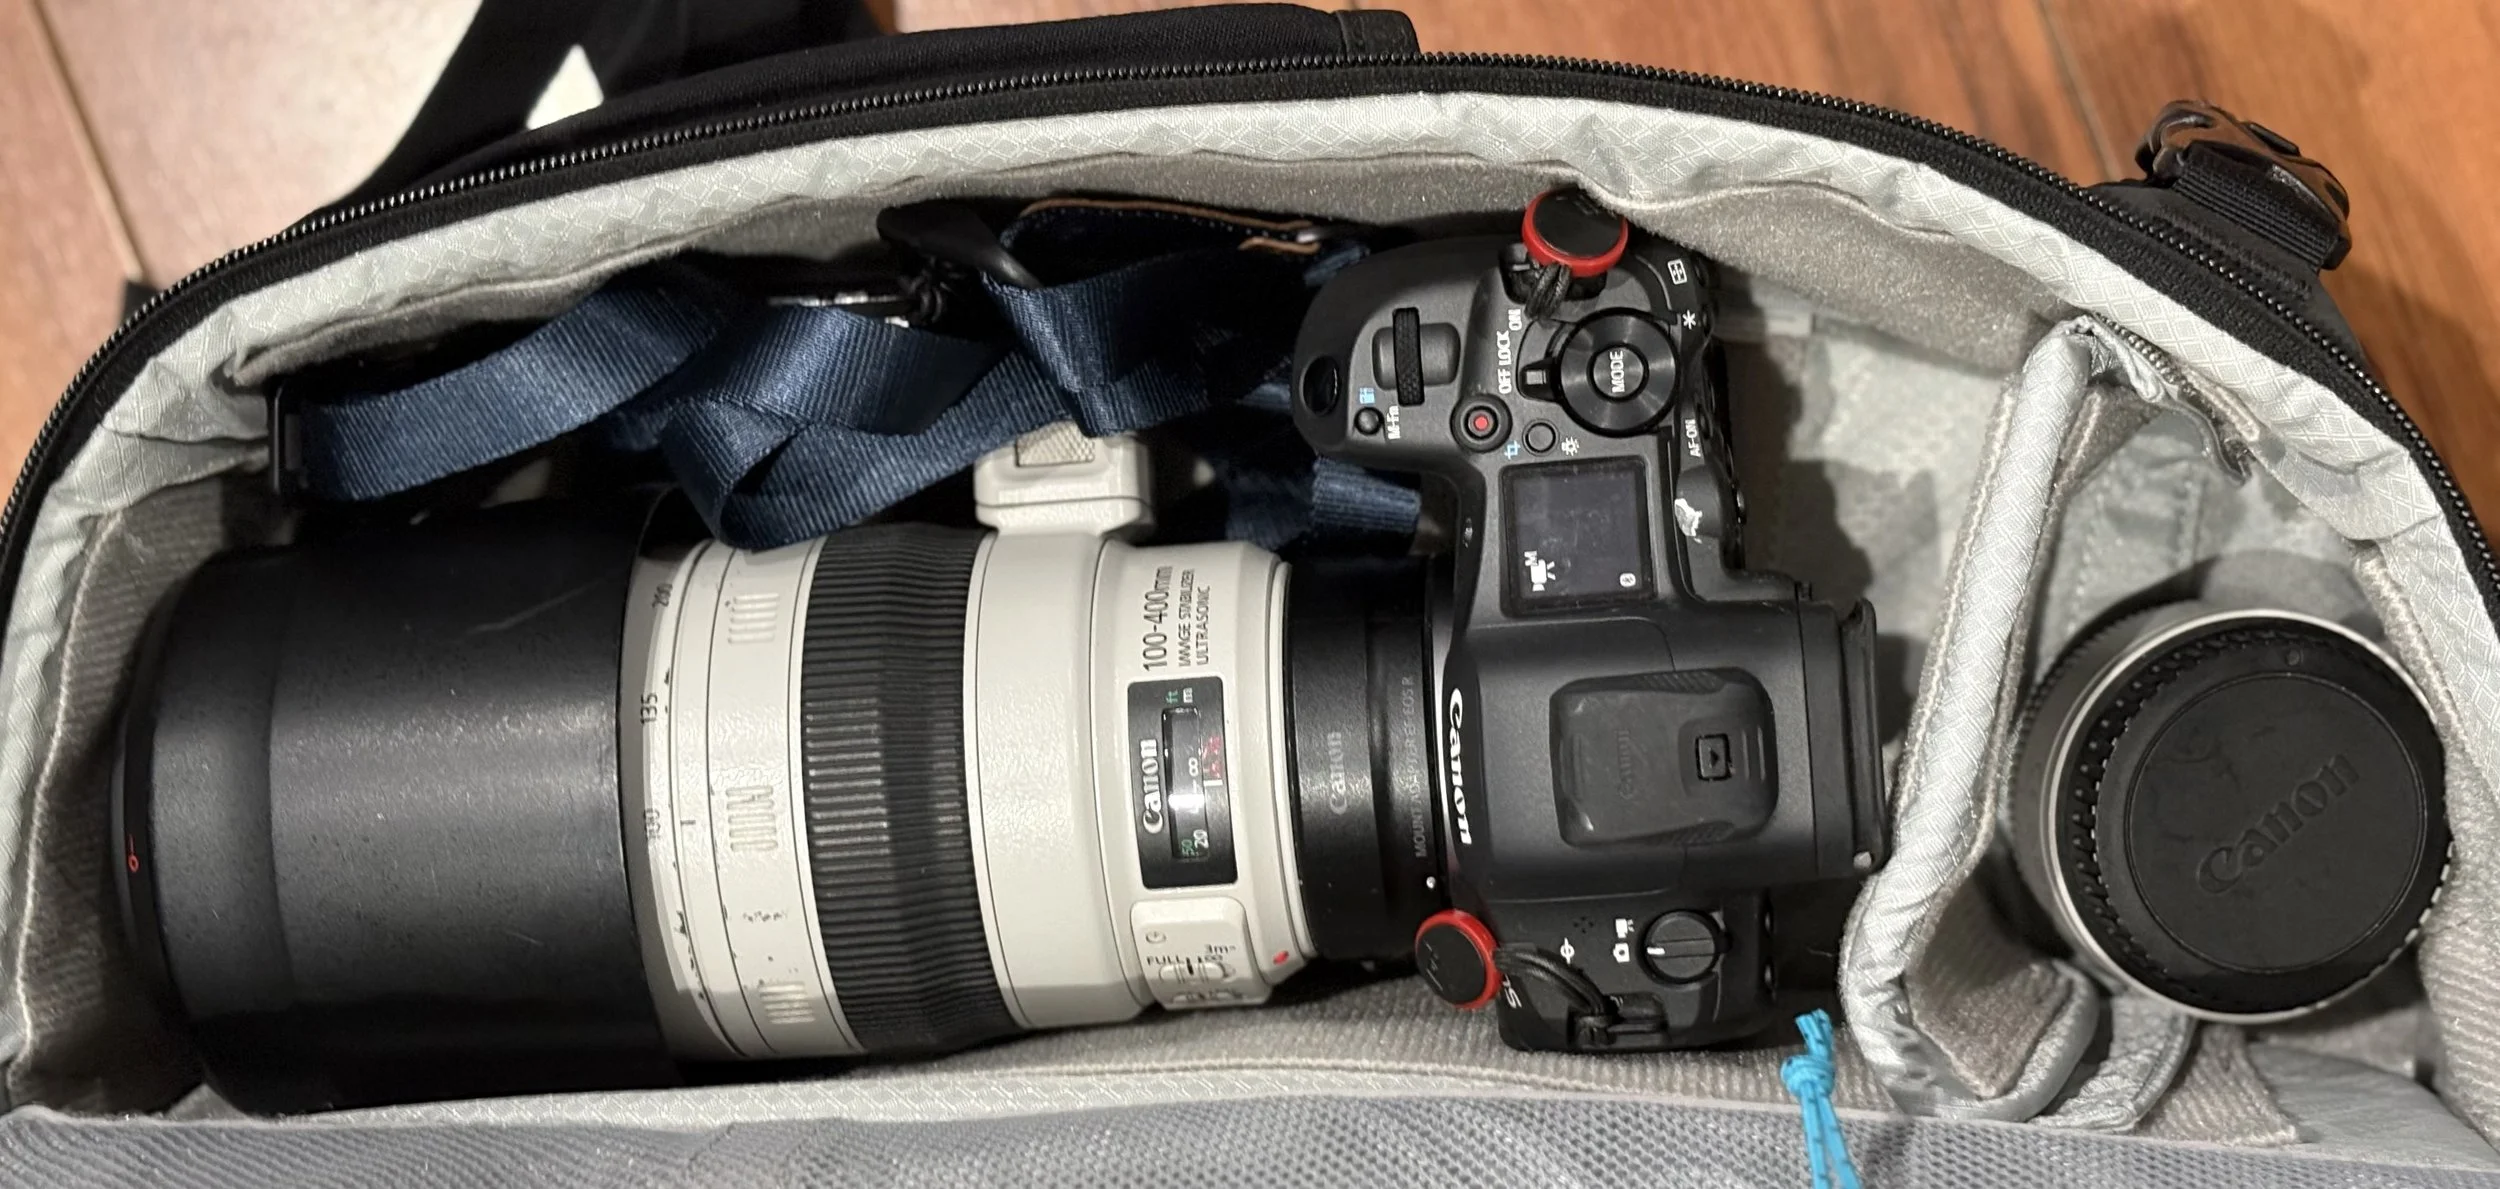
For Option 2 in the Gura Gear bag which is significantly smaller I have the Canon R5II with the EF 100-400 lens and the Canon EF 1.4 teleconverter.
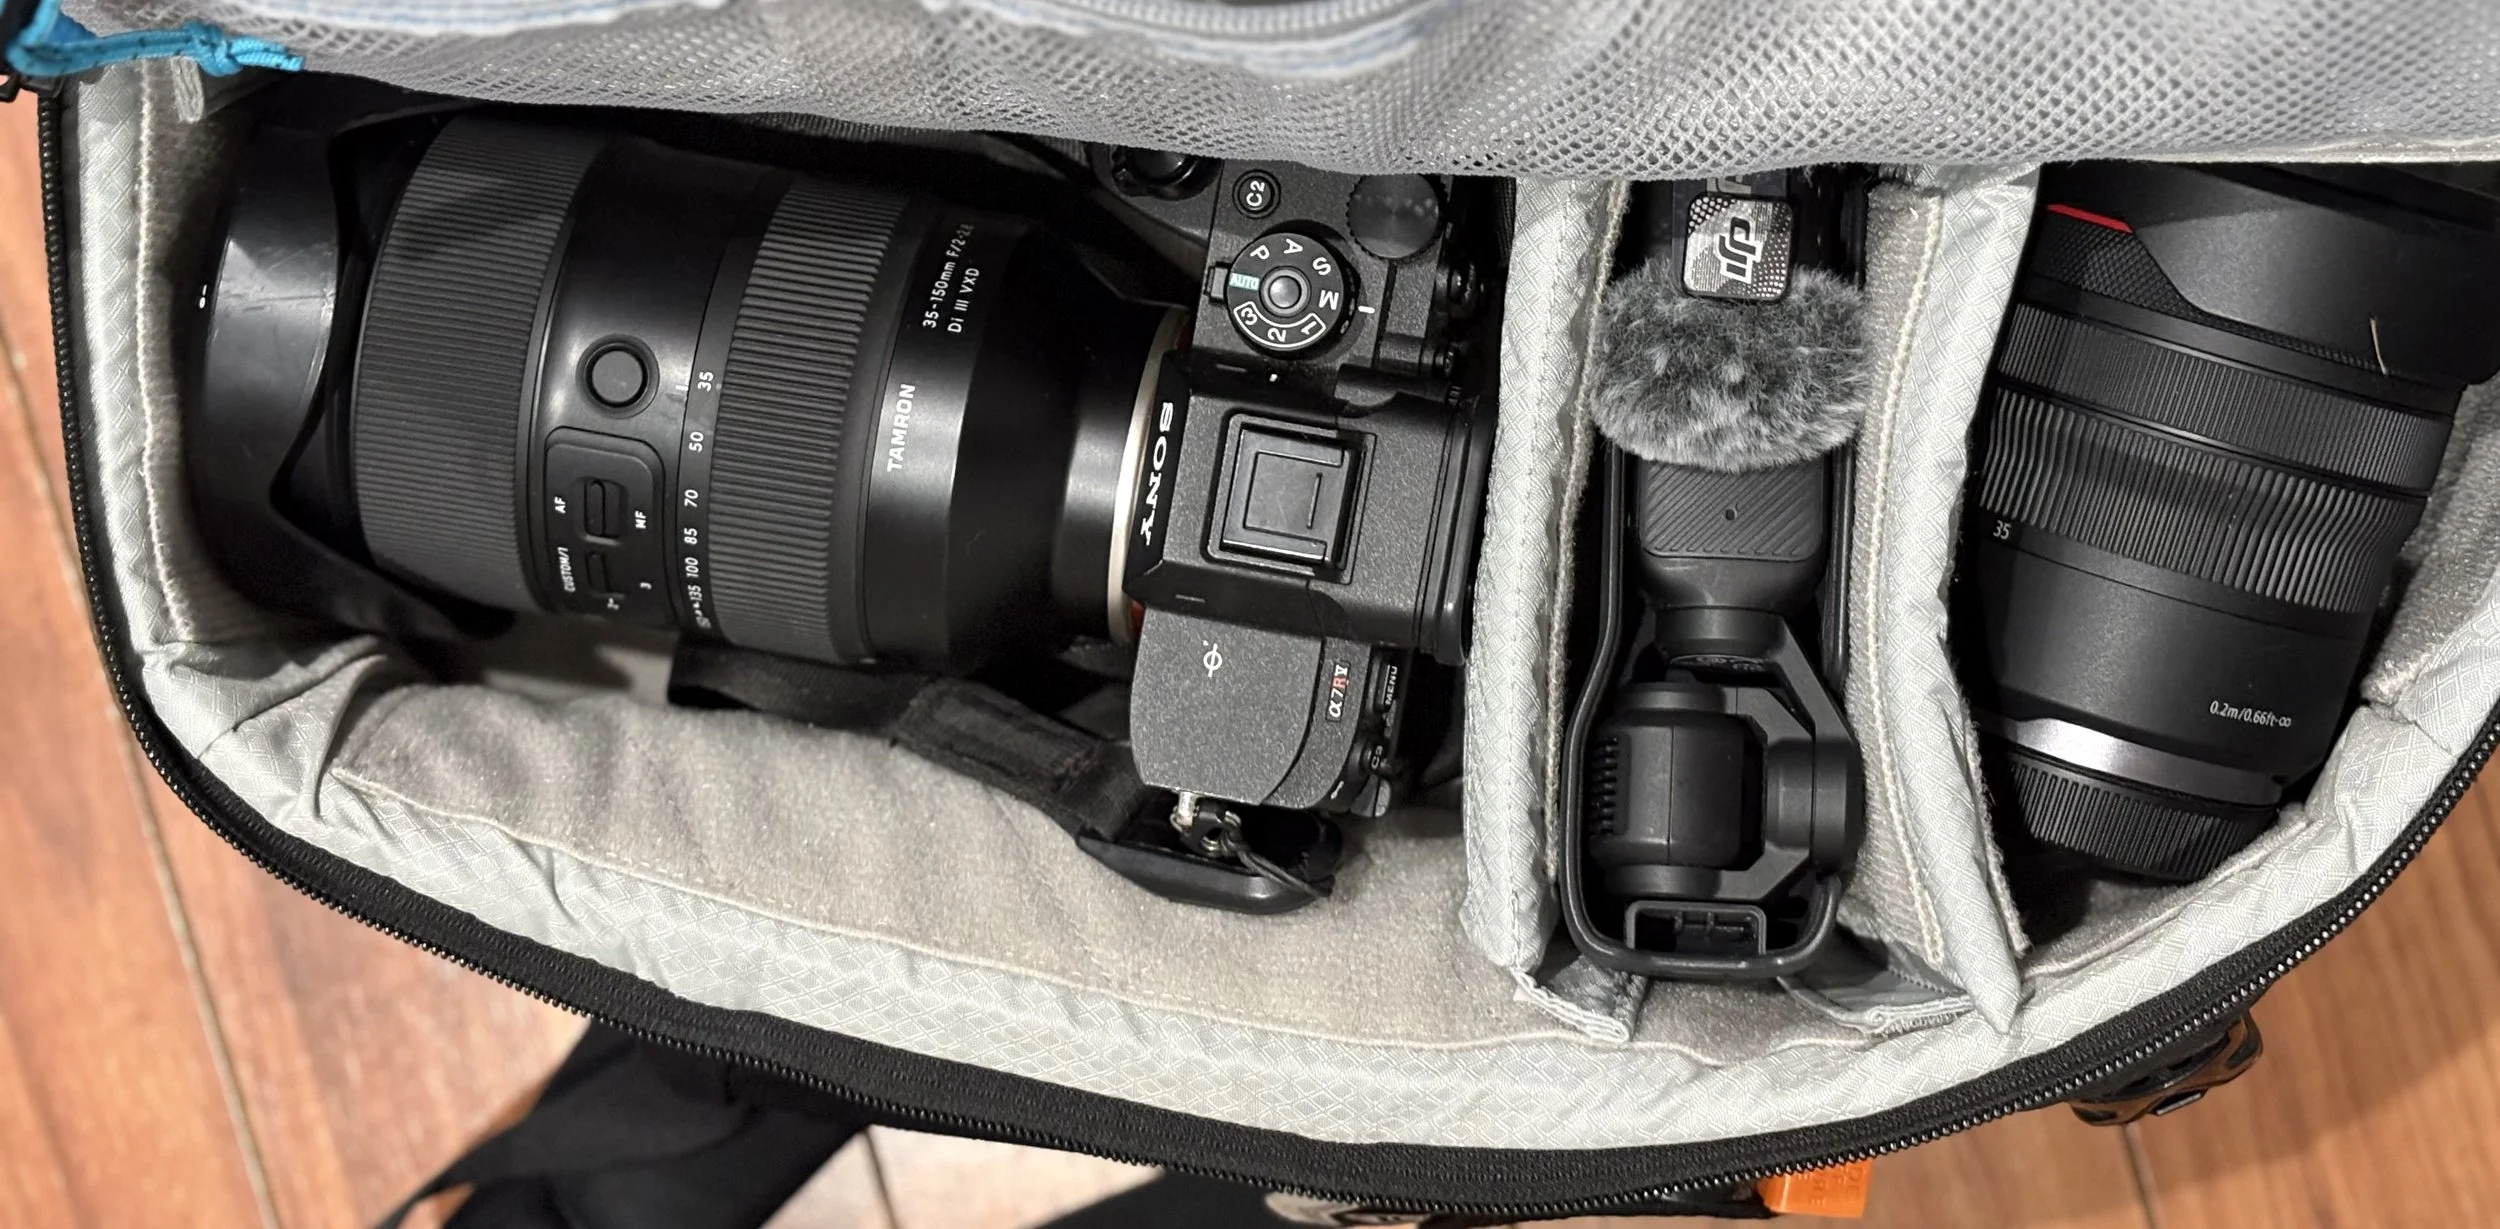
Side 2. I have the Sony A7R5 with the 35-150, Osmo Pocket 3, and the Canon 14-35 f/4. This bag has plenty of storage for all the accessories and a small area that will fit the Macbook air.
During Salmon season this year I have mostly carried the Canon R5II with the 100-400 lens and the Sony A7r5 with the Tamron 35-150 lens and have found this to cover fairly well what I am shooting. Most of the time for these medium sized mammals at distances of between 10-40 metres these lenses have worked out well. I’m hoping most of the time the shooting will be similar from the safari vehicles based on what I have heard from other photographers.
If money were no object, I would absolutely prefer to have a low light beast like the Canon 100-300 f/2.8 along with a couple of teleconverters which would allow for a great range plus good low light performance but that lens is significantly out of budget and I’m hoping Sigma will come out with a new version of their 120-300 at some point for FE mount at a much more reasonable price point.
The 35-150 has turned out to be a very versatile lens for both photography and video. I think that this lens may stay on the Sony camera for much of the trip especially for many of the large animals that we will come across and for more environmental shots with the animals.
The 100-400 range will likely be sufficient for most of the other nature photography and I’m expecting that we will have pretty good light much of the trip. The 1.4 teleconverter is for just in case we see some birds that I can’t pass up the chance of capturing.
If I have the 14-35mm lens on the Canon for some landscape or wide environmental shots then I might switch to the 500mm on the Sony to ensure that I have a long telephoto ready for big cat action. The Sigma 500 is such a light and small super telephoto prime that it may be worth bringing even if I don’t use it most of the time. Salwa will have a 16-35 in her bag if I do need a quick wide angle shot on the A7RV and the Canon is busy.
he main reason for the wide range of the lenses on a trip like this is because most of the time we will be in a safari vehicle and will be unable to get out to change perspective so we will absolutely have to do so with the zoom lenses.
Salwa similarly will be bringing a set of lenses that cover the gamut from 16mm to 560mm with a 16-35 f/4, 24-105 f/4, 100-400 f/4-5.6 and a 1.4 teleconverter all on her Sony A74. It is likely she will be doing a lot more video than I will and she is very comfortable with this lens setup that she takes on most of her video shoots.
The other little things we will be bringing:
Many memory cards for all the cameras.
SSDs for backup
Insta360 X5
Filters (ND and polarizers)
DJI wireless microphone
On camera microphone
Otherwise we will have minimal clothing, a bit of medicine incase of any trip related issues and not much more. Can’t wait to get out there, planning a trip this far ahead is very difficult for us to not get too excited too early. Hopefully I haven’t over examined this with all the time I have had…sometimes overthinking is bad :)
I will revisit my decisions once we come back from the trip to see if we ended up having what we needed or if we should have brought other gear. So far things are working well enough for shooting black bears on the rivers edge and elk out in the fields.

Winter trip - Stage 3 - Desert States
When it is time to run from the cold and rain the desert states seem like the perfect place to get back to sunshine and that dry heat. That was the plan and for the most part we found a good amount of sun but for some odd reason the cold was still following us down from the north.
When it is time to run from the cold and rain, the desert states seem like the perfect place to get back to sunshine and that dry heat. That was the plan and for the most part we found a good amount of sun but for some odd reason the cold was still following us down from the north. We left the coast after visiting friends near San Jose and travelled up to Lake Isabella. It was a fantastic road up through Sequoia National Forest and our first night of BLM camping along the Kern river.

The view from our campsite on the Kern River. Sony A7III with 16-35 f/4 at 19mm, f/9, 1/800s ISO 1600
This is definitely an area we would like to come back and explore again as there were old mines fantastic rock formations and signs of animals in the area. This trip however we just spent the one night and headed towards Death Valley. This seemed like a great idea as it almost never rains there, right?
Well, we were lucky enough to come in just before a huge wind and rainstorm that tested the strength of our camper (and our sanity). It wasn’t all bad, in fact the weather actually made for some pretty spectacular photography. Scenes that were probably pretty rare with storm clouds on one side of the valley and sun on the other.

Salwa was finding sand in her hair for days after this hike. Sony A7RIV with 24-105 f/4 at 46mm, f/9, 1/400s, ISO 100
The salt flats is the first spot we went to see what sunset would be like. The views were amazing, the salt flats such a cool thing to see but that evening the light wasn’t fantastic. We did get a few interesting shots but went away that night without a portfolio shot.
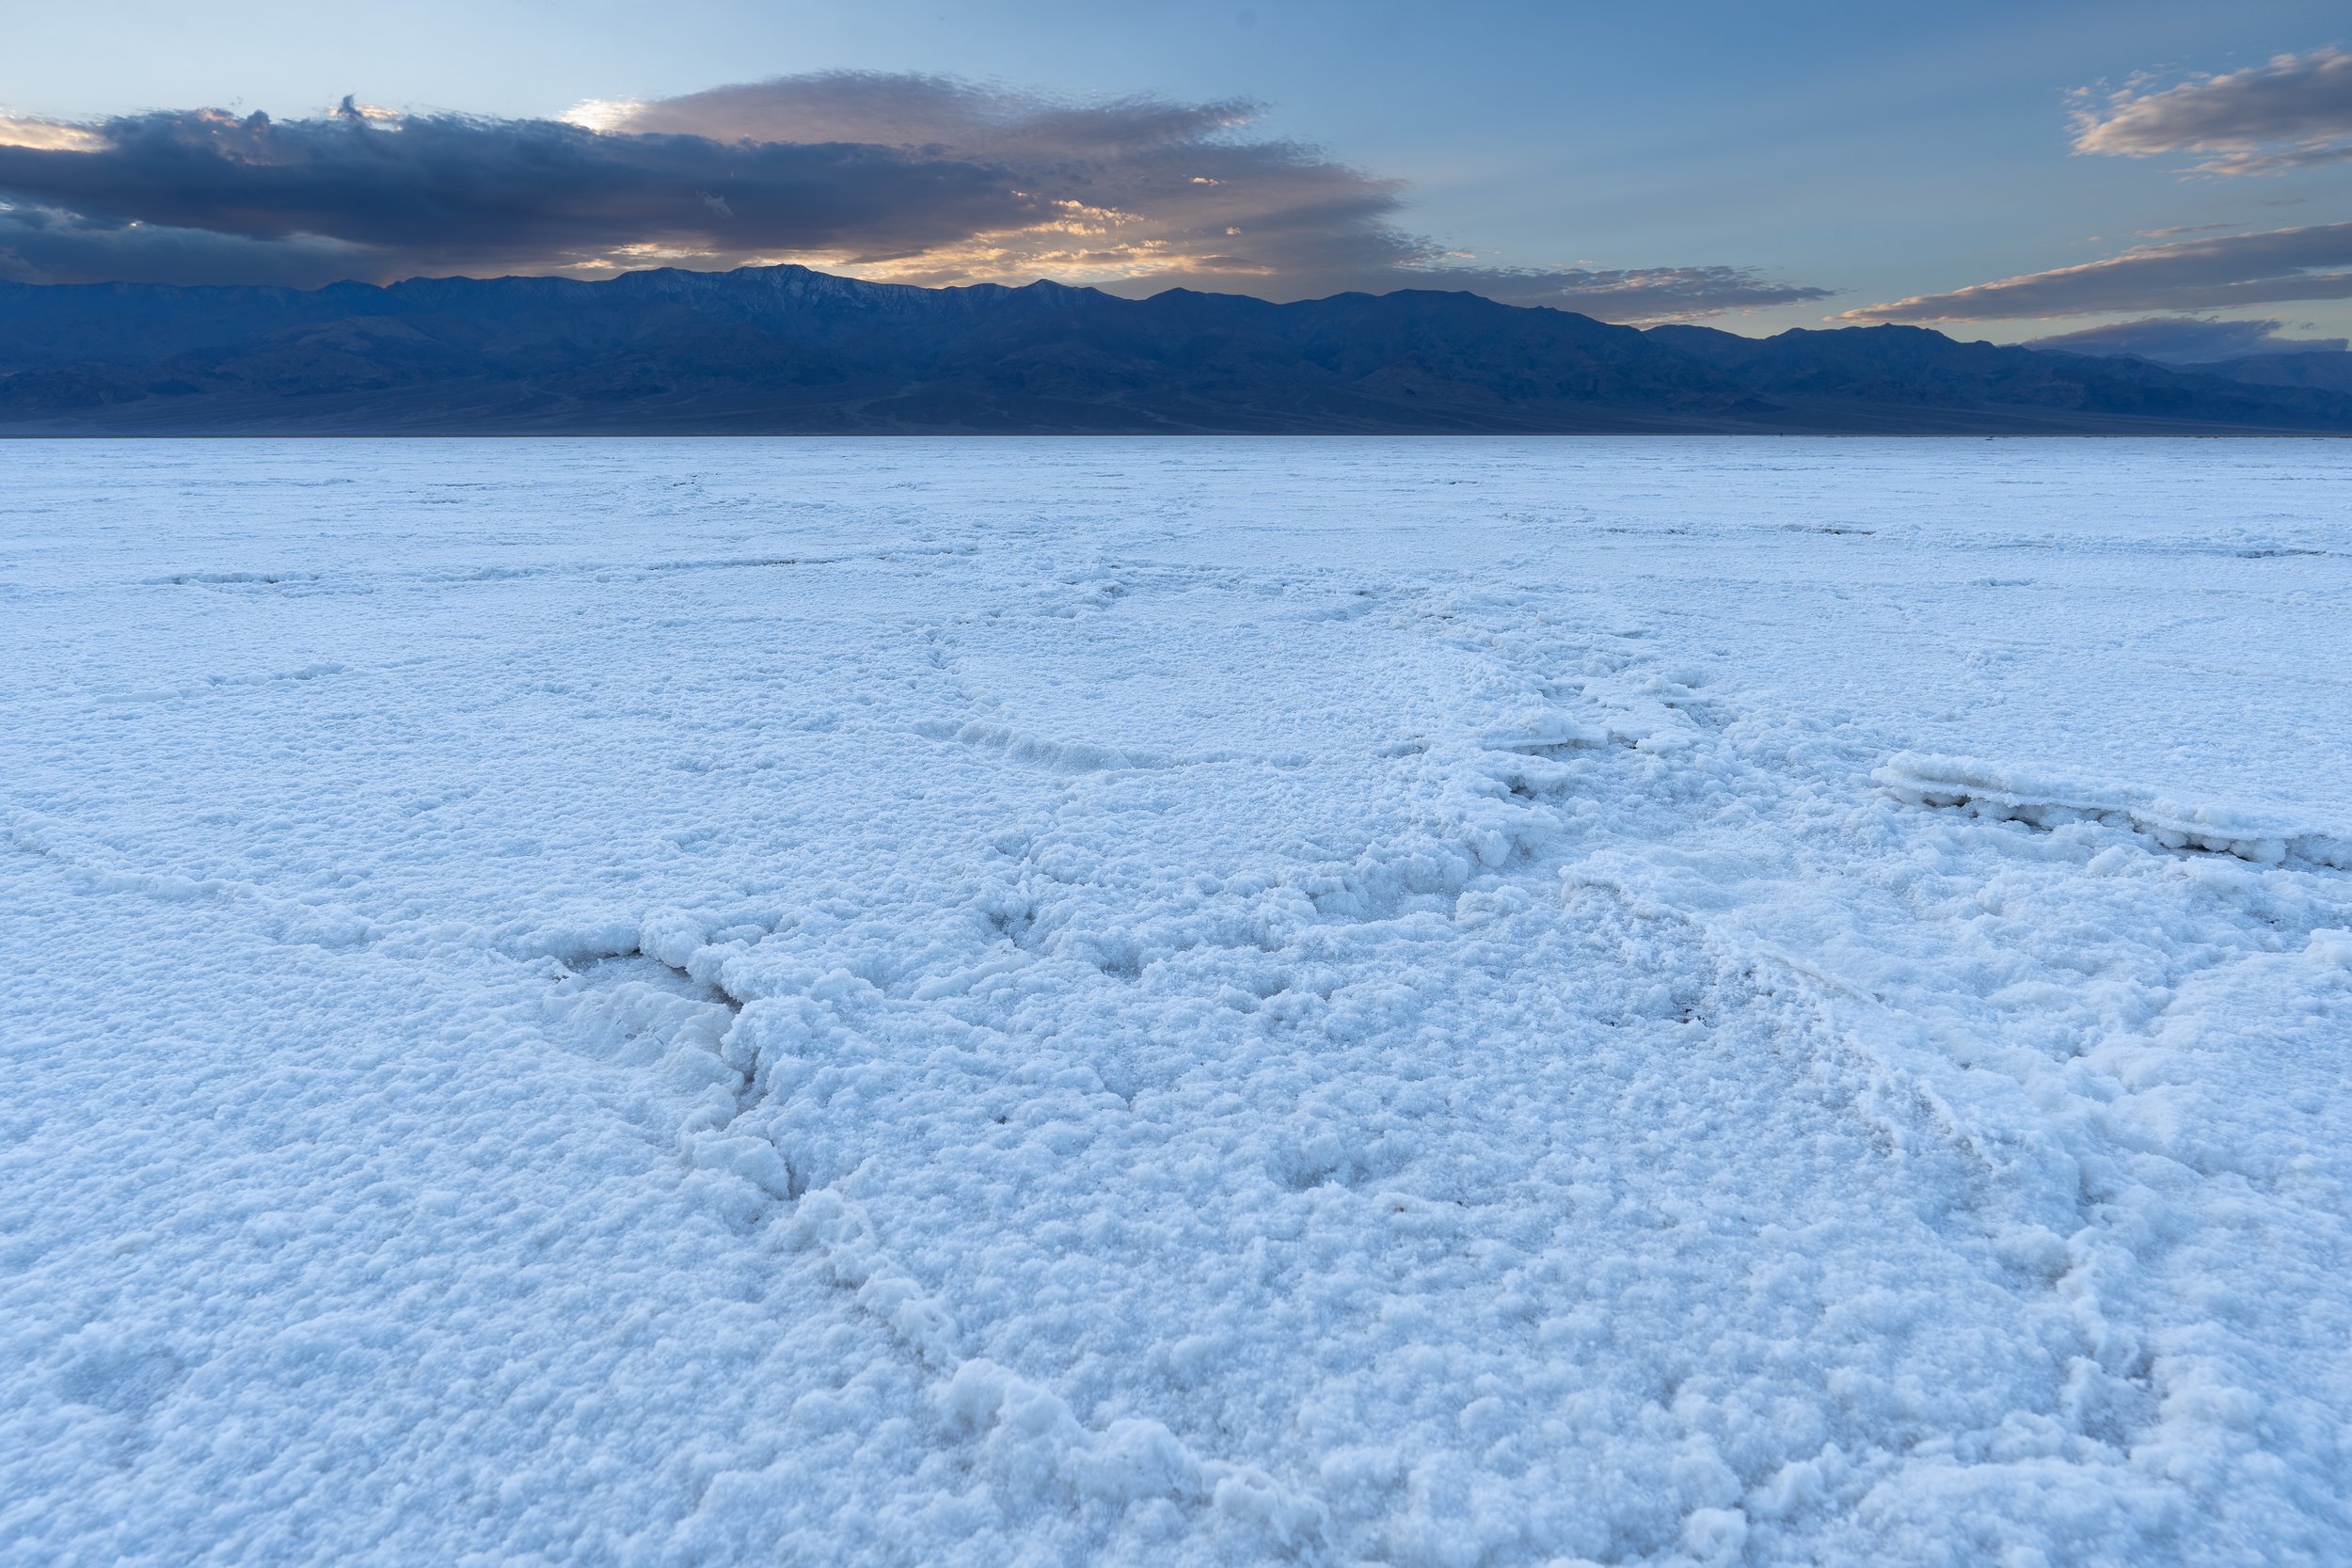
Salt flats at sunset, not quite the sunset we hoped for but still such an amazing place to explore. Sony A7III with 16-35 f/4 at 19mm, f/10, 1/20s, ISO 100
The next day was a different story. The wind picked up again and we could see storm clouds around us so we drove north again towards the sand dunes which looked promising. We managed to get out about a half mile into the dunes when the wind suddenly went crazy, blasting sand at us and then the sky opened up pelting us with rain that felt like pellets from an air gun. This didn’t stop us completely as we tried to get some video of the situation, mostly so that we could laugh at ourselves. We got back to the truck and the rain moved away after about 10 minutes. This was when the sky started to look wild. Dark clouds and rain in front of us with harsh sunlight on the dunes and the wind still throwing the sand around. I think I have at least 10 shots that I could print from the next hour out there…maybe more.
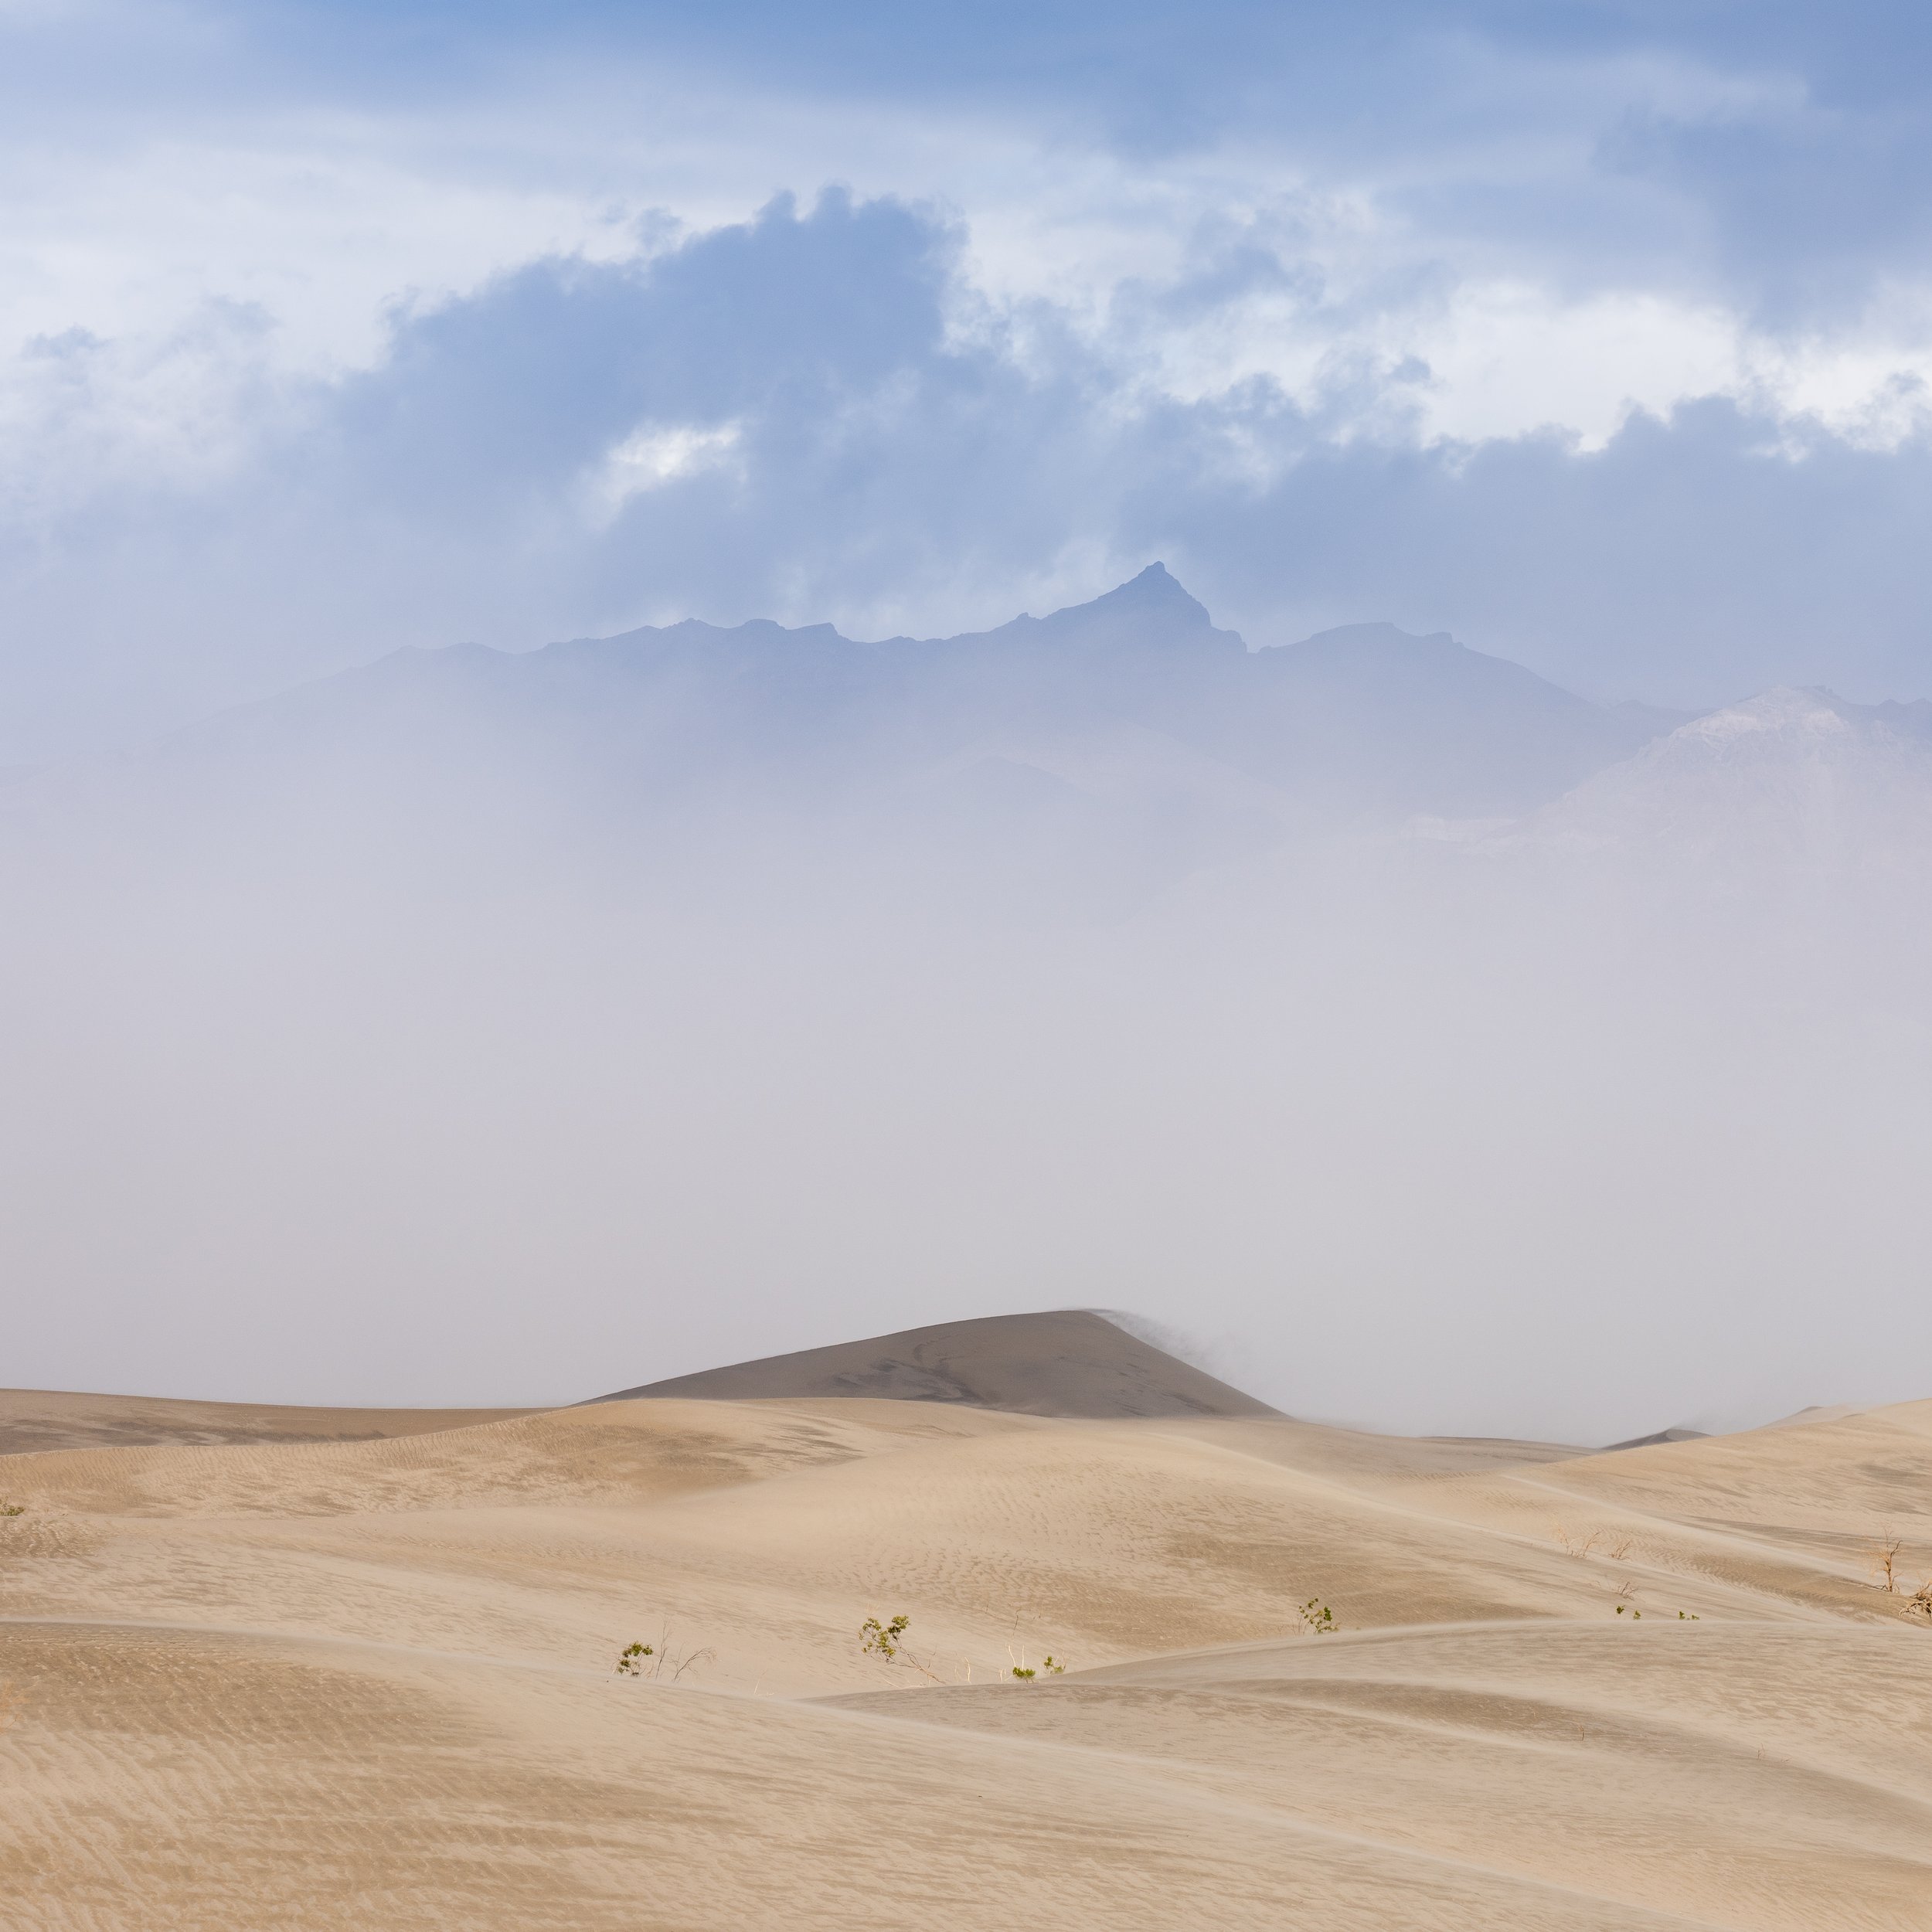
A rain storm making its way past us across the valley of Sand dunes. Sony A7RIV with 24-105 at 105mm, f/10, 1/250s, ISO 100

The sand was still blowing in the distance, but the light and shadows were amazing as the storm clouds moved on. Sony A7RIV with 24-105 at 43mm, f/9, 1/320s, ISO 100

Salwa on the top edge of one of the larger sand dunes. Sony A7III with 16-35 f/4 at 34mm, f/9, 1/320s, ISO 100
As per usual on this trip the weather was starting to turn again as we heard that snow was coming for the mountains on the way to Vegas. We decided to run for the hills, and got to the very top just in time for the snow. It was a slow and nervous trip down into Las Vegas that night but after a night at a KOA campground to get a shower, wash some clothes and get the batteries topped up we were headed to a park on the other side of Vegas called Valley of Fire.

Salwa near the beginning of wave of fire hike. Sony A7III with 70-200 f/4 at 70mm, f/4, 1/1000s, ISO 100
This turned out to be one of the best stops of the entire trip, and I had barely heard of the place before we went there. We camped at the Atlatl Rock campground in the park where we were surrounded by fantastic red rocks with desert bighorn sheep wandering through regularly. Just hiking through these rocks could take up your time for days.

Waves of weathered rock. Sony A7RIV with 16-35 f/4 at 17mm, f/11, 1/200s, ISO 100
We spent most of our time hiking along White Domes road with beautiful slot canyons that we accessed from the end of the road.

Part of the Slot canyon near White Dome. Sony A7III with 16-35 f/4 at 16mm, f/10, 1/20s, ISO 100
From just after the sun came up we wandered all around Fire Wave trail. This area had some of the most spectator rock formations and wild colors. This is an area to check out with a quick hike and then come back again and again in different light. I think I would like to come back here and spend at least a week capturing dawn and sunset shots. If you are into astro or night sky photography you might find you will really never have time to sleep in this park.

So many textures and colours make the Wave of Fire hike a photographers dream. Sony A7RIV with 16-35 f/4 at 16mm, f/11, 1/125s, ISO 100

Pink, orange, red…pick your favourite colour. Sony A7III, 16-35 f/4 at 16mm, f/8, 1/100s, ISO 100
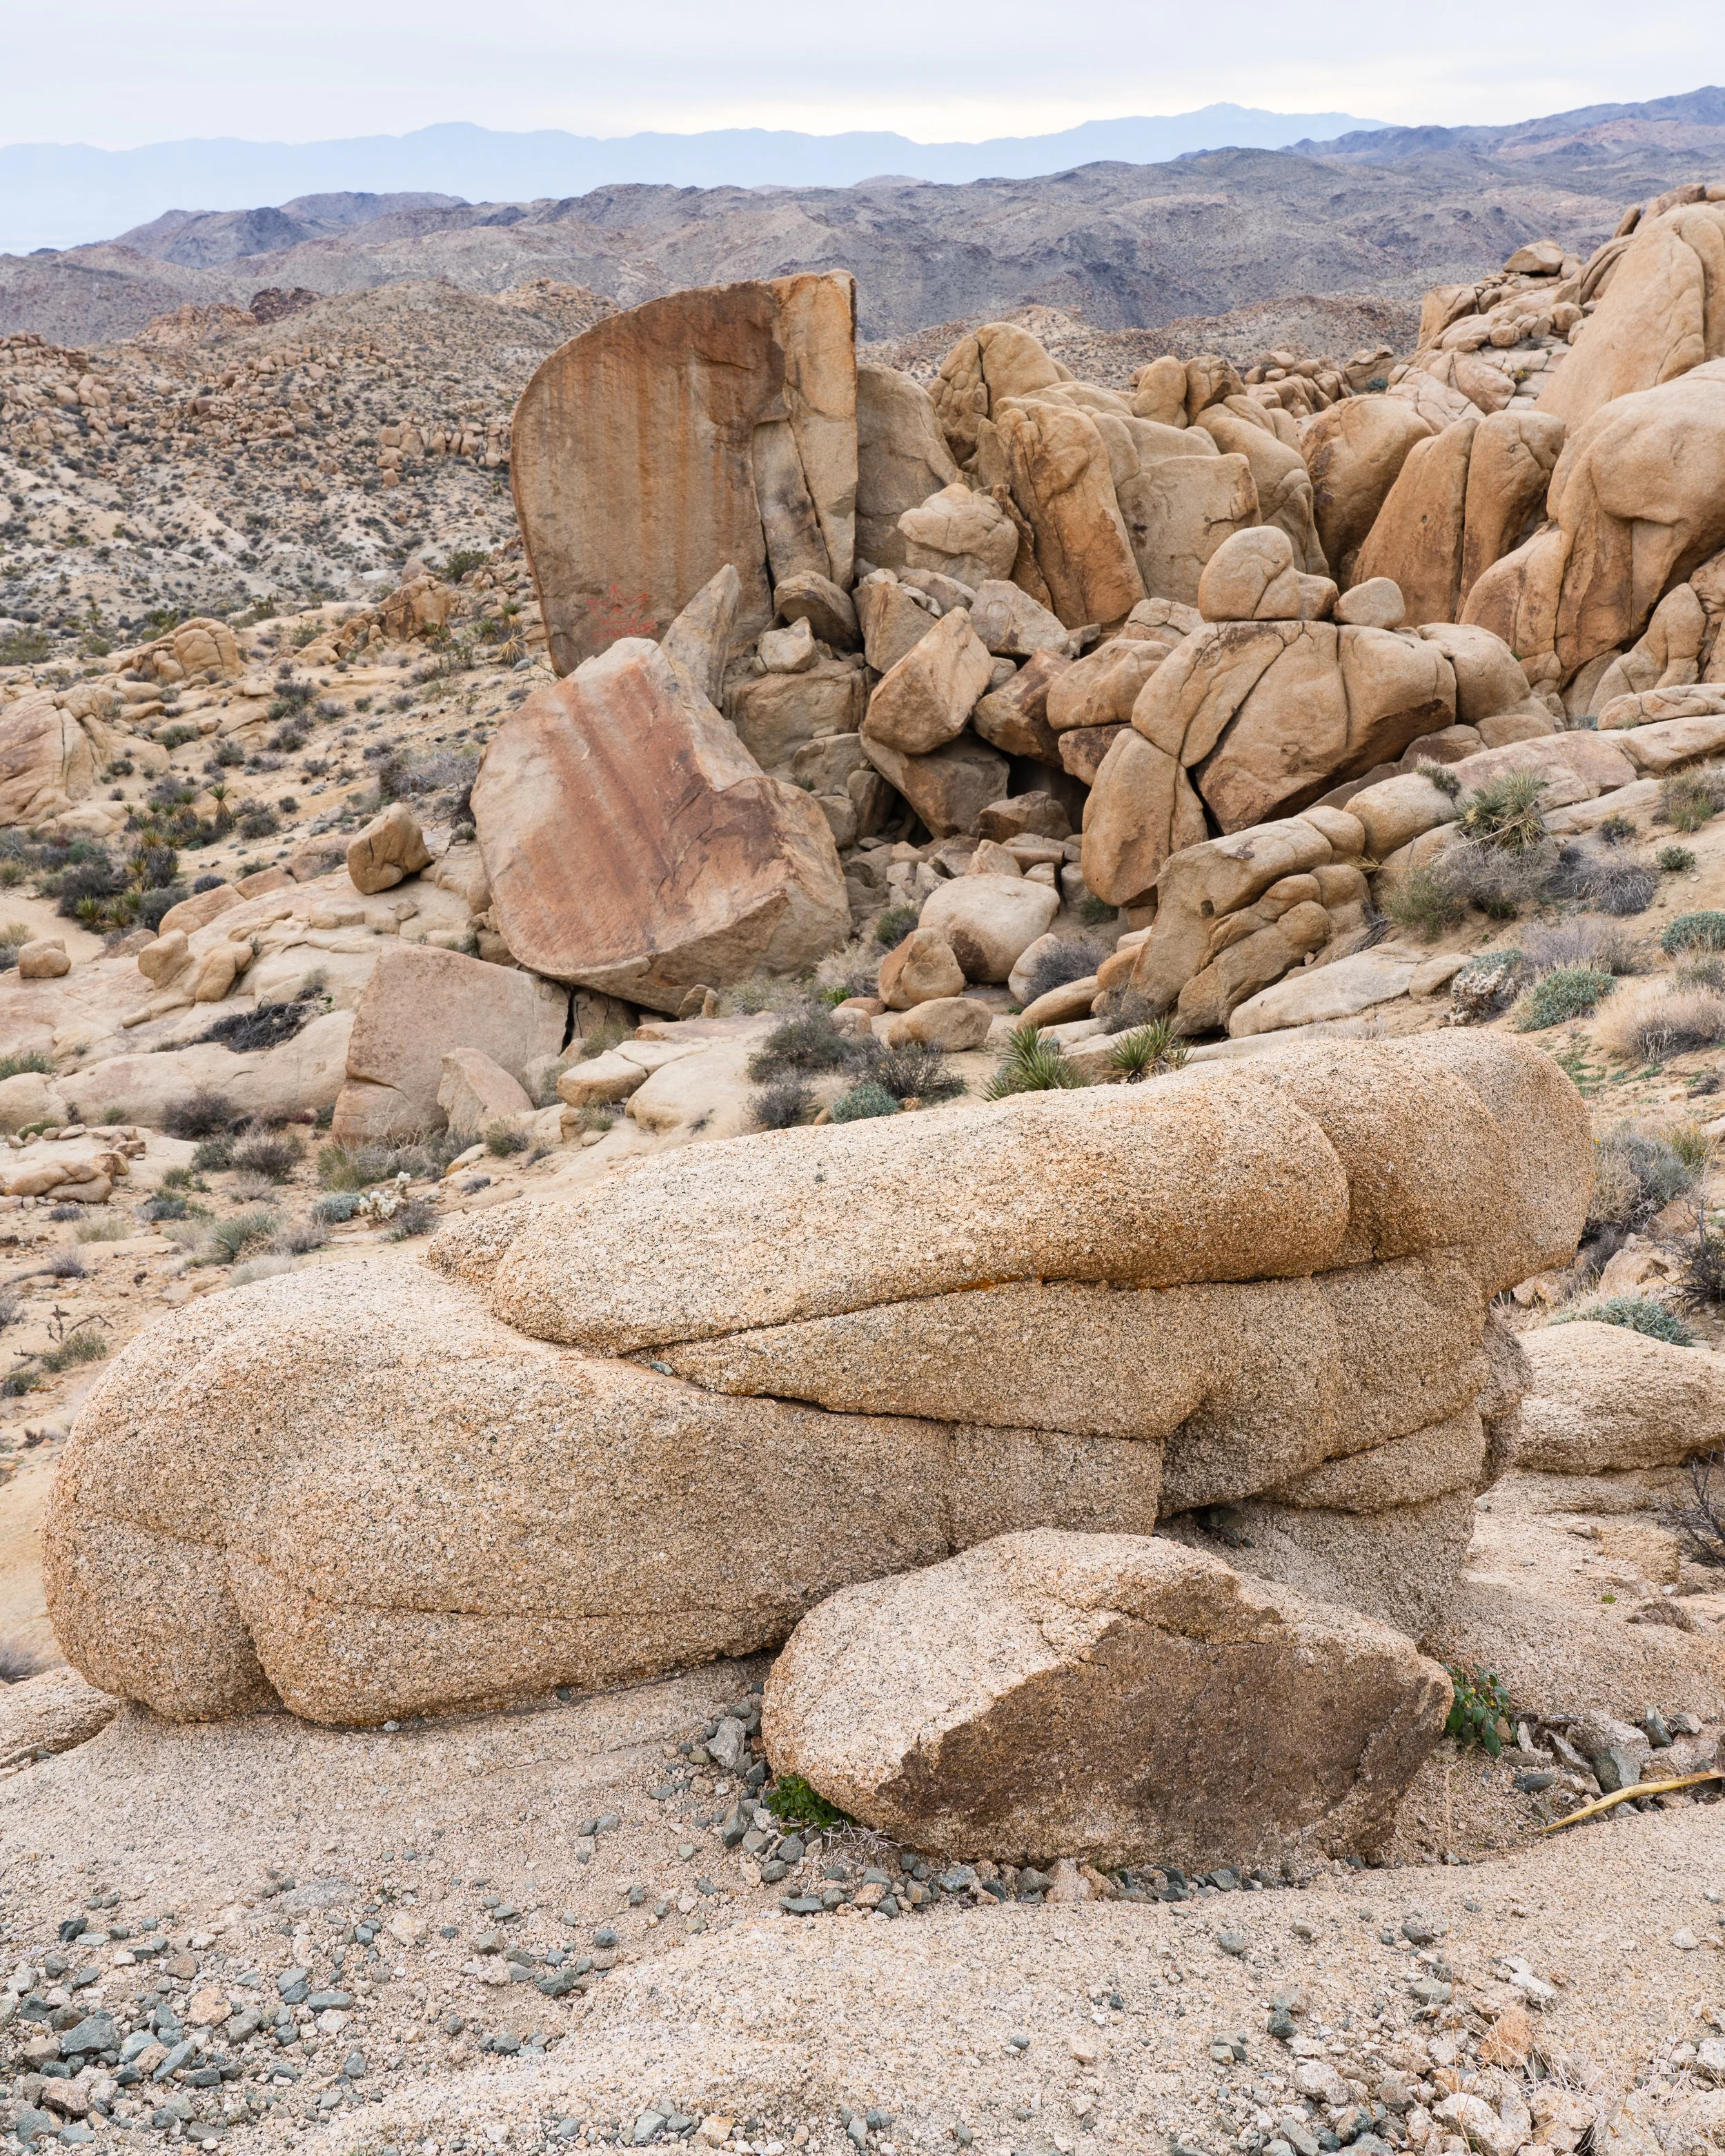
When we finally did leave Valley of Fire we were off to another very different desert landscape. This was an area we visited years ago in a 1976 VW Westfalia. Joshua tree may not have the same wild colors but the shapes of the boulders, and the Joshua trees themselves make for some wild landscapes.
If you can’t find camping in the park, there is an area at the south end of the park for BLM camping which will allow you to spend your days in the park without too much time on the road. On this trip we spent most of our time around Jumbo Rocks and Cottonwood.

A dead tree with some fantastic boulders in the background. Sony A7RIV with 24-105 f/4 at 34mm, f/8, 1/80s, ISO 100
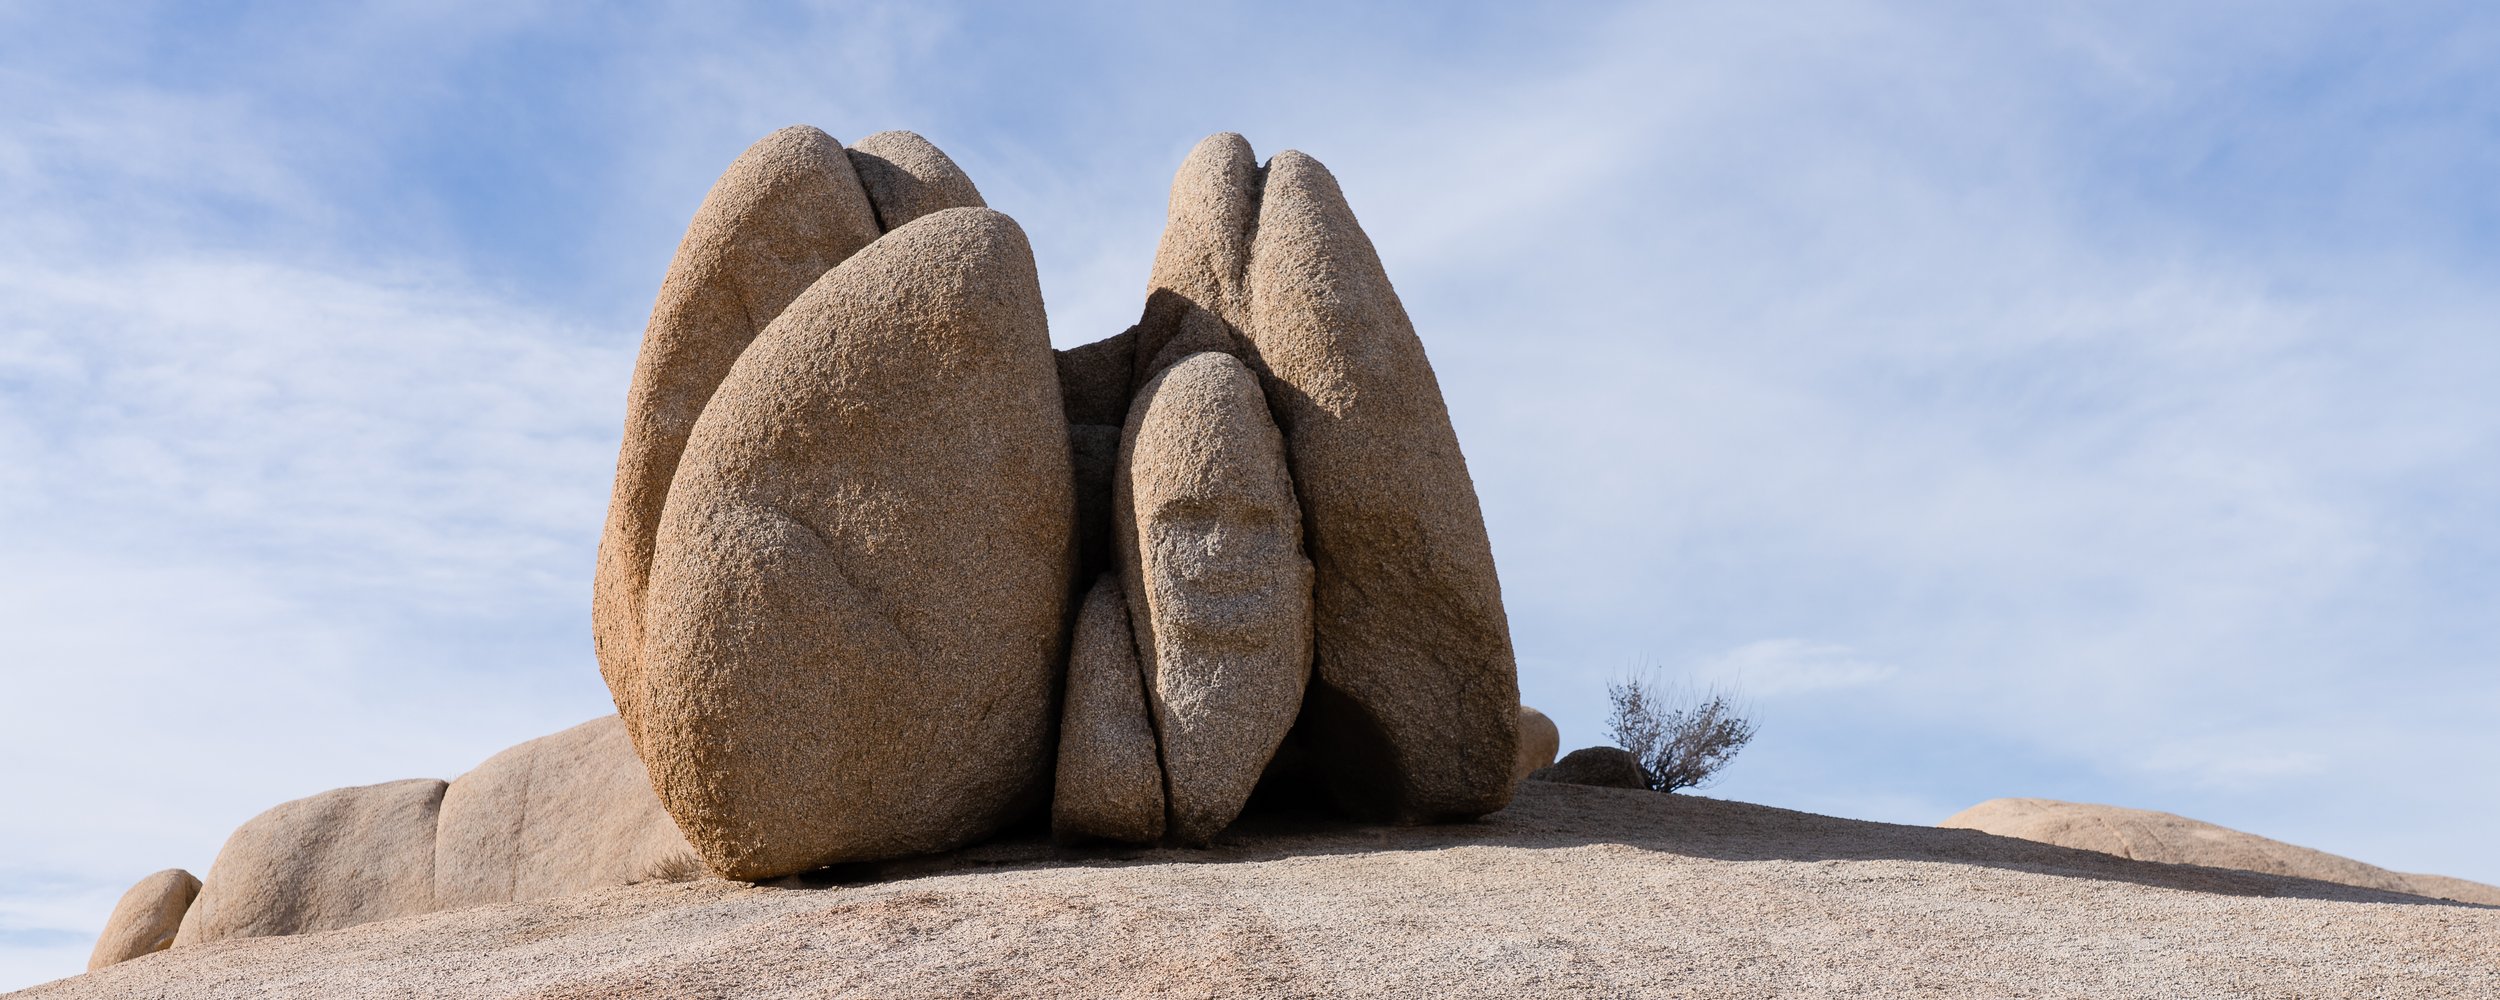
I see a face, do you? Sony A7RIV with 24-105 f/4 at 49mm, f/9, 1/320s, ISO 100
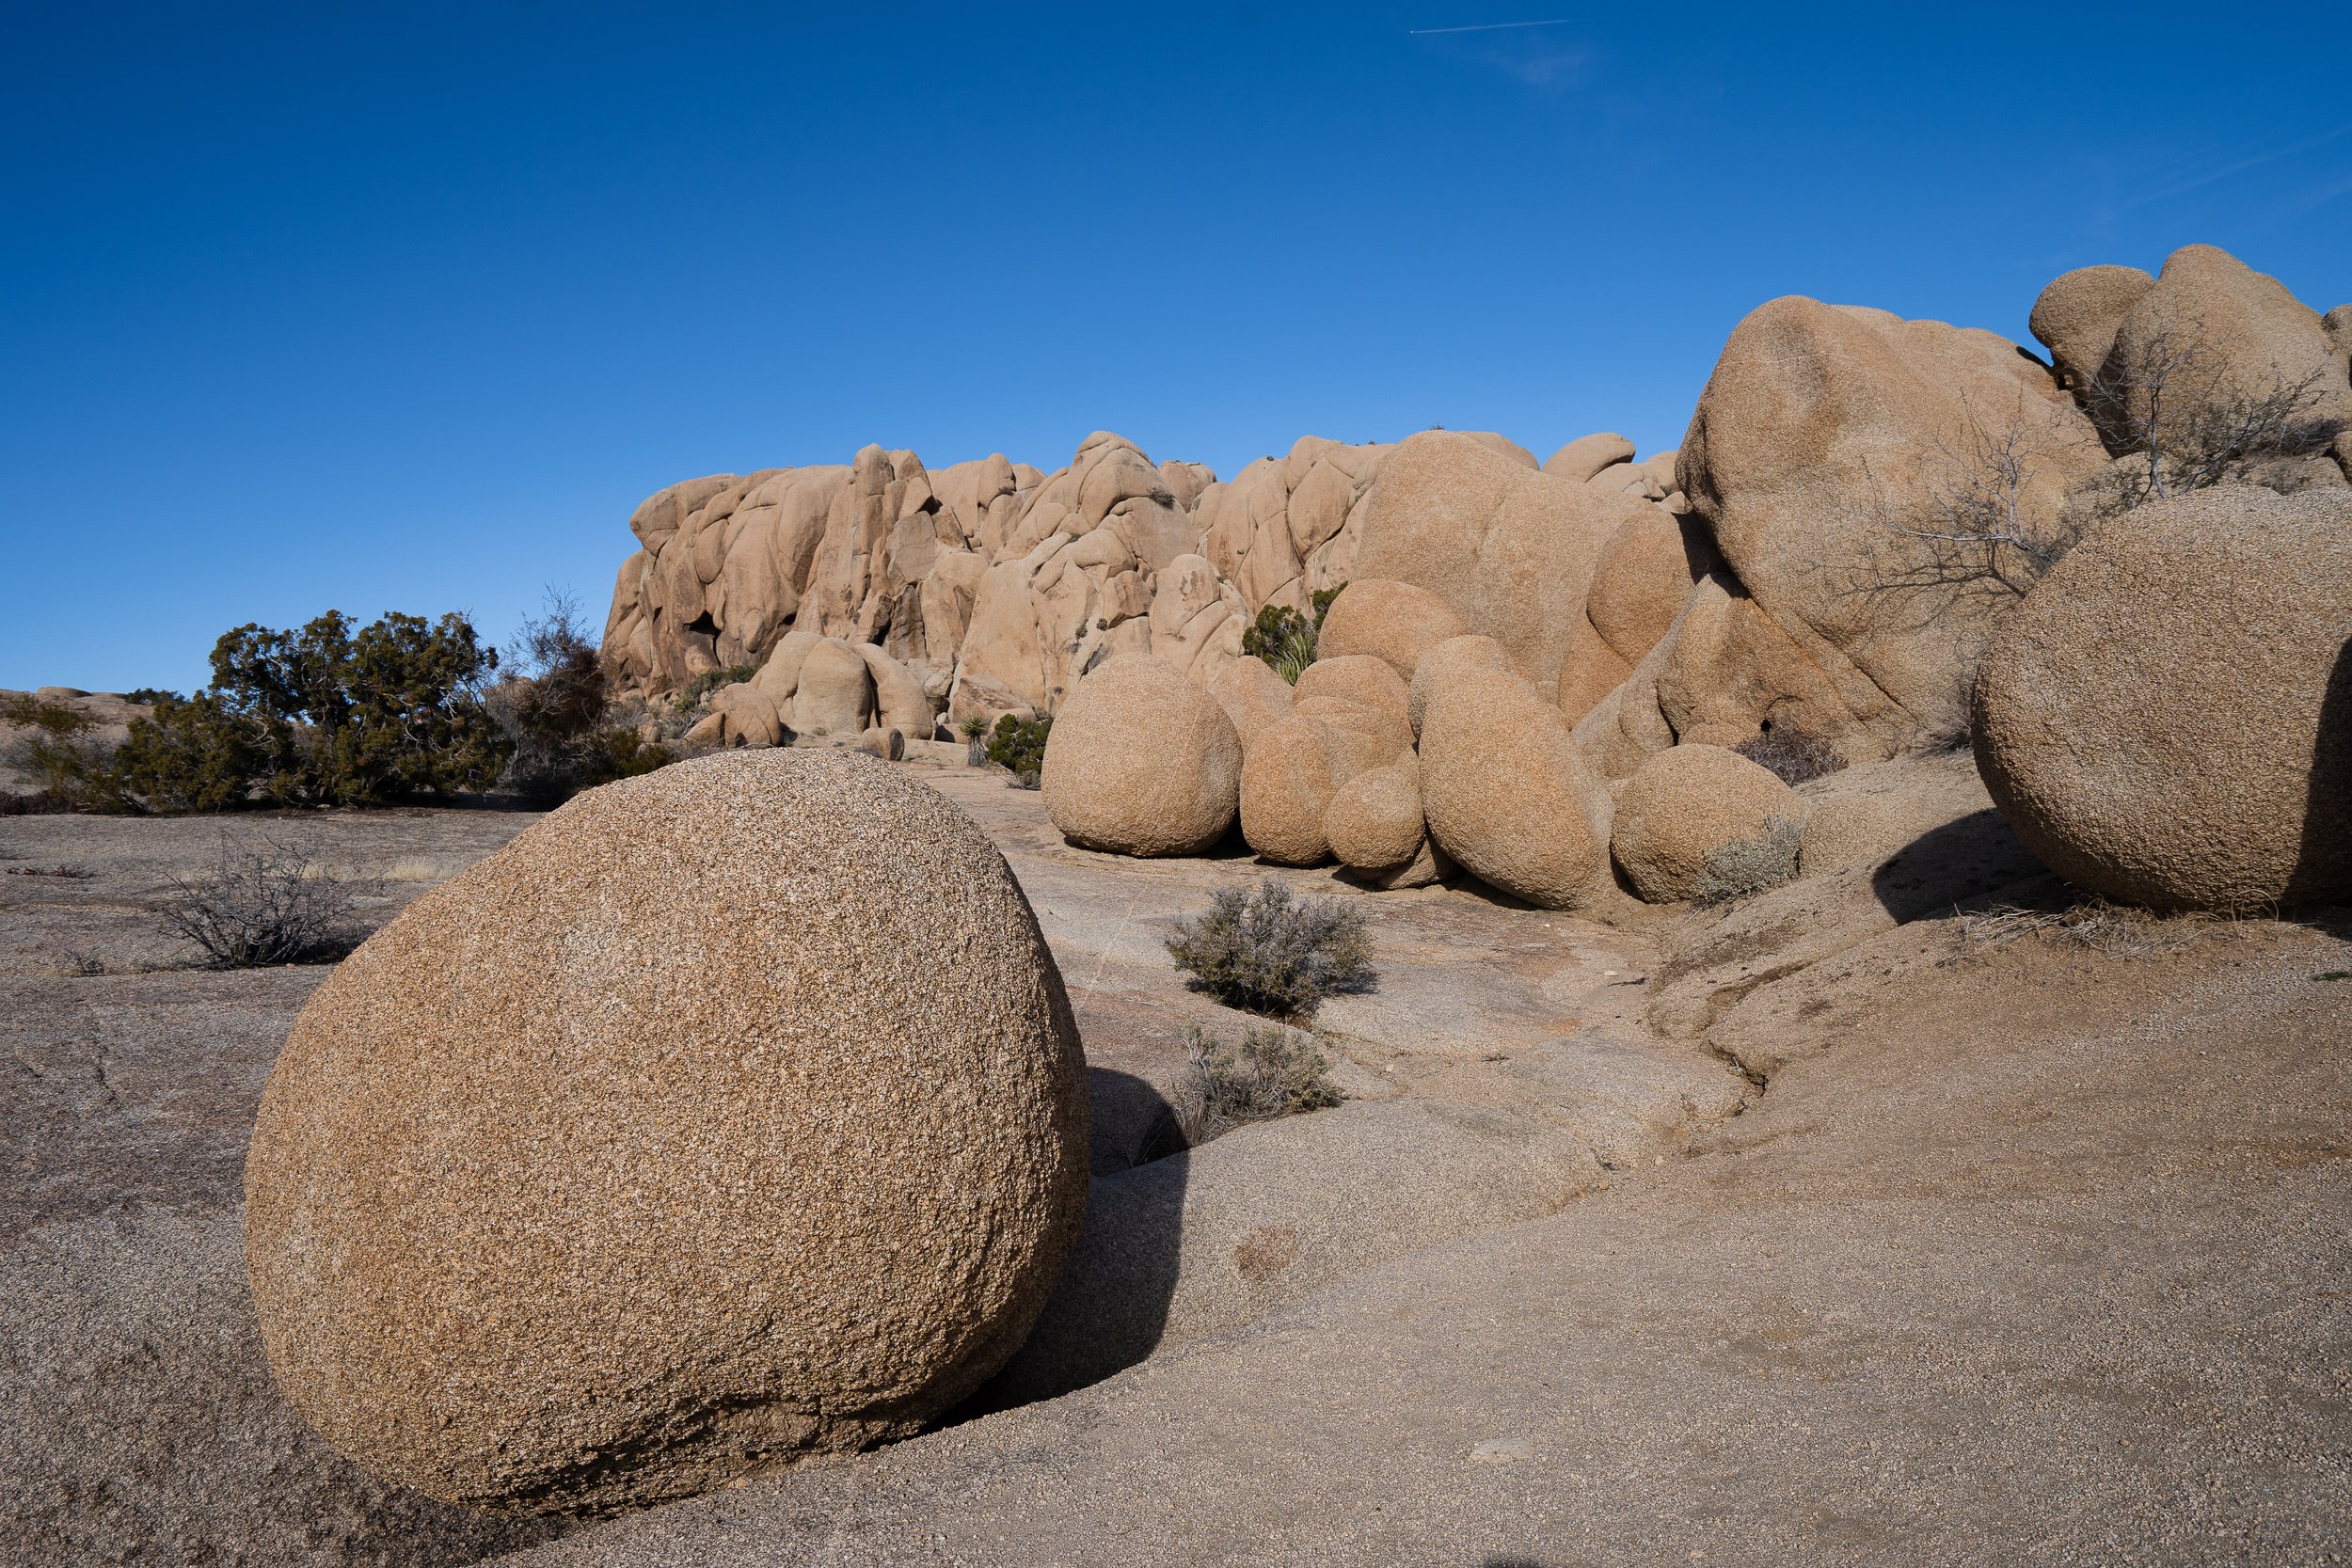
a boulder playground. Sony A7III with 16-35 f/4 at 22mm, f/7.1, 1/800s, ISO 100

Joshua tree hugging Salwa…always another tree to hug. Sony A7III with 16-35 f/4 at 26mm, f/9, 1/250s, ISO 100
hiking near Cottonwood campground. Sony A7RIV with 24-105mm at 31mm, f/13, 1/25s, ISO 100
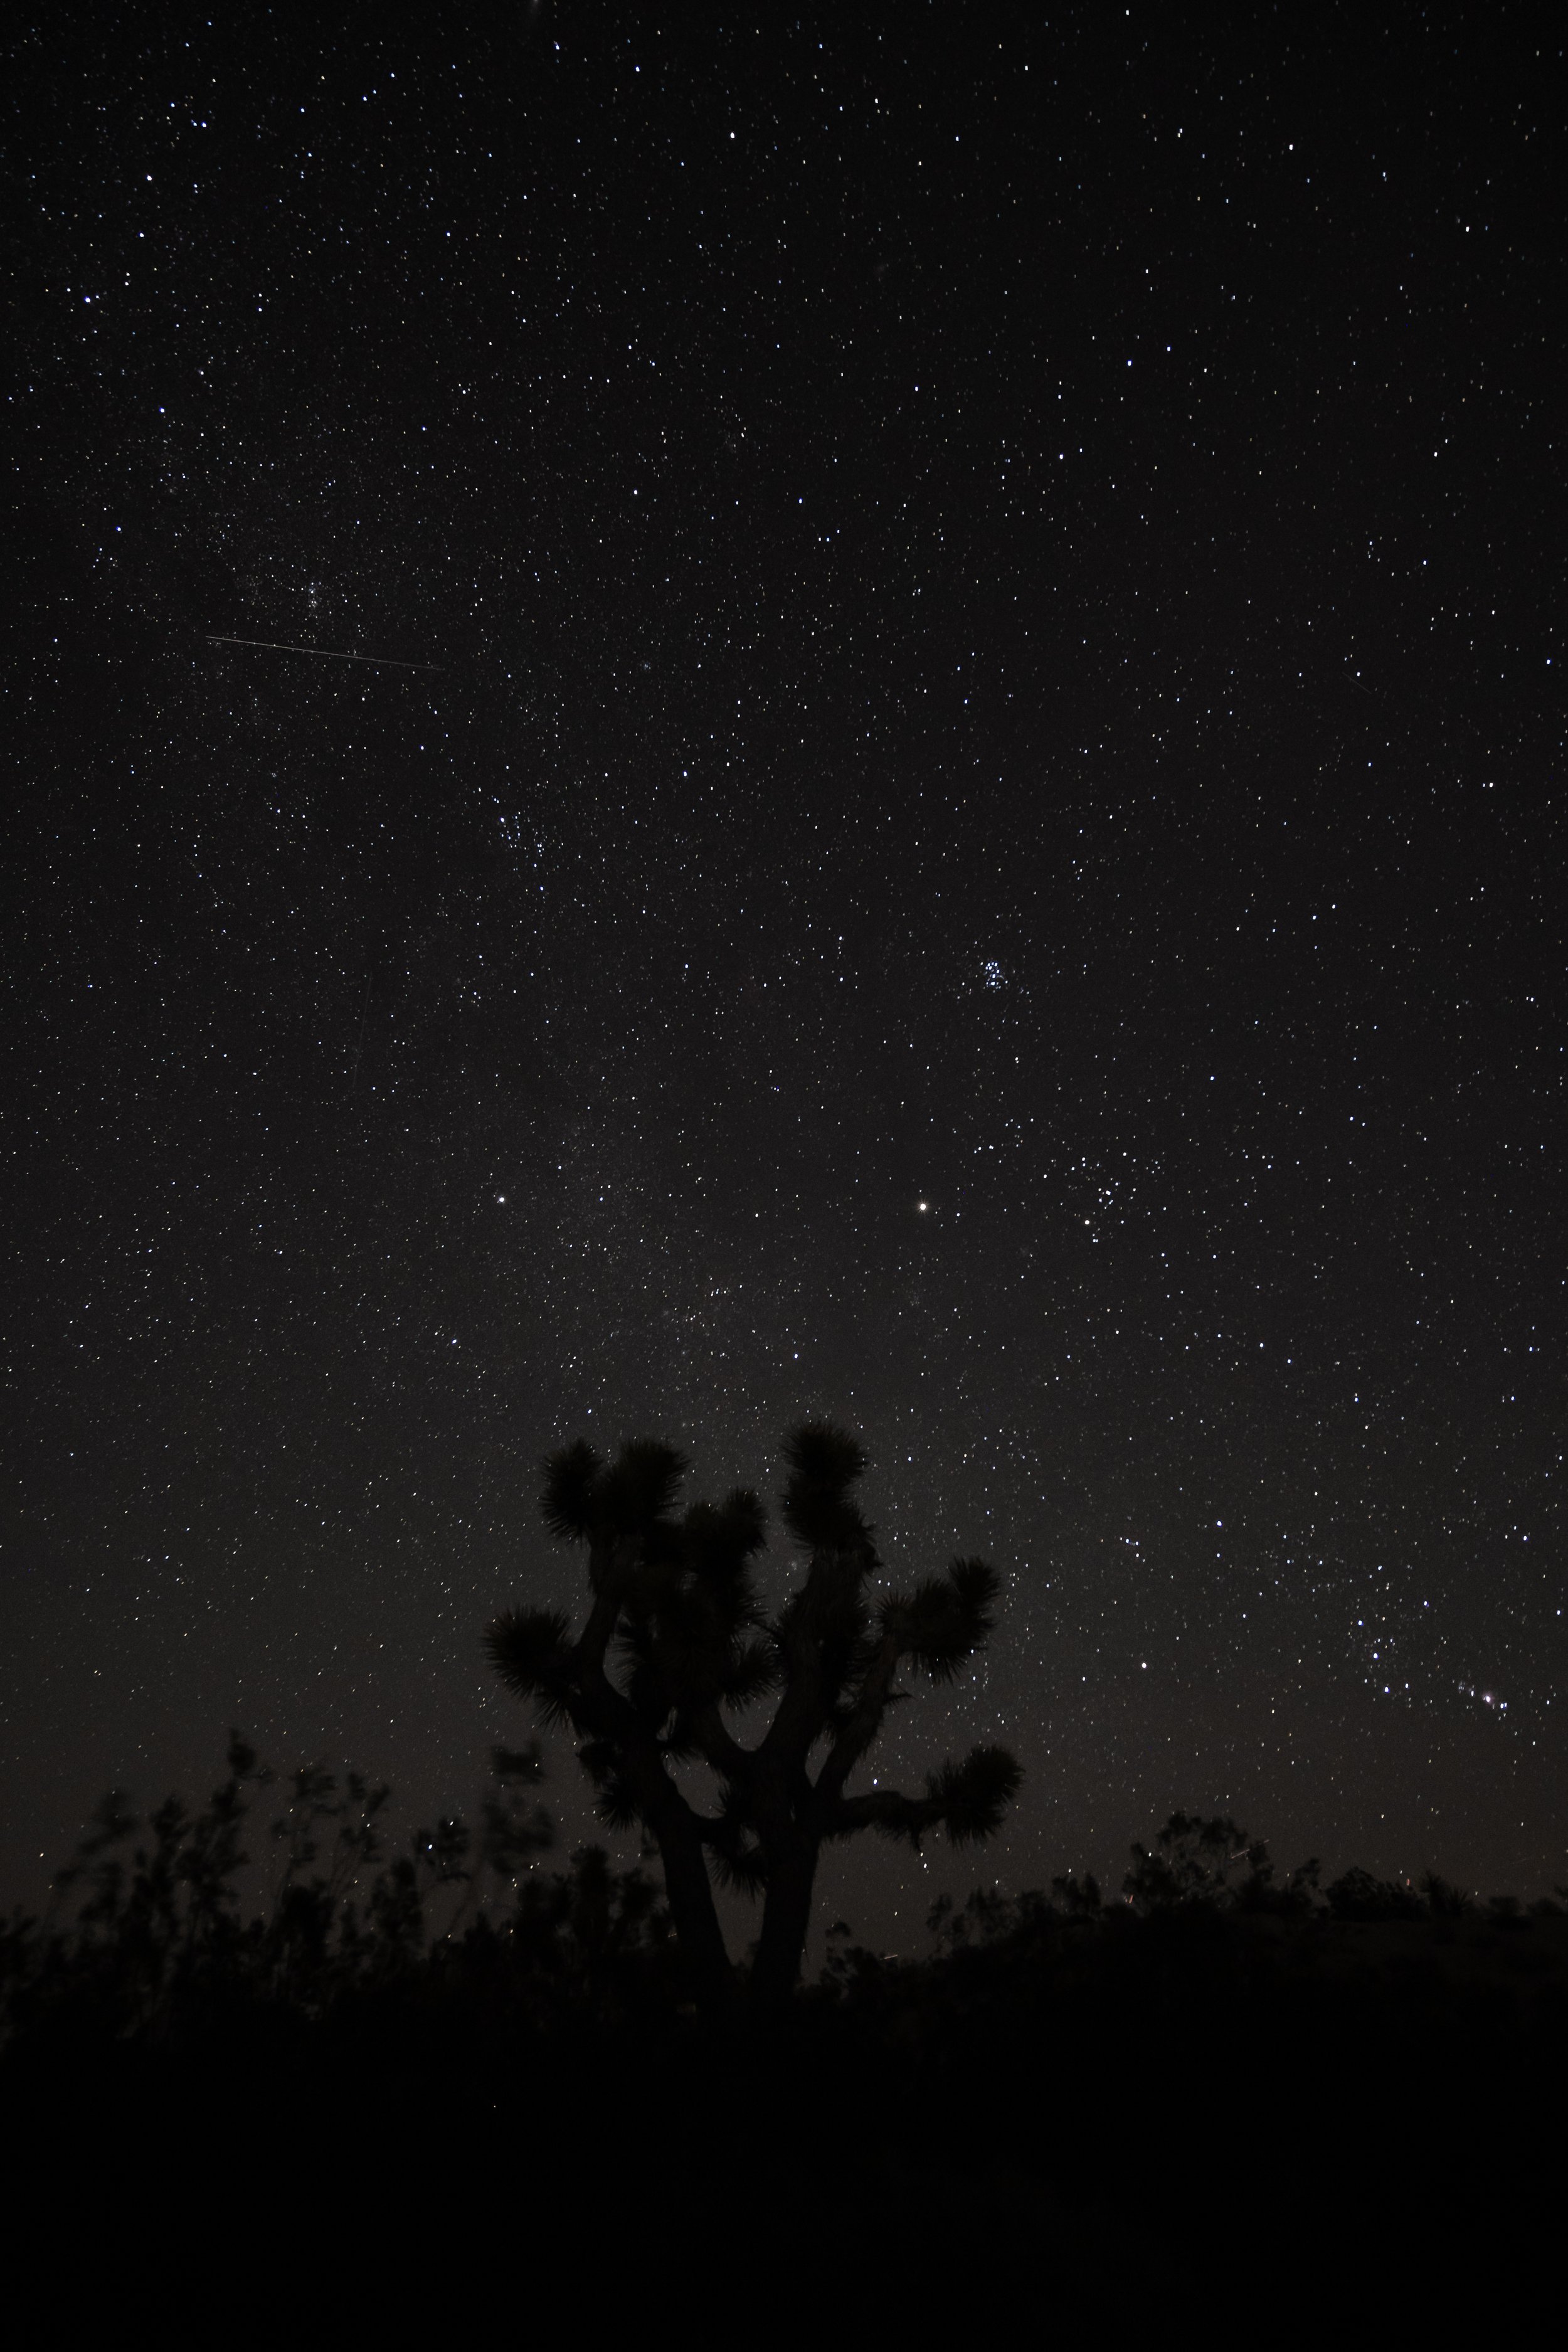
Night sky and a Joshua tree. Sony A7III with 16-35 f/4 at 16mm, f/4, 25s, ISO 1600
At this point we started to put California, and Nevada into our rear view mirror and headed to Arizona. Organ Pipe Cactus National monument was going to be our first stop and was one of the first times we actually had some warm weather (at least for a couple of days). This park is a little south west of Phoenix down on the Mexican border and it is easy to see what this park is named for.

Sunset in Organ Pipe Cactus National Monument. Sony A7III with 70-200 f/4 at 200mm, f/5.6, 1/1000s ISO 1600
This is also when we started seeing more birds and I was able to pull out the big lens.
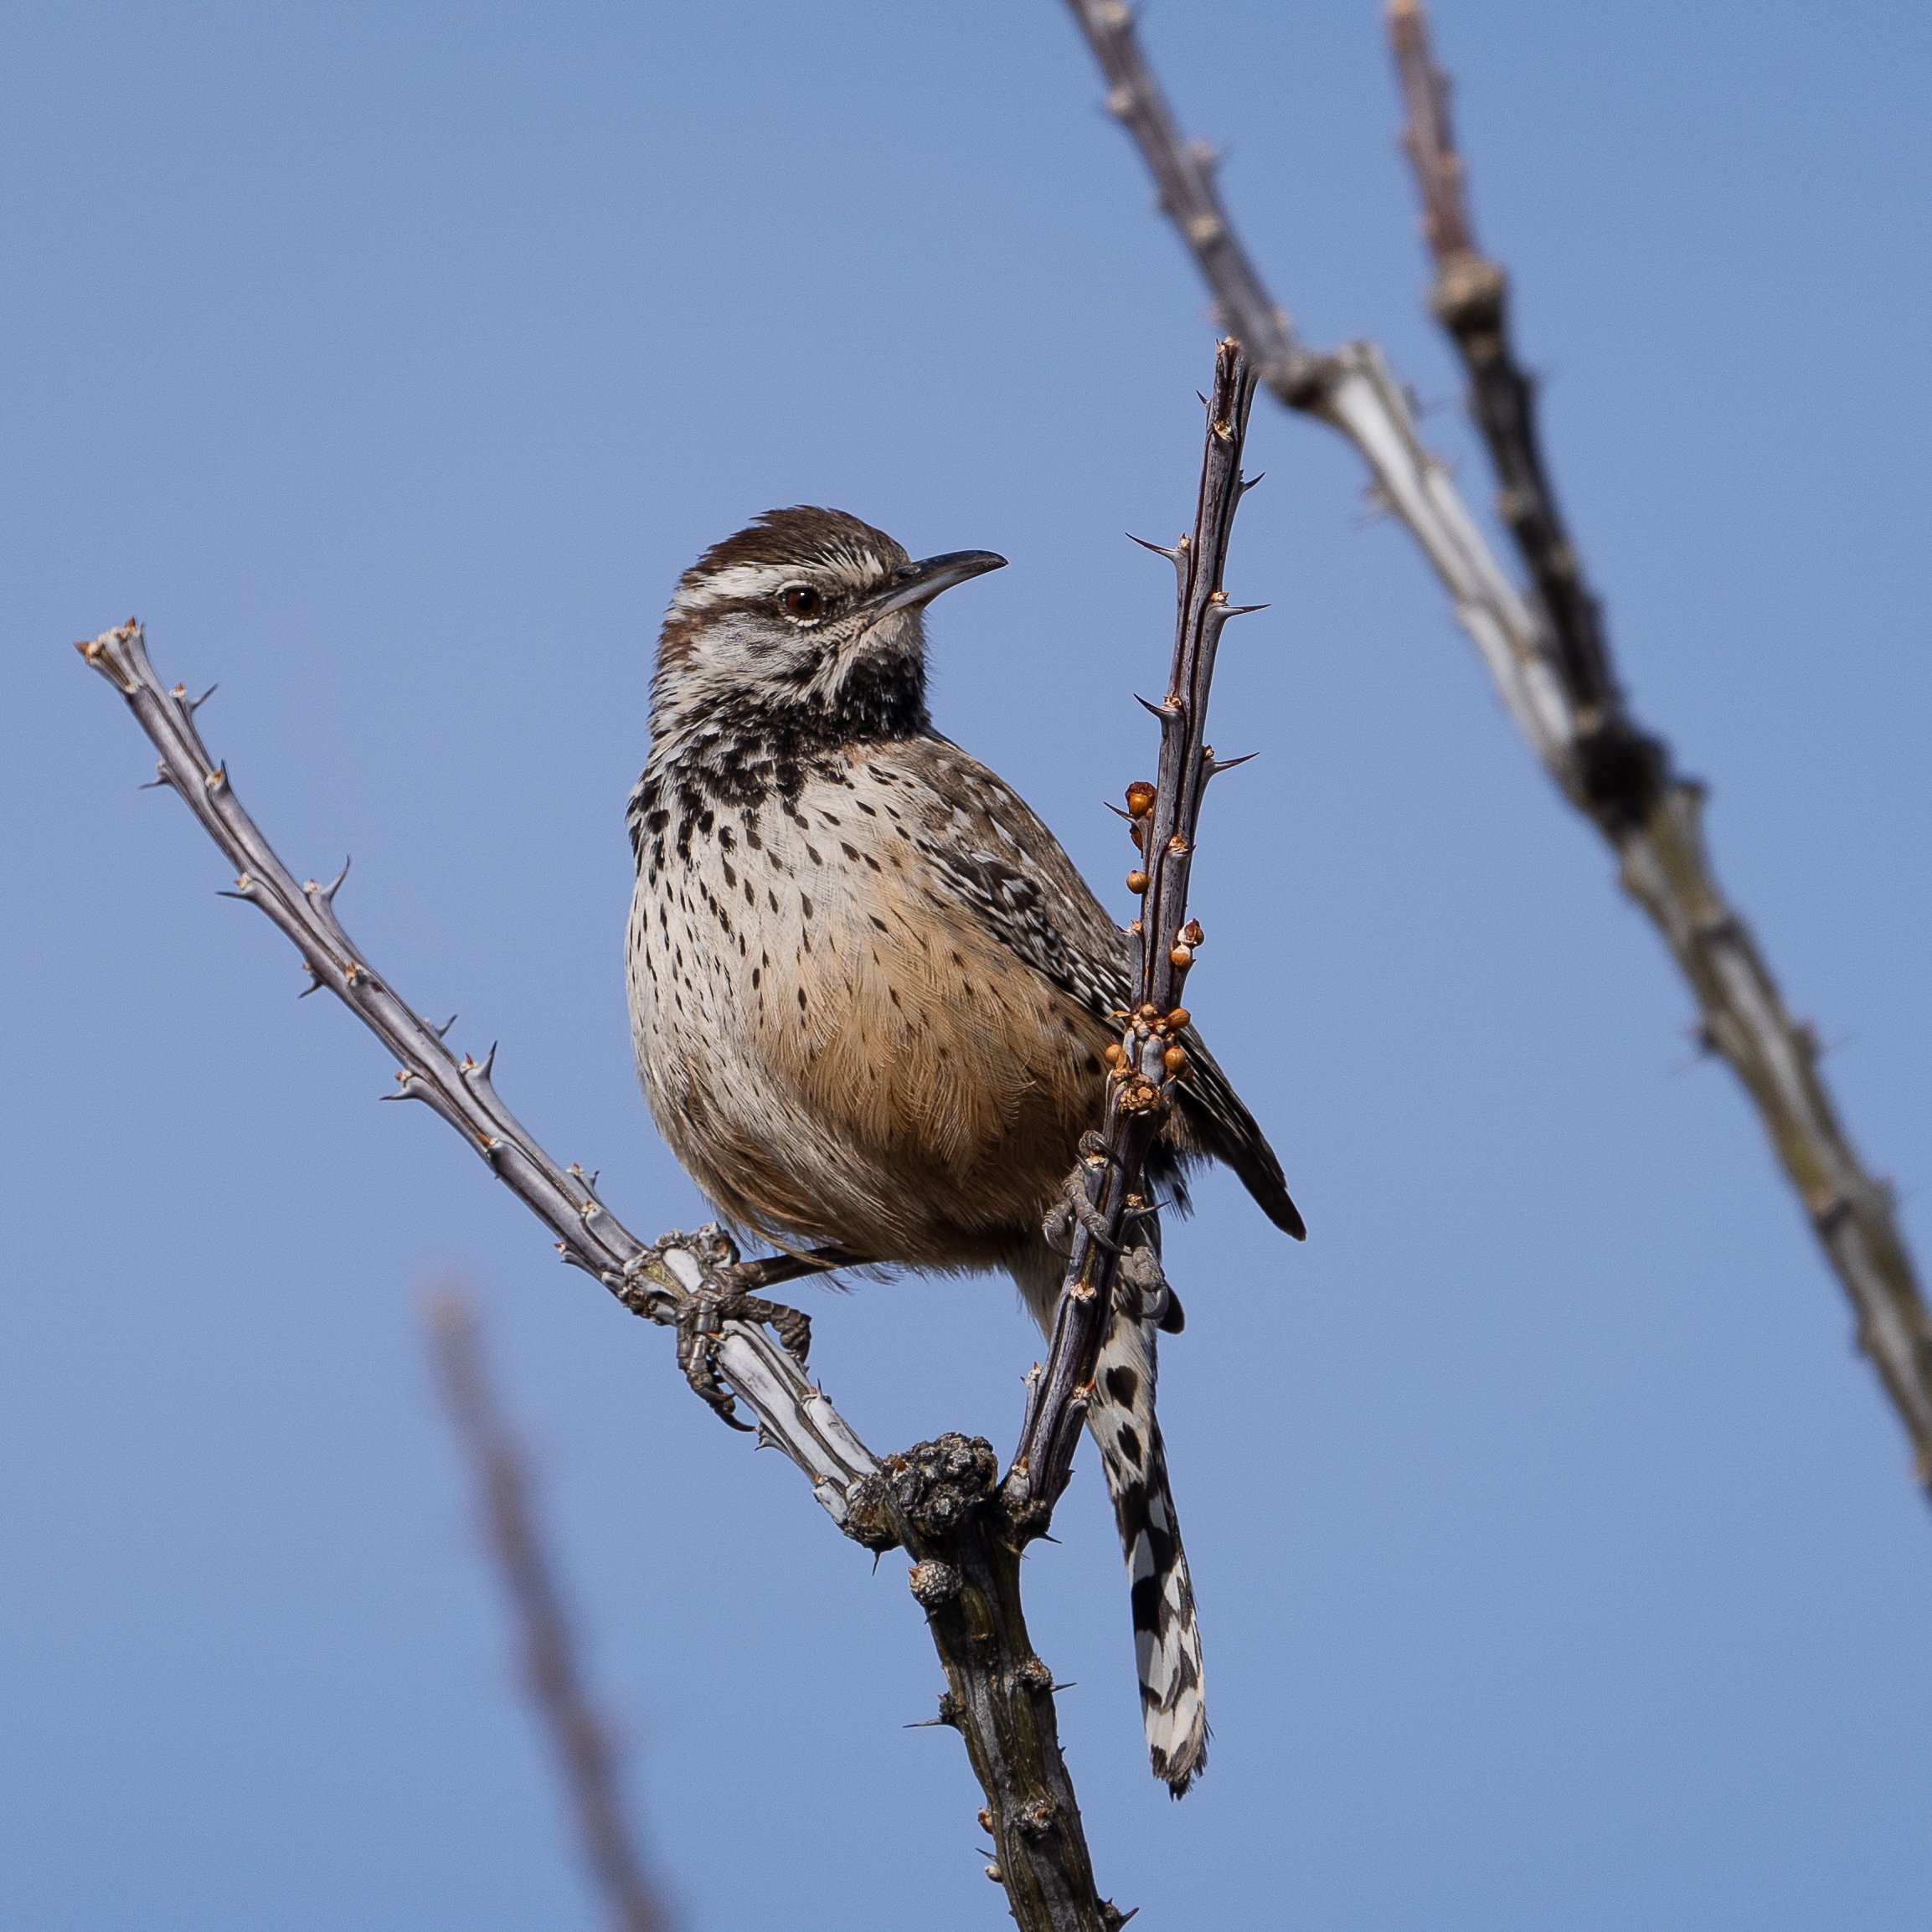
Cactus Wren. Sony A7III with 200-600 f/5.6-6.3 at 600mm, f/6.3, 1/1250s, ISO 250

Phainopepla. Sony A7RIV with 200-600 f/5.6-6.3 at 600mm, f/6.3, 1/2000s, ISO 250

Mexican Scrub Jay. Sony A7RIV with 200-600 f/5.6-6.3 at 600mm, f/6.3, 1/2000s, ISO 200
Again, just outside of this park is some BLM land for camping, we stayed in the park this time and learned quickly that there is an area that is generator free so that you don’t have to listen to loud engines instead of the nature in the park.
I have parents that were snowbirds for around 20 years and spent a good deal of their winters in Tucson so I have in the past been able to come down and spend time in that area. Tucson Mountain state park is a great area to get into some of the desert hiking and to wander amongst the Saguaro cactus that so much reminds me of Saturday mornings watching the bugs bunny/road runner hour.

Saguaro cactii and the view into Tucson Mountains state park. Sony A7III with 24-105 f/4 at 24mm, f/8, 1/320s, ISO 100
This time around we spent only a couple of nights in this area but also went up to Mount Lemmon to check out some wildly different terrain and to give us some time for some good food in Tucson itself.

multiple hoodoos to hike through and around. Sony A7III with 24-105 f/4 at 24mm, f/10, 1/160s, ISO 100, 6 shot panorama

More interesting rock formations along the road up Mt. Lemmon. Sony A7III with 24-105 f/4 at 34mm, f/10, 1/320s, ISO 100
On the next portion of the trip we went to a bunch of areas we found out about through other campers, as we headed east just before the New Mexico border there is a small town called Portal which is just that, a little portal into another amazing piece of landscape and also another little birders haven. The whole area from Madera Canyon to Patagonia Lake and across to Portal are great locations to find hummingbirds and many birds that are only found in Arizona and Mexico.

Anna’s hummingbird near Patagonia Lake, Arizona. Sony A7RIV with 200-600 f/5.6-6.3 at 600mm, f/6.3, 1/2000s, ISO 1000

Blue throated hummingbird. Sony A7RIV with 200-600 f/5.6-6.3 at 600mm, f/6.3, 1/800s, ISO 8000

broad billed hummingbird. Sony A7RIV with 200-600 f/5.6-6.3 at 600mm, f/6.3, 1/2000s, ISO 500
Since moving into Arizona we had been lucky enough to have much more sunny weather even if not nearly as warm as we would have liked. This continued as we worked our way into New Mexico and White Sands national park but our hopes to head into northern portions of New Mexico were not going to be on this trip as ice and snow were in the forecast for Albuquerque and Santa Fe.

The shadows bring out the textures in these nearly monochromatic images. Sony A7RIV with 24-105 f/4 at 24mm, f/11, 1/320s, ISO 100

The wind shapes the land. Sony A7RIV with 24-105 f/4 at 52mm, f/11, 1/250s, ISO 100

Black and white image of the rolling dunes. Sony A7RIV with 24-105 f/4 at 89mm, f/11, 1/400s, ISO 100
This meant a whole new plan was in order and now Texas looked to be one of the few areas that was going to be warm enough for us to camp. On the map was Big Bend Nation Park and as with anything in Texas it was a fairly long drive. Our first stop on this leg was Hueco Tanks, a park I had always wanted to visit when I was a younger and was fairly active in bouldering and climbing. This park is a haven for bouldering and we watched a few climbers attempting stuff I couldn’t think of now.
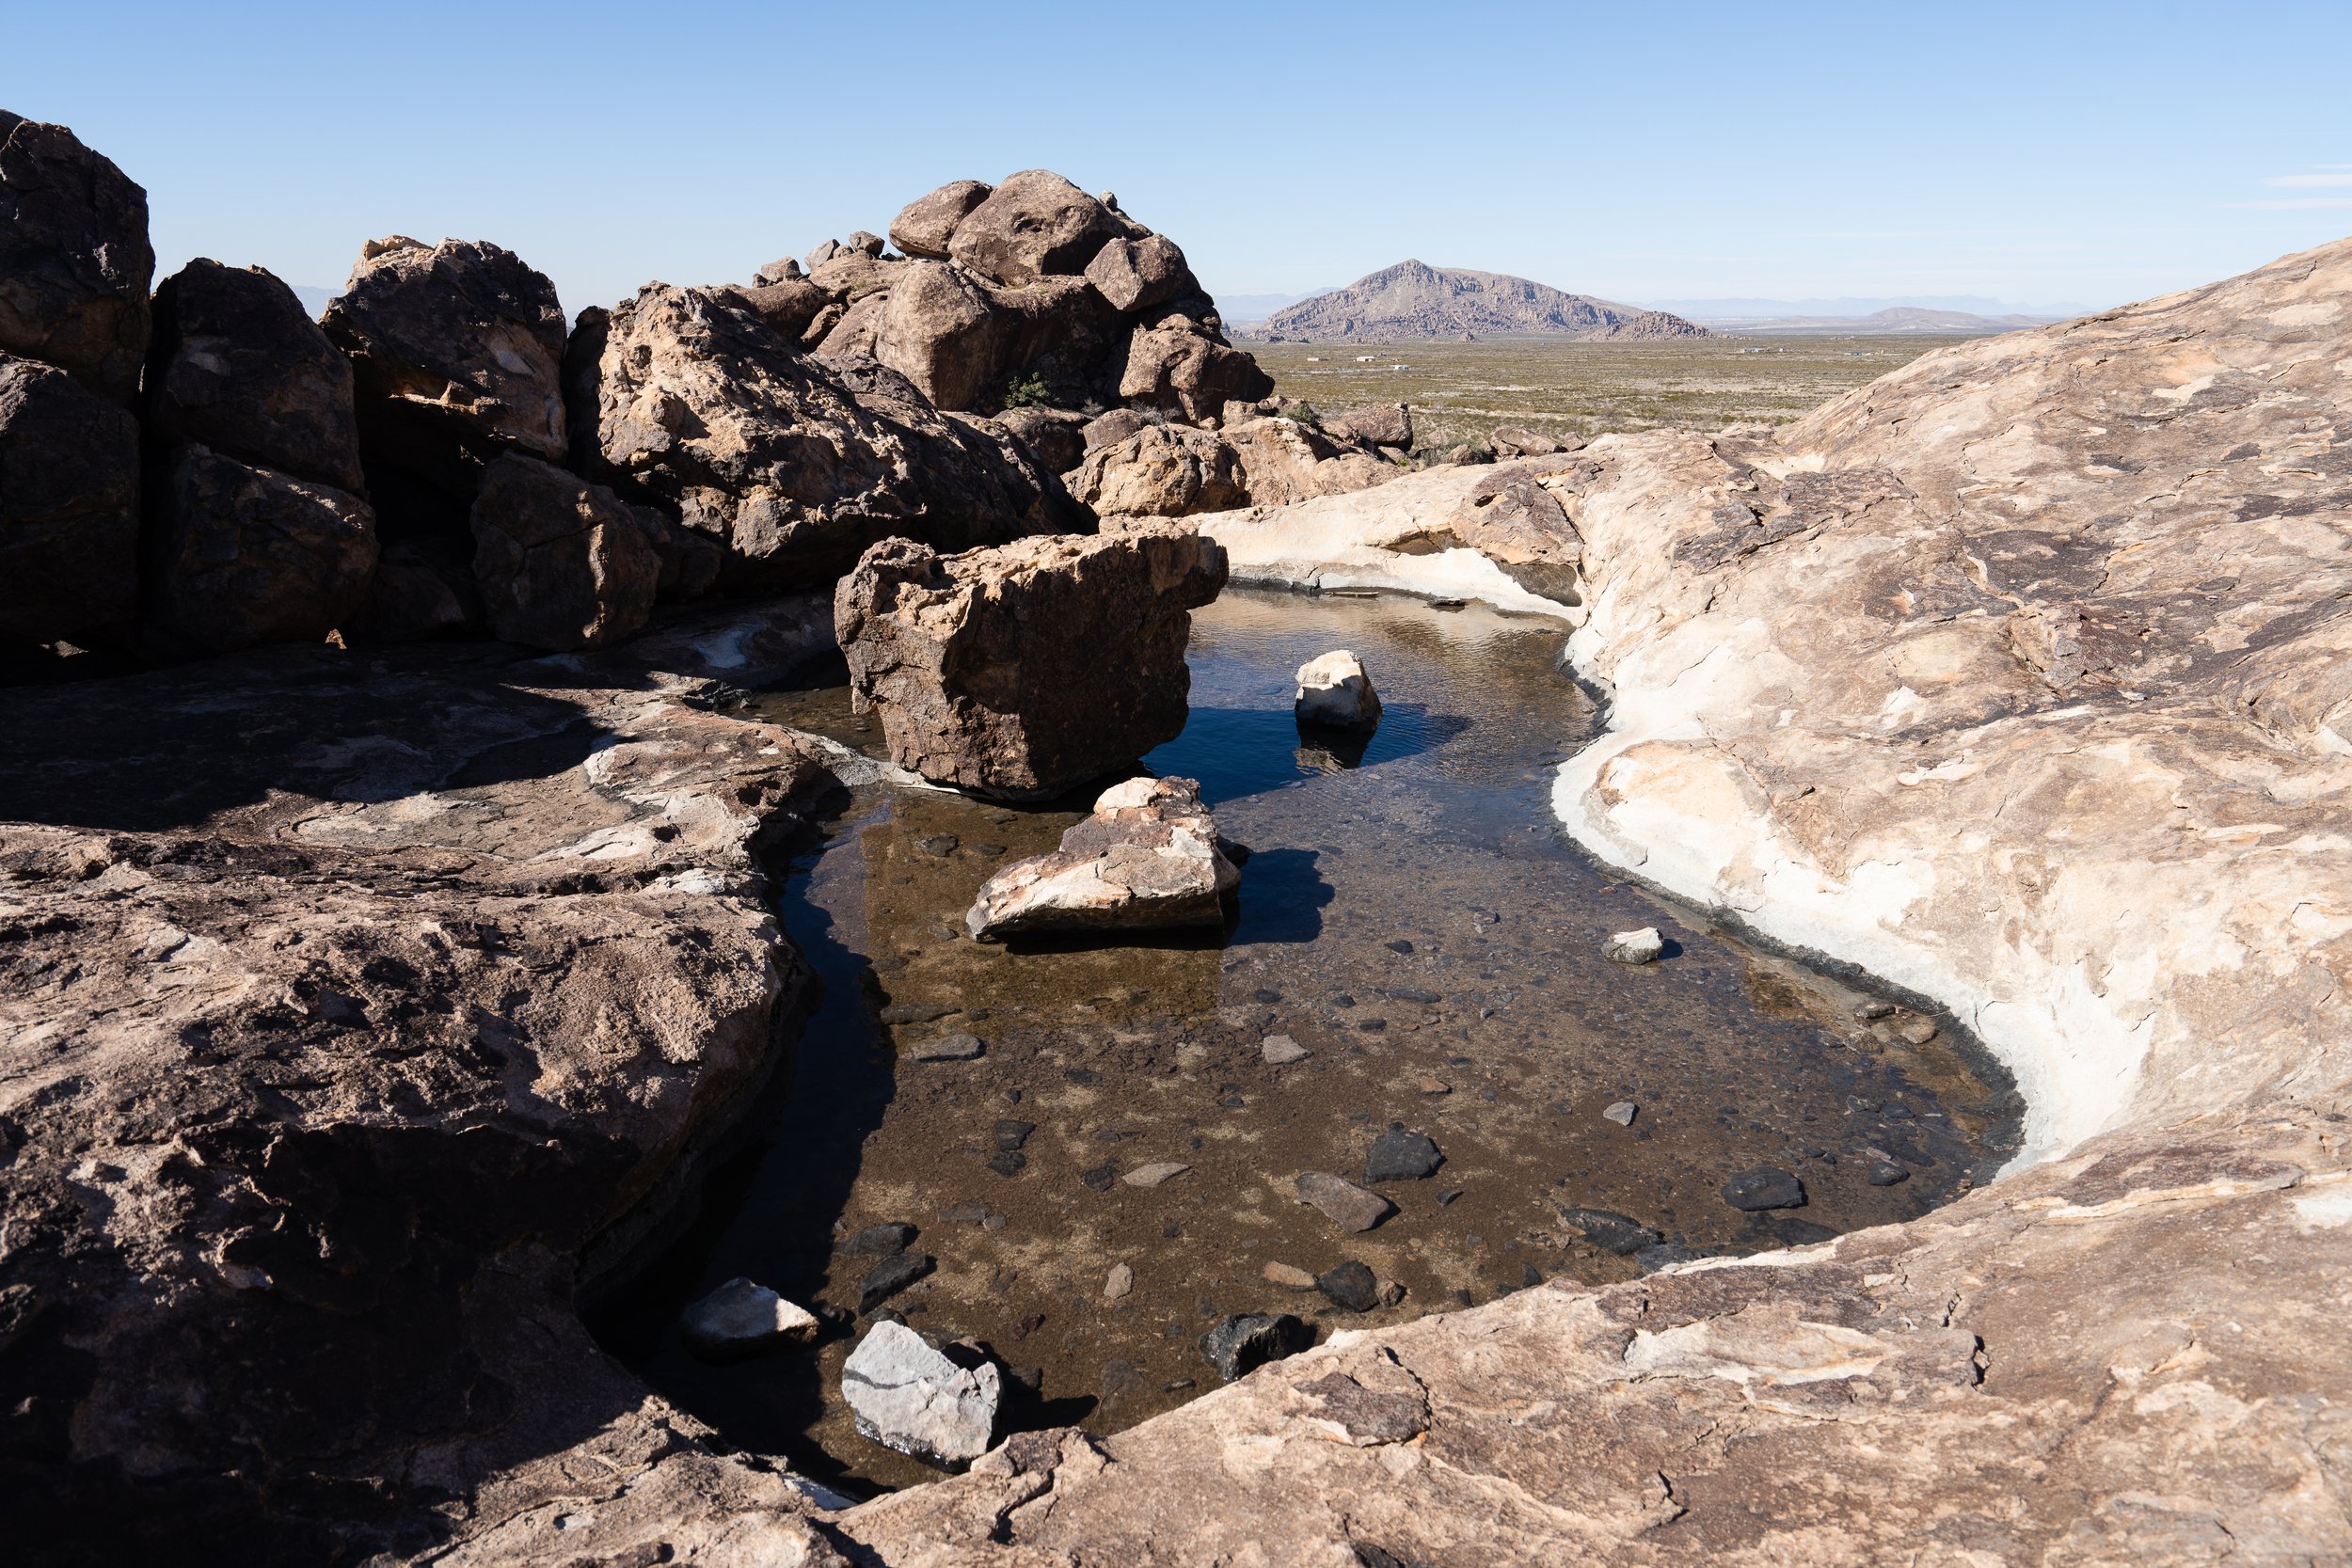
An example of the defining feature here in Hueco Tanks. Sony A7RIV with 16-35 f/4 at 22mm, f/14, 1/80s, ISO 100
Hueco tanks is a very protected area with some significant native historical landmarks and petroglyphs so treading carefully and only in the self-guided parts is important to ensure others will be able to enjoy this area for years to come.

Some fantastic petroglyphs in a cave. We had to be so careful not to touch the wall in this tight and slippery location. Sony A7RIV with 16-35 f/4 at 16mm, f/4, 1/8s, ISO 1600

Just the view from in the cave, but the light was so amazing this is one of my favourite shots from the trip. Sony A7RIV with 16-35 f/4 at 16mm, f/9, 4s, ISO 100
Getting a bit closer to Big Bend, we found a nice park to stay at in Fort Davis which has a big Observatory near by. Nice hiking, camping and dark skies along with some more desert bighorn sheep made for a good stopover before some outback camping on the north end of Big Bend. We didn’t get a chance to check out the observatory this time, but I definitely would like to come back just for that.

Sunset from the lookout at Davis Mountain. Sony A7III with 24-105 f/4 at 105mm, f/22, 1/15s, ISO 640
Our first night in Big Bend was at a spot called Nine Point Draw and we were out there completely on our own. This was so beautiful and quiet. We were able to really relax and just enjoy the scenery. I think we could have spent weeks in the National Park and the state park combined. We managed a number of interesting hikes, one called balancing rock (how many of those are there?) was very picturesque, the hike down to what was called the window to the world was busy but still worth it. Finally the view into Santa Elena Canyon was amazing.
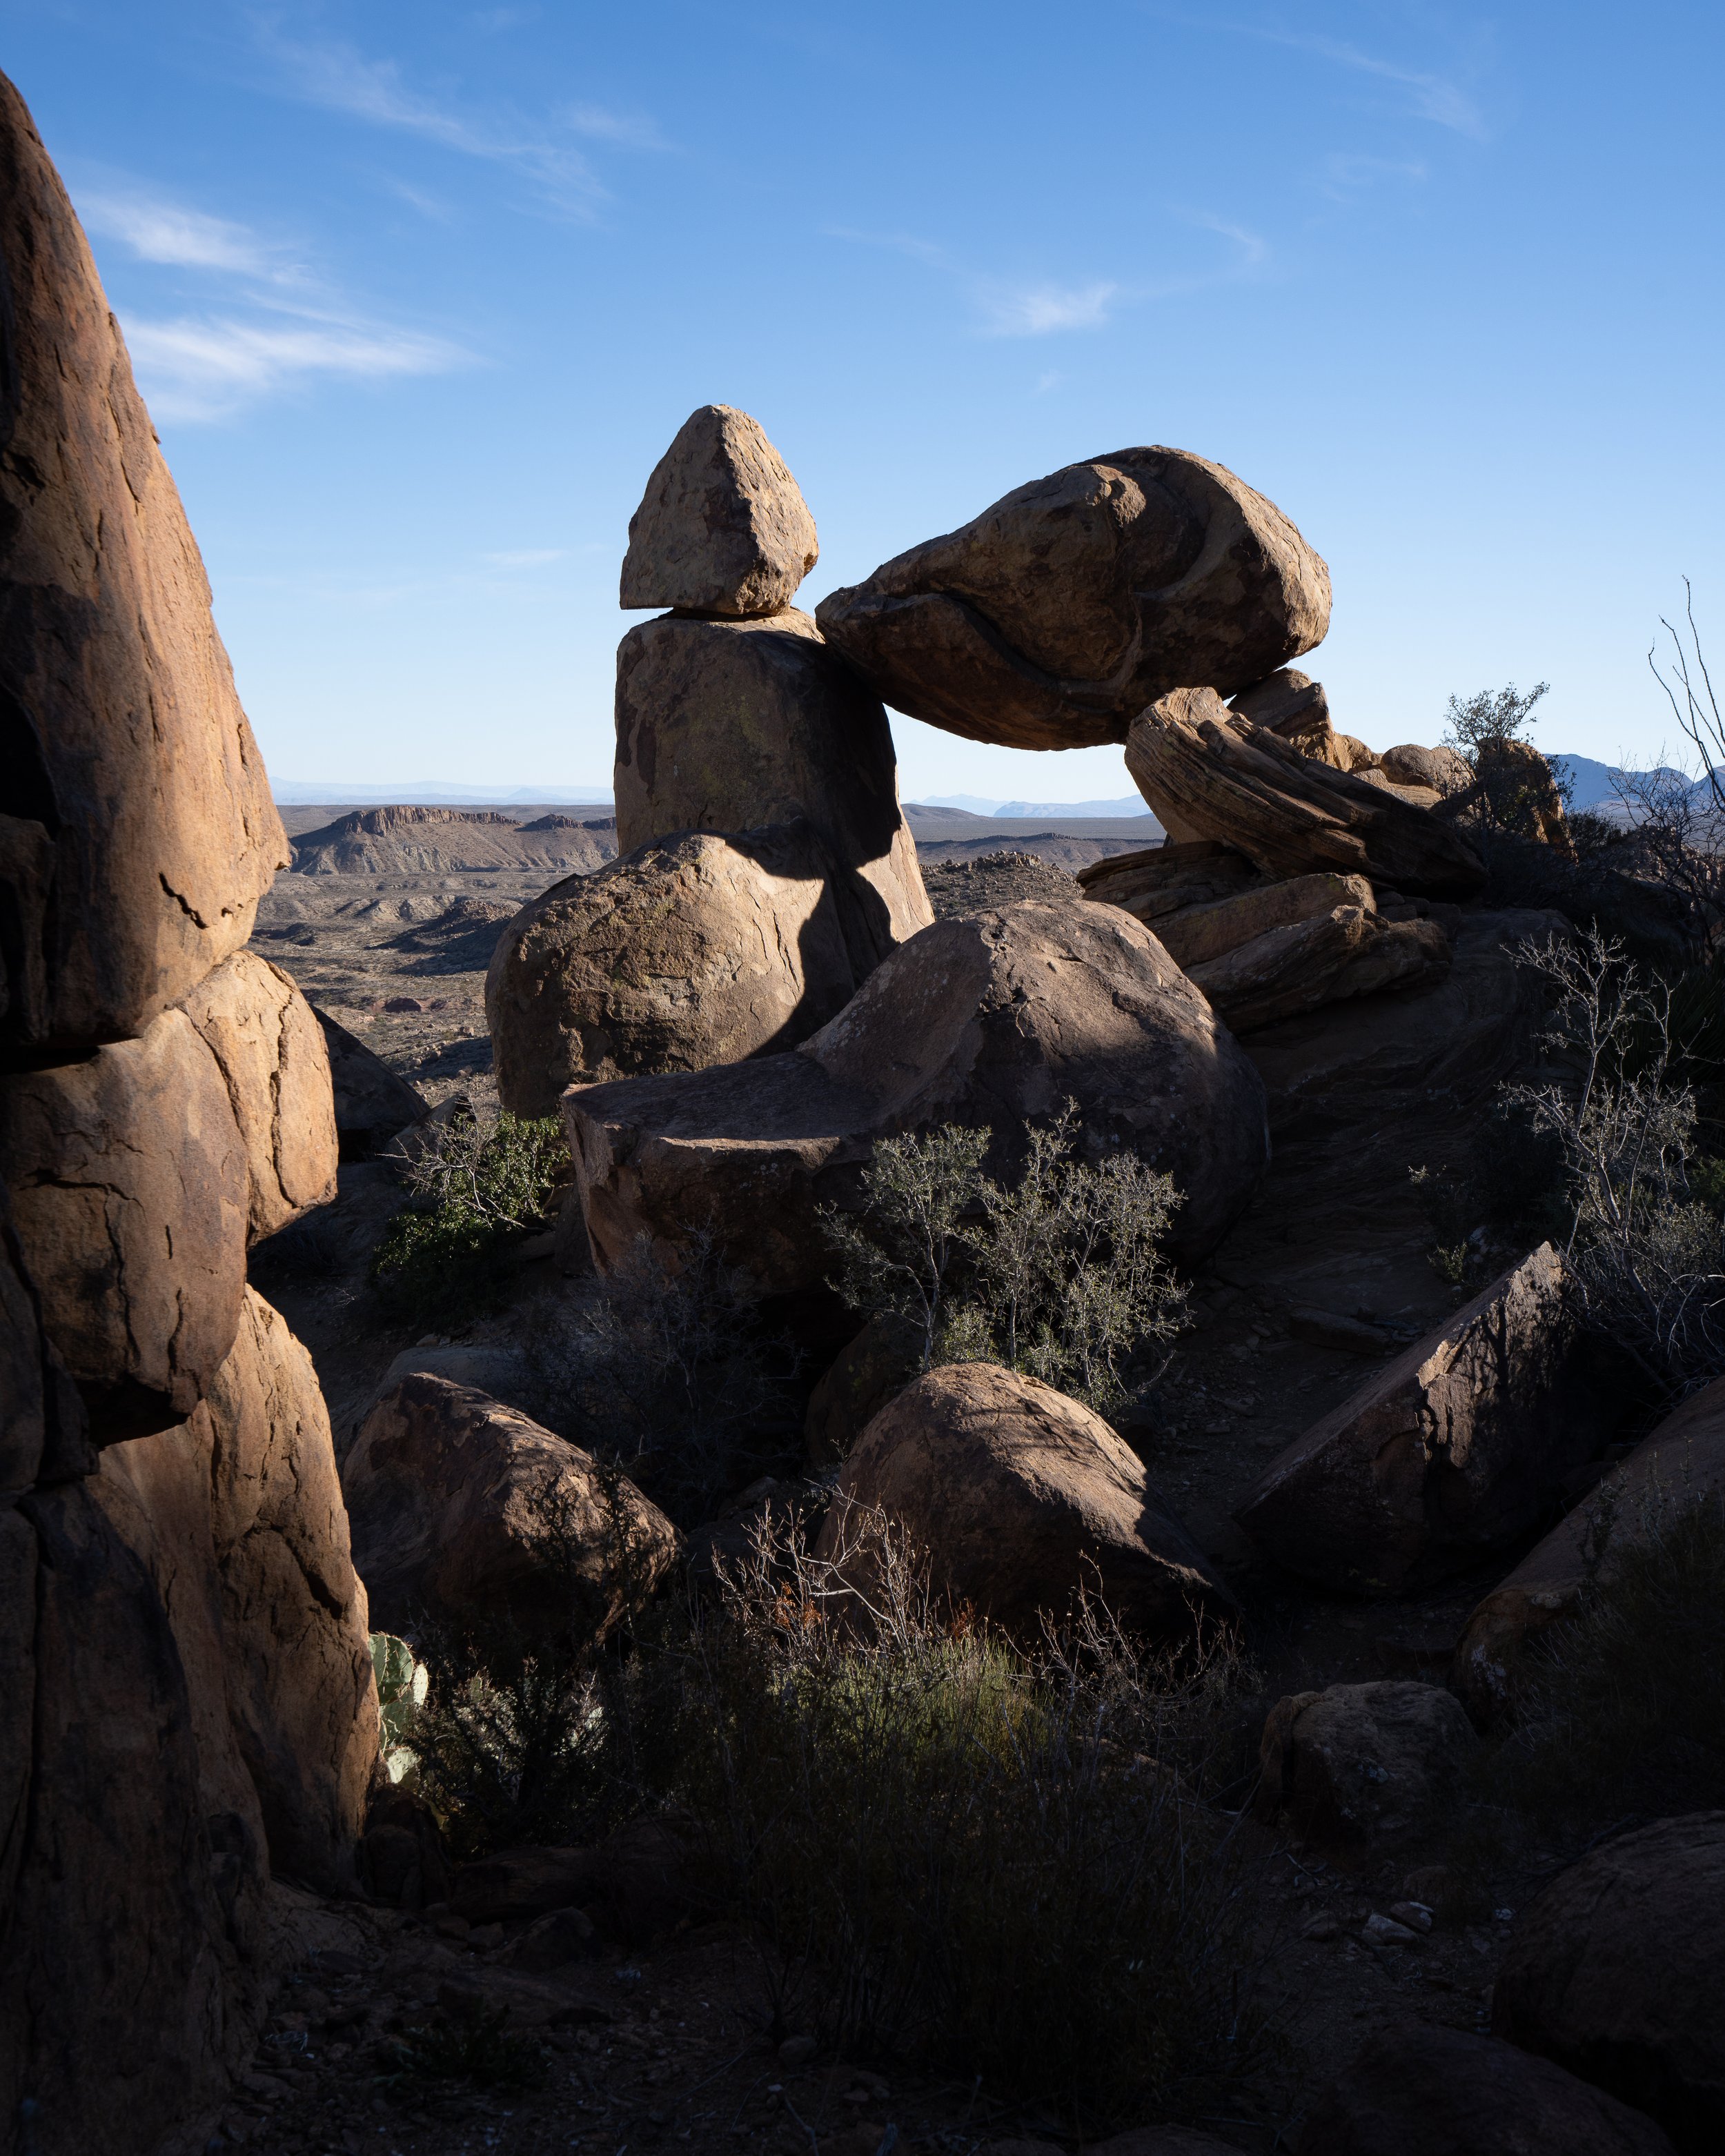
Balancing rock, Big Bend National Park. Sony A7RIV with 16-35 f/4 at 35mm, f/10, 1/125s, ISO 100

Window to the world. Sony A7RIV with 16-35 f/4 at 16mm, f/10, 1/40s, ISO 100
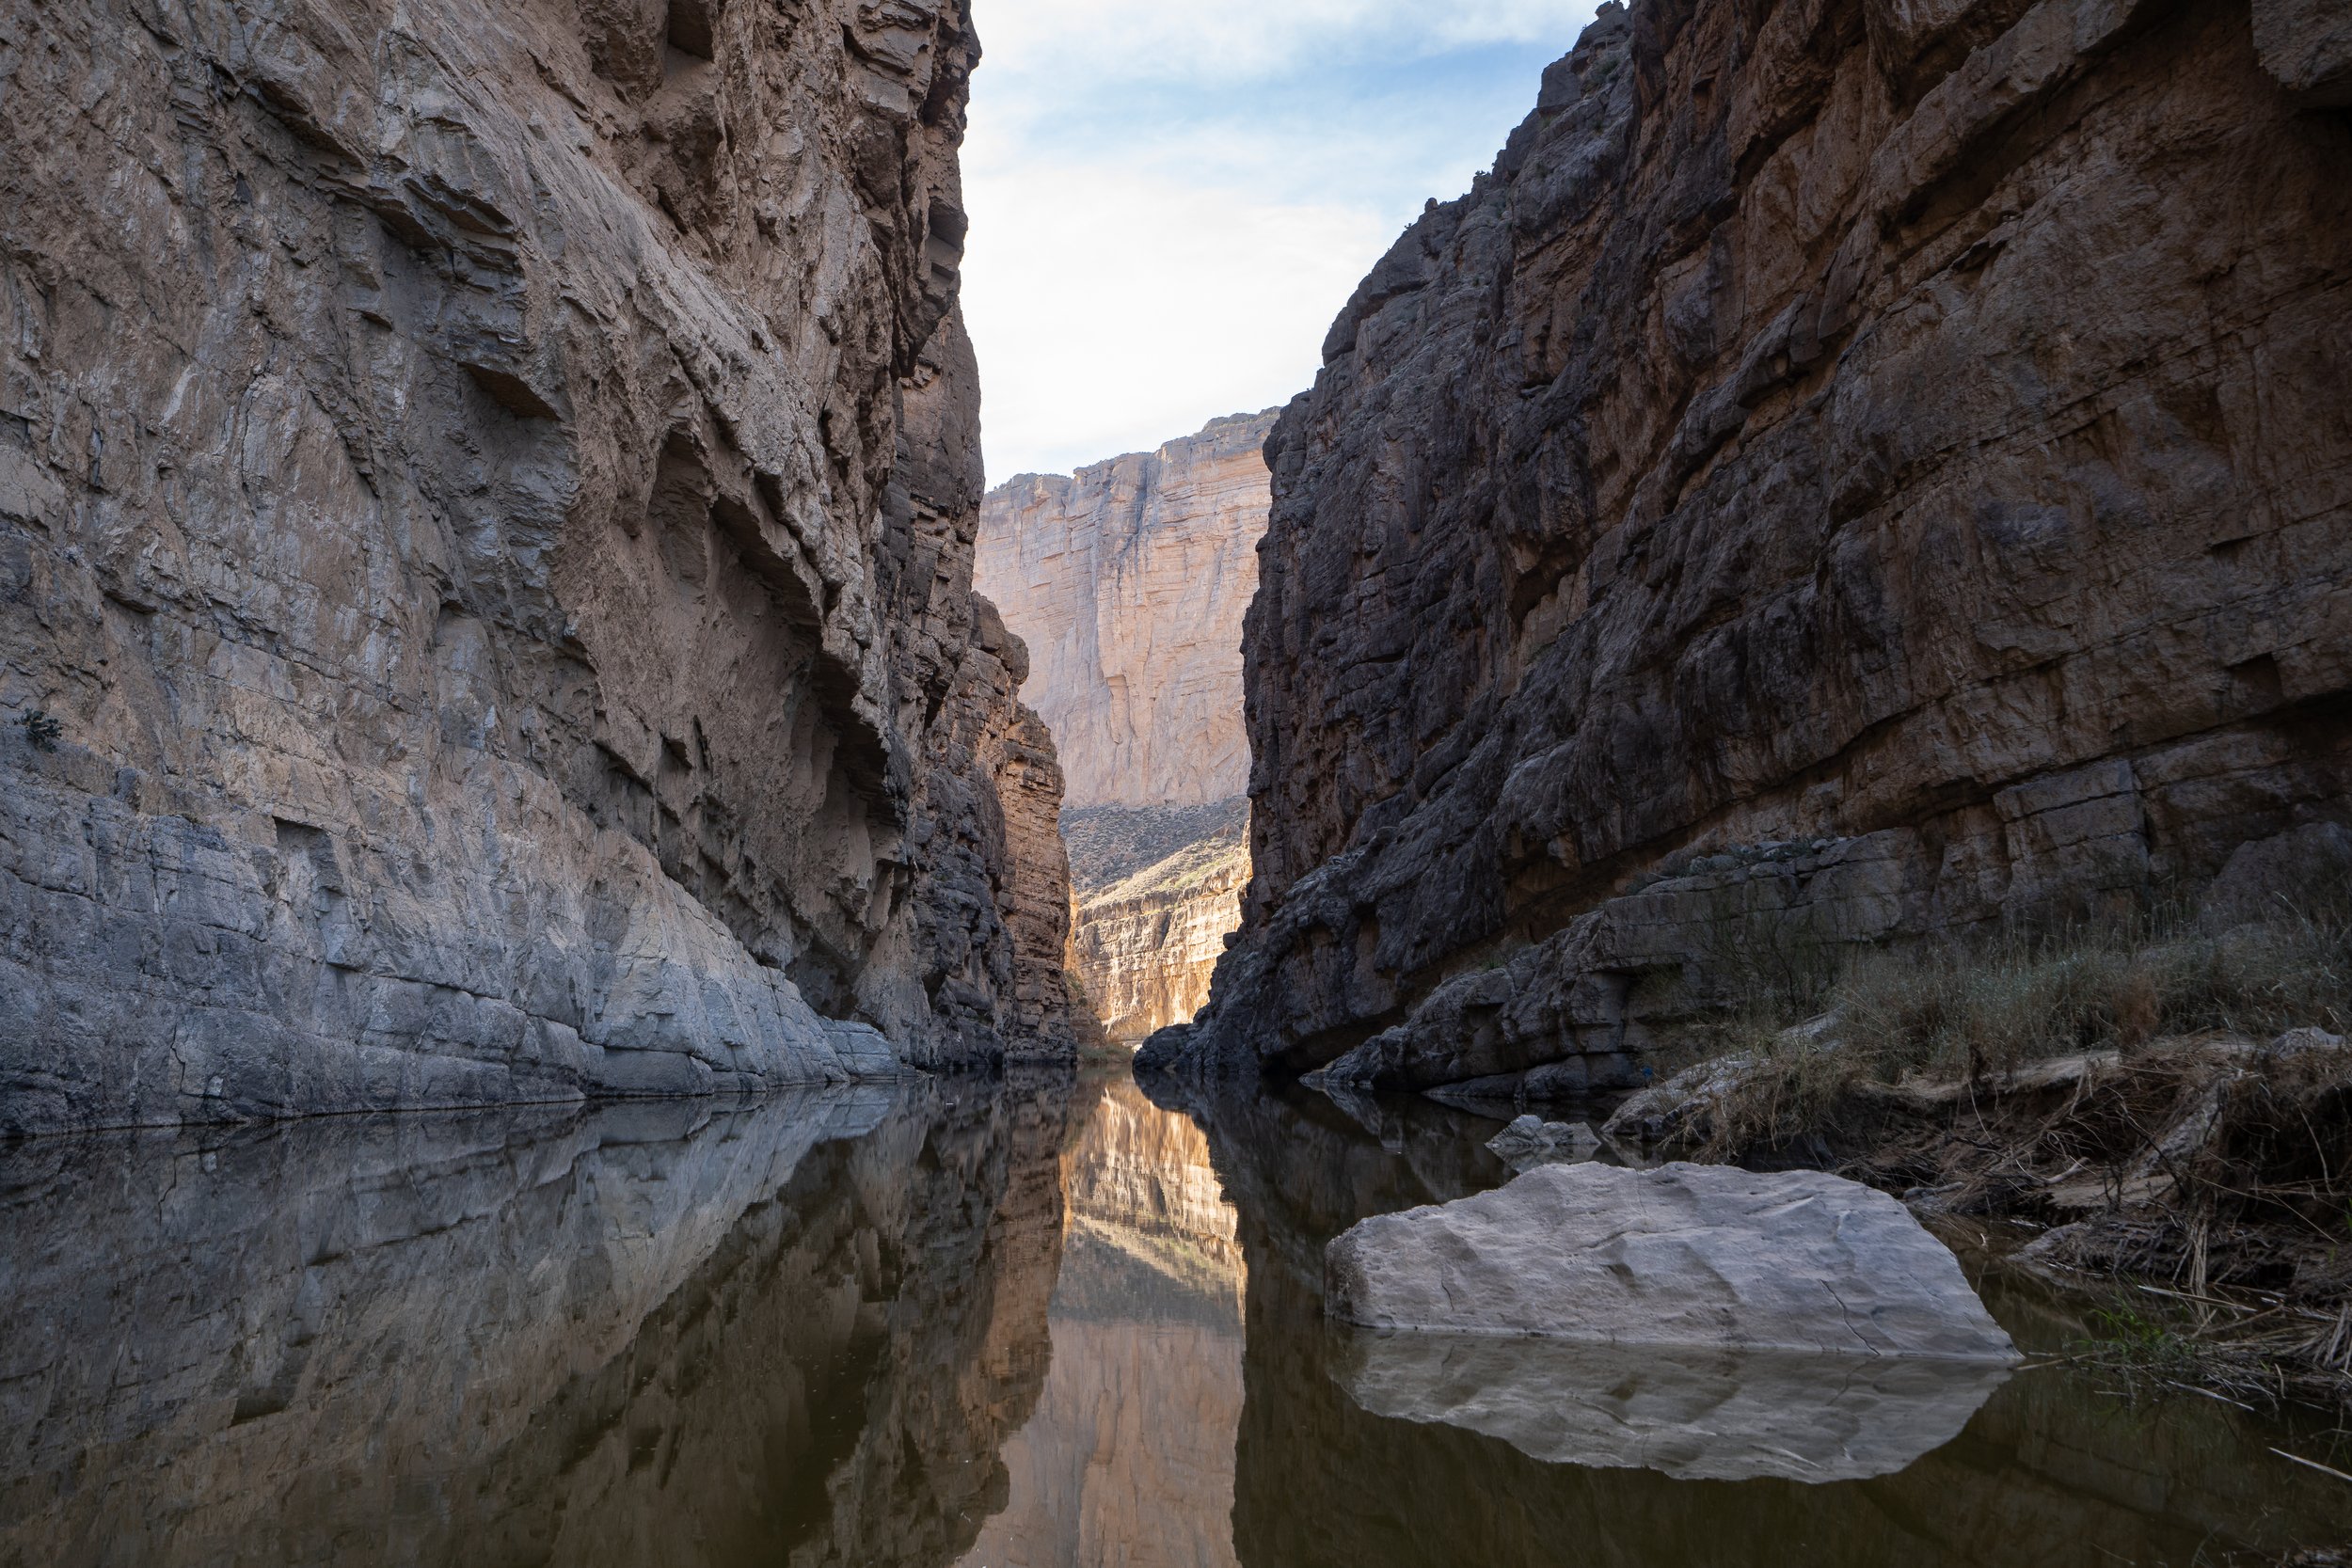
Santa Elena Canyon. Sony A7RIV with 16-35 f/4 at 35mm, f/8, 1/50s, ISO 100
At this point in out trip things took a turn…we didn’t know if we should head back west and try to find warm weather in southern Arizona and California or to continue east since we were interested in a boat show in Miami in a couple of weeks. Our indecision was also challenged as we found a problem with our trailer that caused us to spend a week in San Antonio to get fixed (thank you Arkto for dealing with this so well for us). Our decision was made for us as the weather became ice and snow all the way to San Antonio and we managed to miss the worst of it by heading straight towards Louisiana and onwards to the east coast, but that’s a story for the next posting.

This was a fun road through Big Bend State Park. Sony A7III with 200-600 f/5.6-6.3 at 200mm, f/7.1, 1/2000s, ISO 2000
Nature photography on the road - Chasing the sun (blog version) part 1.
I had a plan. This plan was to reduce the amount of time I spend working in my real job (I am a physicist who migrated to the financial world to build computer software and systems for mathematical modeling). If I did this right I would be able to take some long trips to do the types of photography I love in new places for extended periods.
I had a plan. This plan was to reduce the amount of time I spend working in my real job (I am a physicist who migrated to the financial world to build computer software and systems for mathematical modeling). If I did this right I would be able to take some long trips to do the types of photography I love in new places for extended periods.
My plan has come to fruition, but of course not everything goes to plan the way you think it will. I have been working on contracts that last about 18 months and then I take 6 months to do other things. The first of these “sabbaticals” was during the pandemic and we moved ourselves from southern Ontario (where we landed for a job in Buffalo, NY) to south central British Columbia. This in itself was a challenge as we had hoped to buy a small acreage and look towards building a tiny house as a base. Housing and land prices skyrocketed during the pandemic so that part of the plan turned into a long term rental in the Okanagan Valley and a second 18 month contract working from home.
With the pandemic slowing (not entirely) and travel being allowed again into the United States we decided to prepare for our next 6 month excursion by purchasing a camping trailer and a pickup truck and set out to photograph the west coasts of both British Columbia and the United States.

Ford Ranger and Arkto trailer, ready for our photo excursion.
Our journey started one month after my contract completed and we were able to close out our lease and pack everything we own into a storage container and our little trailer. Of course the weather had plans for us that would change our well laid out plans completely.
One thing I had to learn quickly on these trips is to change the way I think about photography. When you are shooting nature or landscapes close to home (within about 6 hours driving) you have time to understand the habitat you are in, including where you are likely to see animals or birds and the best place to be to get the shot both without disturbing the subject and ensuring an interesting photo. You do not have that luxury when you are on the road unless you are with a guide that has that knowledge. In most cases we are only in a location for 2 or maybe 3 days. This usually means doing some work beforehand on the internet to see if we can figure out some good locations and then the first day is mostly about hiking the area to see for ourselves what is around and when and where we might come back for some shots. For the landscape shots we take this can be enough to get a good location but we need to get lucky for the weather to be just right to get some good shots the next morning or evening. For nature photography we have much the same conditions we would like to have but now we also need to get lucky and have something show up. Often we also need to choose whether we are going to do landscape or nature since the best times of day are sunrise and sunset for both. Although, some birds of prey are best shot in bright daylight, and that is one of my favorite things to shoot.

A pair of red-tailed hawks fighting over a hunting area.
What we do try to do is to make notes where we go, just in case we do manage to get back to those locations so that we might be able to capitalize on that knowledge when the conditions are looking good.
All that being said, when you are out each evening and morning you do still get some pretty fantastic shots. I guess what is different is if you can come back regularly you can refine you compositions until you get what you picture in your mind, whereas currently I try to take a number of different shots relatively quickly while the light is good so that I can look at them later to decide what composition was better.
We have also been doing significantly more video in the last couple of years. Some of this is to document our trip, but also just because video is one of the best ways to get yourself known out here on the internet, and there is so much potential in that medium.
This poses other issues, as we are shooting video while we are trying to take shots, looking at getting “B roll” that is interesting and trying to story board a cohesive video that we hope others may find interesting. That, of course, is not just twice the work but significantly more than just trying to get out there and produce some compelling photos as I’m sure many of the YouTubers that do these type of videos will attest.
The last thing that we always need to remember is to take some time to just enjoy the trip. Not everything has to be around getting a good photo and we do need time to relax or to do regular daily things. Since we do love taking photos it is sometimes difficult to remember to just relax.
Back to the trip.
The first leg of our journey was to be a month in British Columbia, starting from the Okanagan Valley to Vancouver and then over to Vancouver Island for what is usually a wet but mild November. We were looking forward to exploring the west coast of the Island along with some treks north to check out some smaller islands and the north west coast.

Sunlight tries to penetrate the canopy
Our first stop was near Vancouver in Golden Ears Provincial Park. The campsite was nestled under a canopy of huge evergreens with that typical west coast rainforest feel. Beautiful mountains surrounding us, a very large creek just below feeding into a long valley lake. In the summer this place would be completely full with campers and day hikers in from the city, but in November there was only a half dozen other people in the campground that had basic amenities of a pit toilet and not much else this time of year.

Plenty of water rushing down from the mountain in Golden Ears Provincial park.

Moss and ferns make the scene into a flood of greens
Our next stop was a campground near central Vancouver. We were here to meet some friends, do some shopping and eat at some nice restaurants before our ferry trip across to the island. It was also during this stay that we started to understand that we had a few leaking issues on the camper as one of those atmospheric rivers decided to descend on Vancouver. Despite the rain is was a good layover with good friends including one I had not seen in about 40 years. Not much in the way of photography was to be done here, other that the quick shot of the Lion’s Gate Bridge as we had our morning coffee.

Lion’s Gate bridge in Vancouver with a good bit of flare from shooting into the sun.
I love ferry rides, usually I stay out on the top deck with cameras looking for coastal shots and maybe even a whale or some dolphins. This trip was indicative of much of our time on the island as it was cold, wet, and overall uninviting. It didn’t stop me from getting on deck for a bit to get a few shots off.

View from the ferry on our crossing to Vancouver Island.
The eastern coast of Vancouver Island is a very interesting landscape. You can nearly always see the coast of the mainland with white capped mountains but in between there are many smaller islands. Many of these island are worth a trip in themselves as we have found out on previous trips. Wildlife is more abundant on the island and especially on the coast. The first place we camped was near Parksville where a number of resident bald eagles could be heard at any given point and the seals and sea lions are constantly poking their heads up as I try taking pictures of some of the shore birds coming in for what is left as the tide recedes. These are some reasons that we would love to come back to some of these areas not just for photography but to find that little piece of land so that we can explore the area much more.

Bald Eagle watching the shoreline as the tide goes out in Rathtrevor Provincial park, Parksville, BC.

Great Blue heron fishing along the coast with the BC mainland in the background.

shorebirds taking off as a wave disturbs their feeding.

Seal keeping an eye on us two legged things on the shore.
Our next trip was directly across the island to an area that has always been on my list of places to go. Ucuelet and Tofino are rather remote but definitely a tourist destination not just for the beautiful scenery but also for the surf as a choice destination for many surfers in almost any weather. As you can see by many of the photos this area is rich in coastal scenery and fantastic if you enjoy “long walks on a beach” with a significant other.

View from the lookout of Cox bay. The hike up to this point is quite a muddy climb but well worth it.
We stayed at the Surf Grove campground, which as the name suggests was filled with surfers waiting for the November storms to bring in the big waves. This was a great campsite for a base but can be rather expensive. This time of year the choices were few and there are not really any places to camp that are off grid on this part of the coast. Be sure to make plans ahead of time to stay in the area.
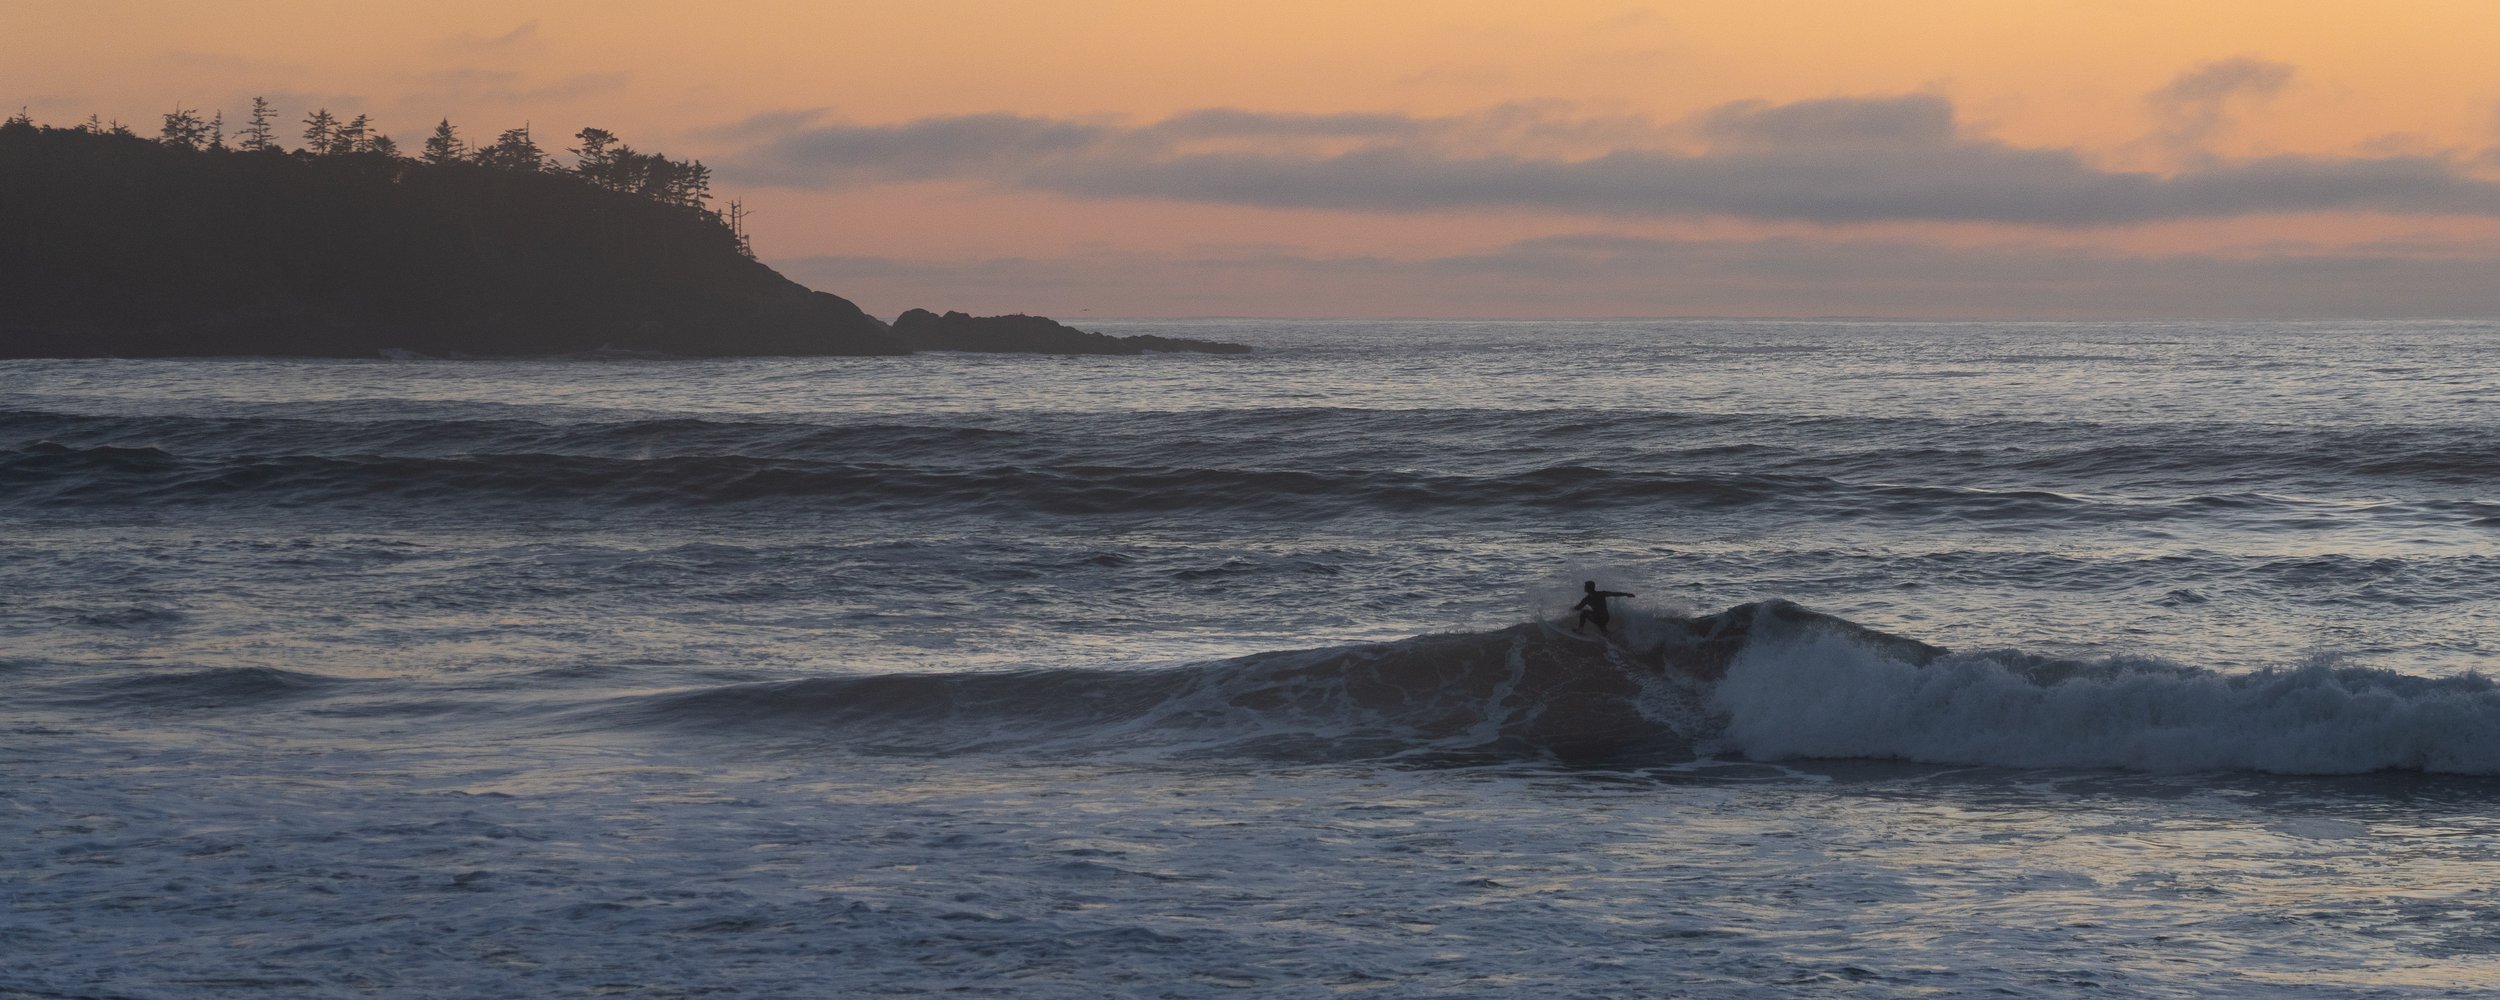
Lone surfer getting the last waves before the sun finally sets on Cox Bay beach.

Foggy morning as we walked through the trees to get to the beach, Cox Bay.

Just after sunset on Cox Bay beach, the surf was still rolling in with the rain heading our way.
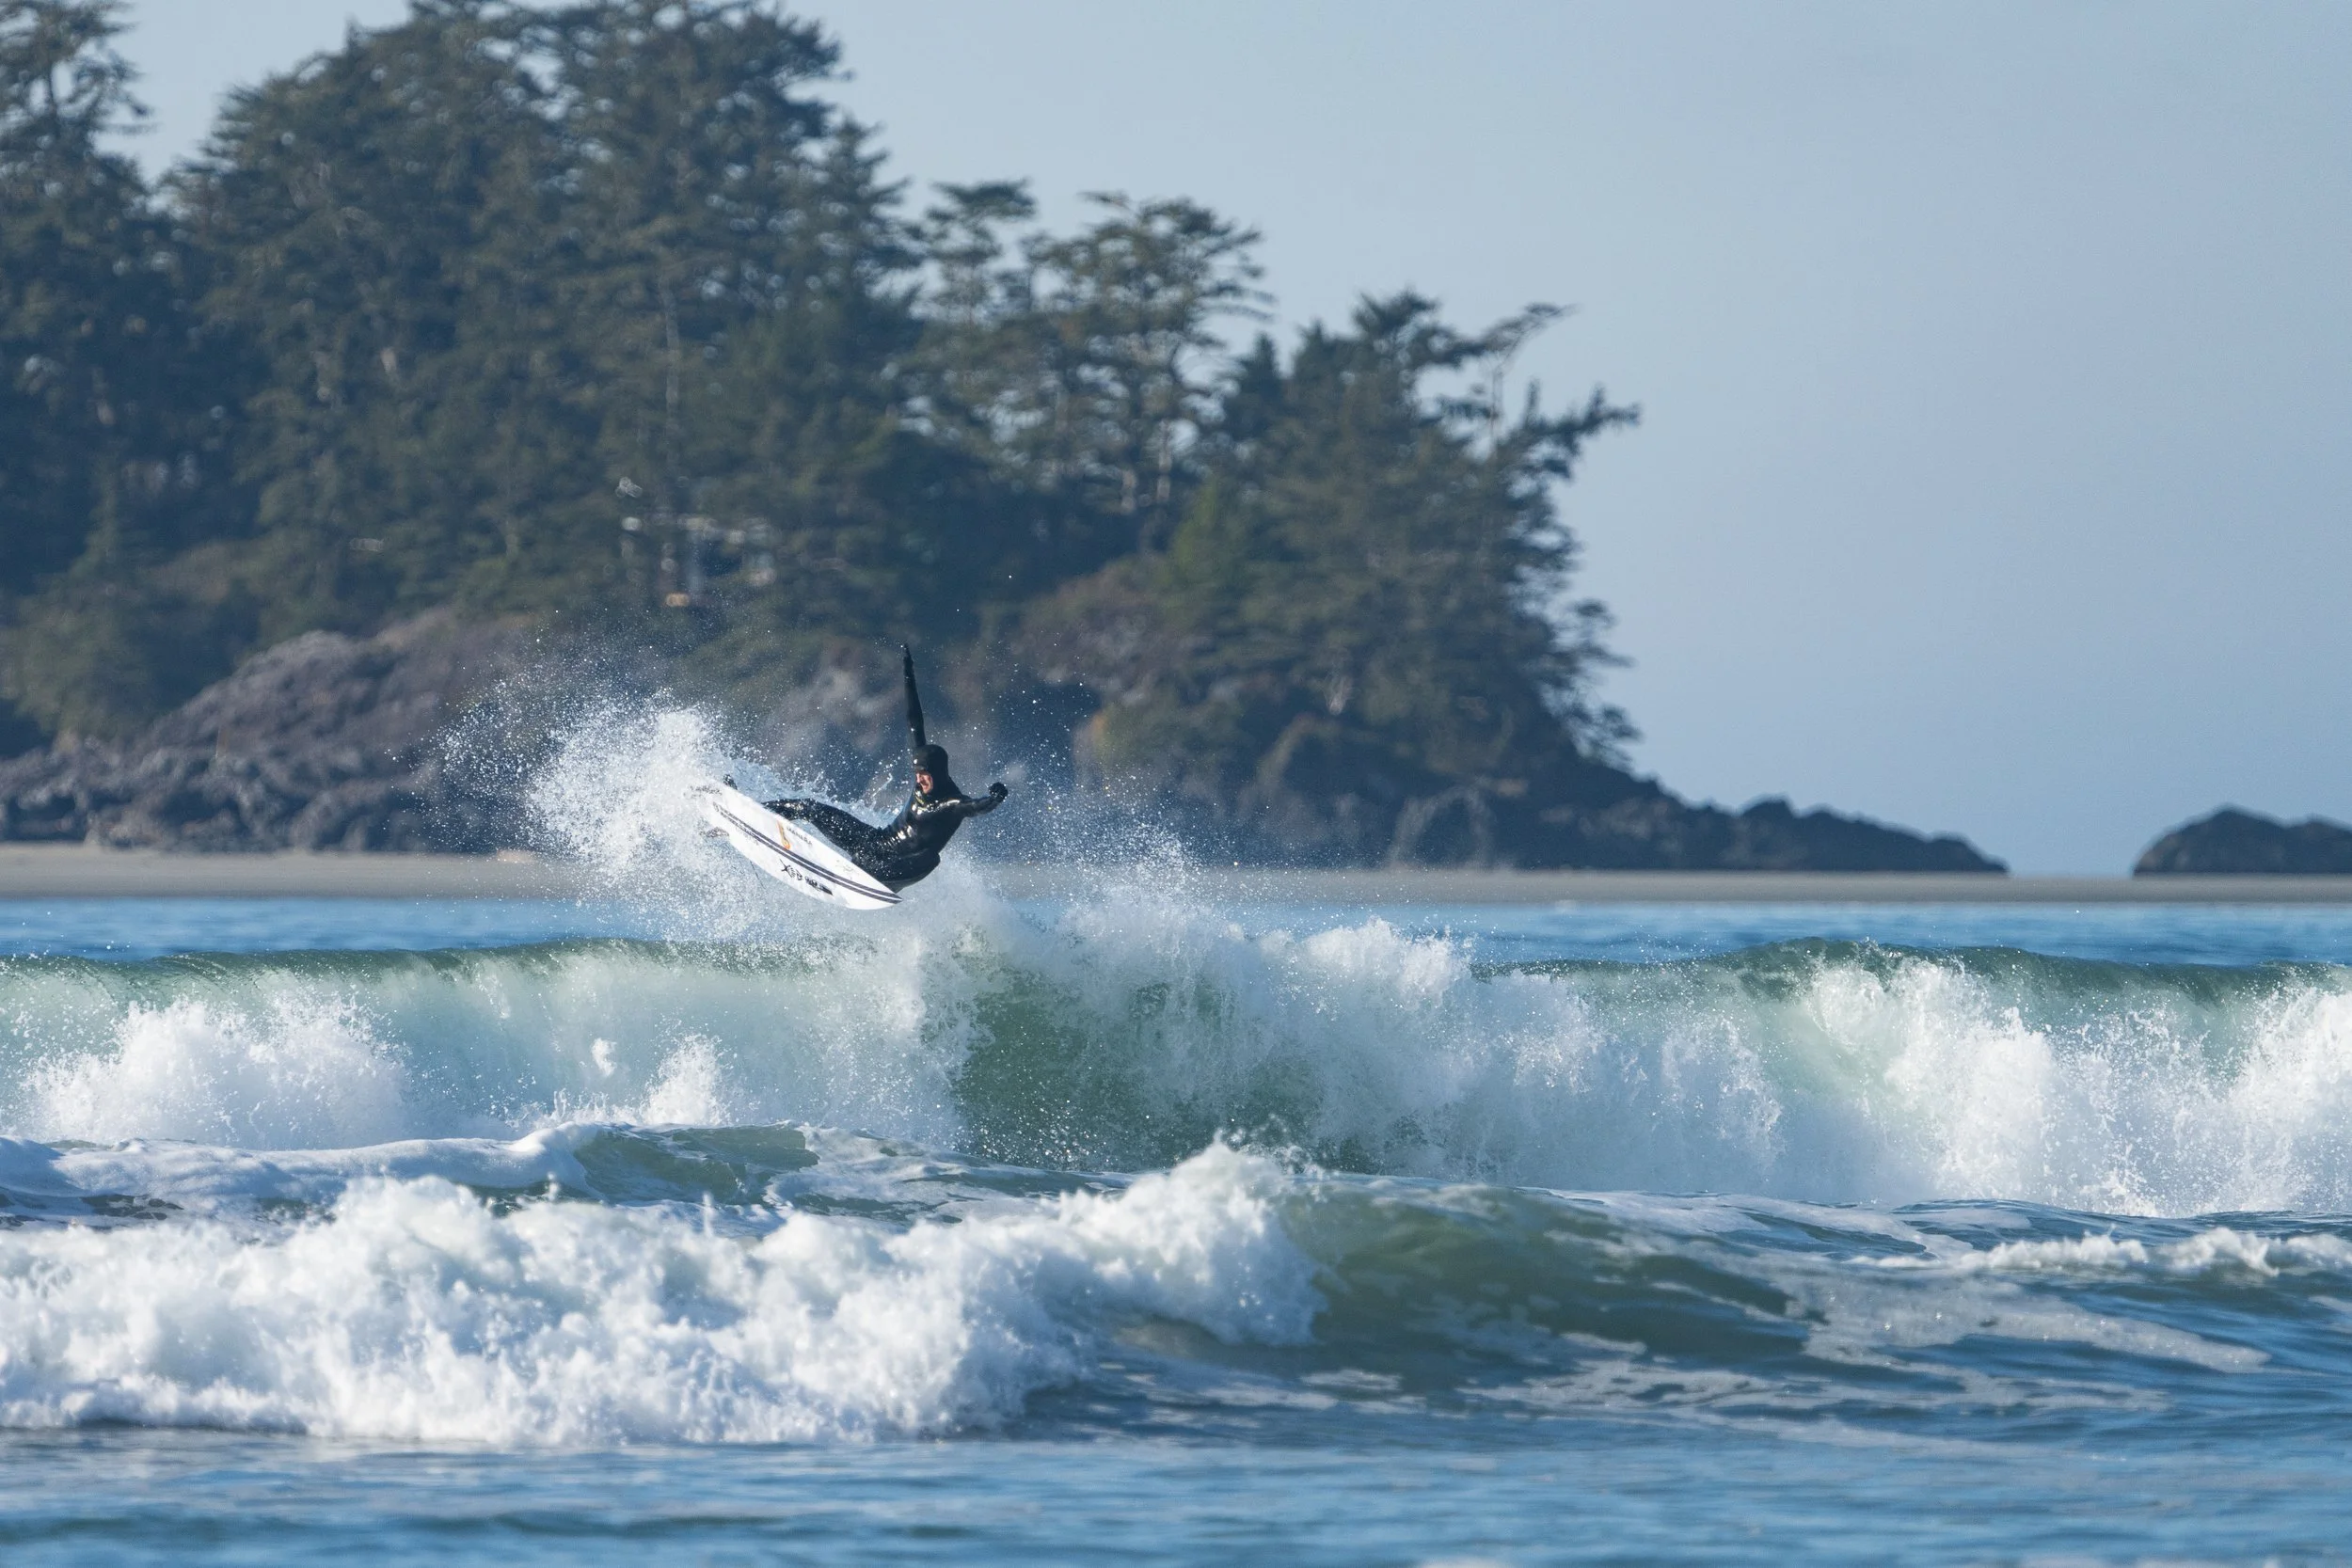
Surfer getting a little air. Good practice for when I might get to see some dolphins riding the waves.
The hikes in Ucuelet should be high on any list, but the beaches along the coast especially Cox beach shouldn’t be missed. If you are there during tourist season, there are many boat tours for marine and coastal life. I will definitely go back hopefully with a boat at some point.

Panoramic view from Ucuelet. Looks like a fantastic area to explore by boat.

Sunset looking out to the west from Ucuelet near the lighthouse.
Our time on Vancouver Island was cut short by a weather forecast that showed not just a ton of rain but one of the coldest and snowiest Novembers on record. With a 3 season camper we were not at all prepared for that.

Pine martin in Goldstream provincial park just outside of Victoria.
We ended up camping in the city near Victoria, mostly a parking lot but with a great view of the harbour and our neighbours were a collection of boathouses that looked very inviting.

Our little camper trailer and the house boats on the harbour in Victoria, BC
Our best choice was to head down to Victoria, spend a bit of time again with some friends and then take the ferry to Port Angeles to start the next stage of our tour through Washington and Oregon. Our first few weeks was definitely high on the learning curve. Figuring out the ins and outs of the trailer, dealing with plenty of rain and wind, and just learning what it means to try to do photography on the road. I am finding that flexibility is going to be the key. Take the shot even if you aren’t sure it is the one. When I have been looking back at my pictures it the shot I finally decide to work on is often not the one that I thought was my best one when I was out there.

waiting for the Port Angeles ferry to start the next leg of our journey.
Go to No.fixed.plans on Youtube for our trip vlogs and a bit more footage of Vancouver Island. Hopefully we will get back to this area in the summer.